Random Joke Generator using JavaScript & API

Random Joke Generator using JavaScript

In this article, you will learn how to create Random Joke Generator using JavaScript and API. JavaScript Joke Generator is a basic project for beginners who can generate random jokes. For this type of project, you can add content manually or with the help of API.

This type of project (random joke generator API) is much easier to create through API. The API helps you retrieve content from any other website and display it in places you like. Various websites provide such API links.

This type of project has a generate button. When you click on it, different content will start to be generated.

Joke Generator using Javascript Code

I used JavaScript HTML and CSS to create this joke API javascript. First I used HTML CSS to create its basic structure. I created a box on the webpage called Basic Structure to which I added a heading.

See the Pen
Random Joke Generator using API
by Raj Template (@RajTemplate)
on CodePen.

 Created an area in which the content can be viewed and finally created a button that will generate a joke when clicked. I have also used JavaScript and API which will supply the content and activate the button.

Step 1: Basic structure of Joke Generator

I have used the following HTML code to create its basic structure. Here I used the box width: 400px and background-color: #fafdfd. With this, the four angles helped to make something round, border-radius: 5px.

<div class=”wrapper”>
</div>
*{
    padding: 0;
    margin: 0;
    box-sizing: border-box;
    font-family: “Rubik”,sans-serif;
}
body{
    background-color: #0772a7;
}
.wrapper{
    width: 400px;
    padding: 50px 40px;
    background-color: #fafdfd;
    position: absolute;
    transform: translate(-50%, -50%);
    top: 50%;
    left: 50%;
    border-radius: 5px;
    box-shadow: 20px 20px 40px rgba(97,63,0,0.4);
}
Basic structure of Joke Generator

Step 2: Add headings to enhance the beauty (more…)

Continue ReadingRandom Joke Generator using JavaScript & API

How to Create JavaScript Copy to Clipboard

How to Create JavaScript Copy to Clipboard

In this article, you will learn how to create Copy to Clipboard using HTML CSS, and JavaScript. JavaScript Copy to Clipboard is a simple project that helps to copy something. This type of structure is often used to copy a lot of content in a box or in a text area.

You can build it with the help of simple HTML CSS JavaScript. If you want to copy manually, you have to copy all those texts. But this project will help you to easily copy all the content with a single click.

JavaScript Copy to Clipboard

I have shared step by step tutorial for your convenience. First I made it more structured with the help of HTML CSS and then I implemented it using a small amount of JavaScript. First I created a box at the top of the web page and added a title to that box.

Then I created a box with the help of Textarea. In that box I have added a lot of text then there is a button. Clicking on that button will copy all the text. I have added some amount of hover in the structure so that after clicking on the button, border color, icon, etc. will change.

See the Pen
Untitled
by Code Media (@codemediaweb)
on CodePen.

Hopefully, the live demo above has helped you to know how it works. Above you will find the required source code.

How to Copy to Clipboard in JavaScript

Now I have shown the complete tutorial step by step on how to make this JavaScript Copy to Clipboard. If you are a beginner, be sure to follow the tutorial below.

First, you create the HTML and CSS files. Here I have used the font awesome CDN link which will make the icon work. You must include that link in your HTML file. Below I have shown the code step by step. If you have difficulty connecting those codes together, you can use the download button below the article.

Step 1: Basic structure of the project

I have basically designed this copy to clipboard HTML using the following HTML and CSS codes.

<div class=”text-box”>
 
</div>

I have designed the webpage with the help of CSS below. Here I have used blue as the background color of the web page.

*{
  margin: 0;
  padding: 0;
  box-sizing: border-box;
  font-family: “Poppins”, sans-serif;
}
body{
  min-height: 100vh;
  display: flex;
  justify-content: center;
  align-items: center;
  background: #0486c2;
}

I use these codes in a box that will basically serve as the basic structure of this project. Its width is 750px and the background color is white.

.text-box{
  position: relative;
  background: #fff;
  width: 650px;
  margin: 10px;
  padding: 0 20px 20px 20px;
  border-radius: 10px;
  box-shadow: 0 5px 20px rgb(1 1 1 / 10%);
}
Basic structure of the project

Step 2: Add the title to the box (more…)

Continue ReadingHow to Create JavaScript Copy to Clipboard

Email Subscription Form using HTML & CSS

In this article, you will learn how to create an Email Subscription Form using HTML CSS, and JavaScript. The newsletter subscription form is an important and widely used project. It helps the website user to connect with that website. 

Email Subscription Form using HTML & CSS

Using this form the user will be able to subscribe to the website with his email id. The user will be notified whenever some content is updated and uploaded to the website.

Although I haven’t seen this system work here. Here only I have designed HTML CSS with the help of JavaScript. This is basically a pop-up subscriber form

A small button can be found instead. When the user clicks on that button, the complete design can be seen. There is a cancel button in this form which if clicked will hide this form again.

Newsletter Subscription Form HTML CSS

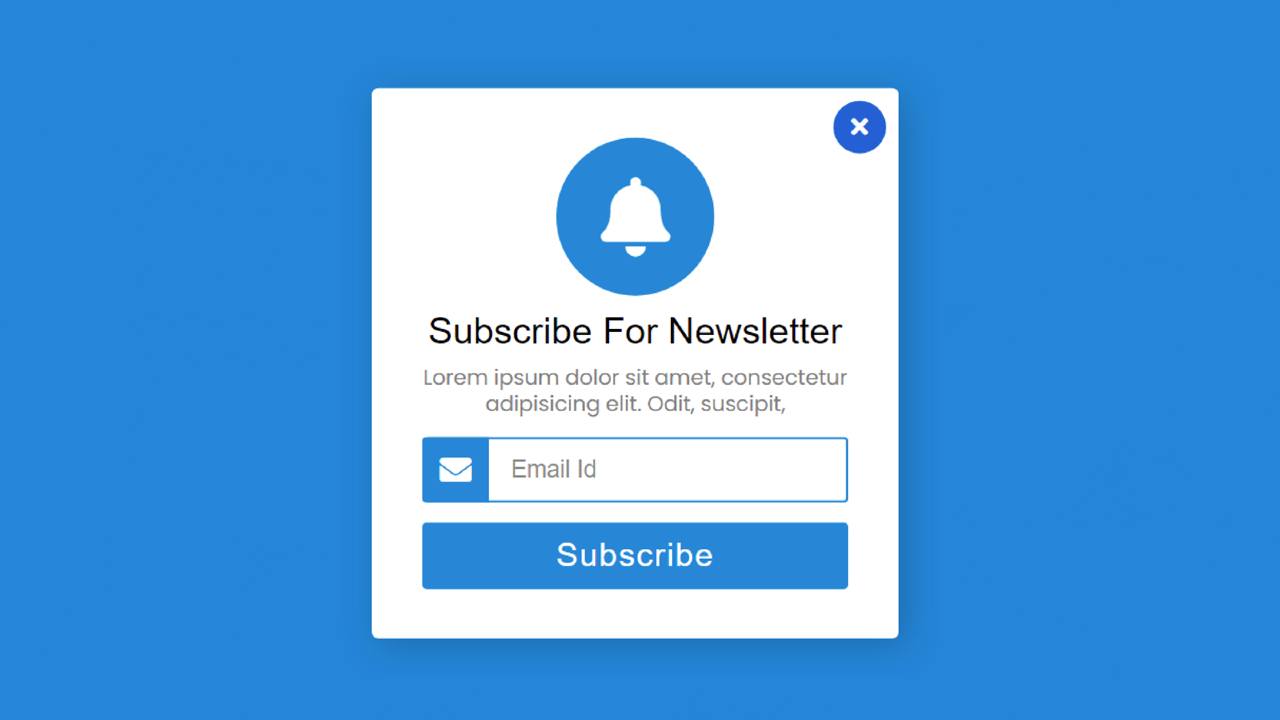
The first of the newsletter subscription form HTML has a cancel button. It has a small logo on it. Here you can use your own website logo. 

See the Pen
Untitled
by Code Media (@codemediaweb)
on CodePen.

Then there is some text and some headings. Below that is a place to input an email ID. Below everyone is a button to subscribe. Below I have shared the complete step-by-step tutorial.

Step 1: Create a popup button

I created a button at the top of the web page using the HTML and CSS codes below. The form can be seen by clicking on it. I have added the necessary information using the following HTML. 

<div class=”start-btn”>
  <a href=”#”>Subscribe</a>
</div>

I have designed the web page using the following codes.

*{
  margin: 0;
  padding: 0;
  box-sizing: border-box;
}
body{
  text-align: center;
  background: #048bd9;
  font-family: ‘Poppins’,sans-serif;
}

Now the following codes have helped to design this button. I have used the background color white and the text color black. I have used font-size: 22px to increase the text size a bit.

.center,.start-btn{
  position: absolute;
  top: 50%;
  left: 50%;
  transform: translate(-50%, -50%);
}
.start-btn a{
  font-size: 22px;
  background: white;
  color: #02242b;
  padding: 15px 18px;
  border-radius: 5px;
  text-decoration: none;
  text-transform: uppercase;
  font-weight: 600;
  letter-spacing: 1px;
}
Create a popup button

Step 2: Basic structure of Email Subscription Form

Now I have created the basic structure of the subscription form. Box width: 400px is used and background color is white. I have used opacity: 0 and visibility: hidden to hide this form in its normal state.

Finally, we used opacity: 1 and visibility: visible in the ‘show-modal’ tag. Later I connected this ‘show-modal’ to the form with the help of JavaScript.

<div class=”center modal-box”>
</div>
.modal-box{
  top: 40%;
  opacity: 0;
  visibility: hidden;
  background: white;
  height: auto;
  width: 400px;
  padding: 38px 30px;
  border-radius: 5px;
  box-shadow: 5px 5px 30px rgba(0,0,0,.2);
}
.start-btn.show-modal{
  opacity: 0;
  visibility: hidden;
}
.modal-box.show-modal{
  top: 50%;
  opacity: 1;
  visibility: visible;
  transition: .4s;
}
Basic structure of Email Subscription Form

Step 3: Cancel button in Email Newsletter (more…)

Continue ReadingEmail Subscription Form using HTML & CSS

How To Create JavaScript Range Slider with min and max

How To Create JavaScript Range Slider with min and max

In this article, you will learn how to build JavaScript Range Slider with minimum and maximum value. We use sliders for various purposes. Basically to create a range or area of ​​value, quantity, etc. of something.

We use such designs (javascript range slider min-max) on different types of e-commerce websites. This price range project you can easily create with the help of HTML and CSS. Here I have used the input function of HTML.

JavaScript Range Slider 

We get many types of input from HTML including e-mail, password, file, text, etc. In the same way, I got a slider called Range (<input type=”range”>). Where we can add a minimum and maximum values.

Below I have given a live demo that will help you to know how it works (multi-range slider javascript).

See the Pen
Untitled
by Code Media (@codemediaweb)
on CodePen.

First I made a box. I have created a slider with the help of input in that box. I have used a minimum value of 5 and a maximum value of 100 in this range. We have created a display where you can see the selected value. 

This value is associated with the button in the range with the help of Tooltip. Changing the position of the slider button will also change the Tooltip.

How To Create Range Slider using JavaScript

Below I have given a complete step-by-step tutorial to create JavaScript Range Slider with min and max. For this, you need to have a basic idea about HTML and CSS. 

First, you create an HTML and CSS file. Then follow the step-by-step procedures below. You will find the download button below the article.

Step 1: Create the basic structure of the slider

I have created a box on the web page using the following HTML and CSS codes. Its width is 380px and height is 80px. Its background color is white and the box-shadow has helped to make it beautiful and attractive.

<div class=”range”>
</div>
*{
  margin: 0;
  padding: 0;
  box-sizing: border-box;
  font-family: ‘Poppins’, sans-serif;
}
html,body{
  display: grid;
  height: 100%;
  text-align: center;
  place-items: center;
  background: #0492f1;
}
.range{
  height: 80px;
  width: 380px;
  margin: 150px auto;
  background: #fff;
  border-radius: 10px;
  padding: 0 65px 0 45px;
  box-shadow: 2px 4px 8px rgba(0,0,0,0.1);
}
Create the basic structure of the slider

Step 2: Create Range Slider with Input

 Now I have created a slide using the range input of HTML. Here I have used a minimum value of 5 and a maximum value of 100. You can increase or decrease the amount you want.

(more…)

Continue ReadingHow To Create JavaScript Range Slider with min and max