#1 Simple and Easy Price Range Slider Using HTML,CSS & JavaScript

Price Range Slider HTML CSS JavaScript

If you want to create JavaScript Price Range Slider then this tutorial will help you. Price Range Slider is used in different places to determine the minimum and maximum value of a price.

You can create this kind of price range slider javascript in many ways. However, the design that I have shared here is absolutely simple. This range slider is made with basic HTML, CSS, and javascript. There are two handles that allow you to set the minimum and maximum values.

Price Range Slider HTML CSS JavaScript

Price range slider HTML Search filters for different types of eCommerce websites. Which will show the result to the user depending on his price value.

I have fully explained the code used to make the Price Range Slider. If you are absolutely Beginner then there is no reason to worry.

Although it is not fully functional, only the basic design has been made here. You can watch the demo below to know how this Price Range Slider HTML CSS works.

See the Pen
Untitled
by Shantanu Jana (@shantanu-jana)
on CodePen.

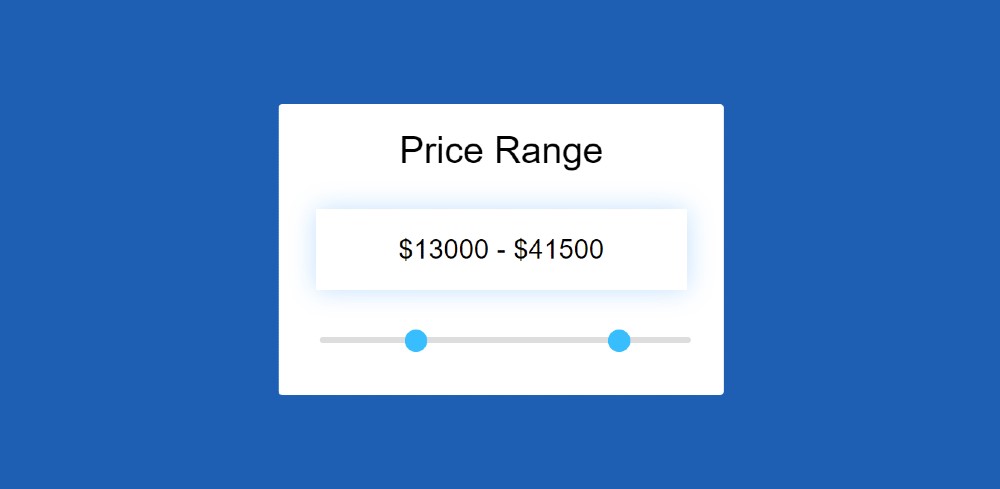
Hopefully, the preview above has completely helped you to know how it works. Here is the complete source code for enhancing this design. First, a box has been created on the webpage where all the information can be found.

There is a heading, there is a result box in which the price minimum maximum value can be seen, then there is a range slider.

I have taken the help of HTML, CSS, and JavaScript to create this Javascript Price Range Slider. First I have added all the information using HTML. I designed it using CSS. Finally, I have implemented this Price Range Slider using JavaScript.

Price Range Slider HTML Code

The following HTML codes have been used to add all the information in this slider. First the basic structure, then a text, then the value view of the range slider, and a range slider with two handles. Copy the following Html code and add it to your Html file.

<div class="slider">
     
   <p>Price Range</p>
     
   <div class="range-slider">
          <span class="rangeValues"></span>
          <input value="1000" min="1000" max="50000" step="500" type="range">
          <input value="50000" min="1000" max="50000" step="500" type="range">
        
   </div>
</div>

Design Price Range Slide using CSS (more…)

Continue Reading#1 Simple and Easy Price Range Slider Using HTML,CSS & JavaScript

Custom Range Slider using HTML CSS & JavaScript

Custom Range Slider using HTML CSS & JavaScript

You will learn how to build a Custom Range Slider using HTML CSS and JavaScript. Custom Range Slider We see it in different types of e-commerce websites or different types of business websites. This type of HTML range slider is used to select a specific value in the slider. 

This is a kind of input function of HTML. HTML has many types of inputs like text, password, file, slider, etc. This type of Custom Range Slider has a minimum and maximum value. The user can select any one of those values.

This type of range slider with min and max values is very important for an eCommerce site. I have used animation in this Custom Range Slider. The button that changes the value is designed with CSS. Emojis are used instead of buttons.

How to Create Custom Range Slider with HTML CSS

The emoji in the slider can rotate 360 degrees. The emoji will be at 0 degrees at the slider minimum value. It will rotate when you change the position of the emoji. If you are a beginner then this project (Custom Range Slider using HTML CSS) is very important for you.

See the Pen
Untitled
by Foolish Developer (@foolishdevweb)
on CodePen.

First, we created the basic structure of the slider using HTML. Then JavaScript has been used to activate this Custom Range Slider. 

This slider can be used in addition to JavaScript. However, JavaScript is important for activating the display. The value of the display will change when you change the position of the button on the slider.

To make this custom range slider HTML CSS you need to have a basic idea about HTML CSS. I have given a demo that will help you to know more about this custom range slider.

Step 1: Basic structure of Custom Range Slider (more…)

Continue ReadingCustom Range Slider using HTML CSS & JavaScript

How To Create JavaScript Range Slider with min and max

How To Create JavaScript Range Slider with min and max

In this article, you will learn how to build JavaScript Range Slider with minimum and maximum value. We use sliders for various purposes. Basically to create a range or area of ​​value, quantity, etc. of something.

We use such designs (javascript range slider min-max) on different types of e-commerce websites. This price range project you can easily create with the help of HTML and CSS. Here I have used the input function of HTML.

JavaScript Range Slider 

We get many types of input from HTML including e-mail, password, file, text, etc. In the same way, I got a slider called Range (<input type=”range”>). Where we can add a minimum and maximum values.

Below I have given a live demo that will help you to know how it works (multi-range slider javascript).

See the Pen
Untitled
by Code Media (@codemediaweb)
on CodePen.

First I made a box. I have created a slider with the help of input in that box. I have used a minimum value of 5 and a maximum value of 100 in this range. We have created a display where you can see the selected value. 

This value is associated with the button in the range with the help of Tooltip. Changing the position of the slider button will also change the Tooltip.

How To Create Range Slider using JavaScript

Below I have given a complete step-by-step tutorial to create JavaScript Range Slider with min and max. For this, you need to have a basic idea about HTML and CSS. 

First, you create an HTML and CSS file. Then follow the step-by-step procedures below. You will find the download button below the article.

Step 1: Create the basic structure of the slider

I have created a box on the web page using the following HTML and CSS codes. Its width is 380px and height is 80px. Its background color is white and the box-shadow has helped to make it beautiful and attractive.

<div class=”range”>
</div>
*{
  margin: 0;
  padding: 0;
  box-sizing: border-box;
  font-family: ‘Poppins’, sans-serif;
}
html,body{
  display: grid;
  height: 100%;
  text-align: center;
  place-items: center;
  background: #0492f1;
}
.range{
  height: 80px;
  width: 380px;
  margin: 150px auto;
  background: #fff;
  border-radius: 10px;
  padding: 0 65px 0 45px;
  box-shadow: 2px 4px 8px rgba(0,0,0,0.1);
}
Create the basic structure of the slider

Step 2: Create Range Slider with Input

 Now I have created a slide using the range input of HTML. Here I have used a minimum value of 5 and a maximum value of 100. You can increase or decrease the amount you want.

(more…)

Continue ReadingHow To Create JavaScript Range Slider with min and max