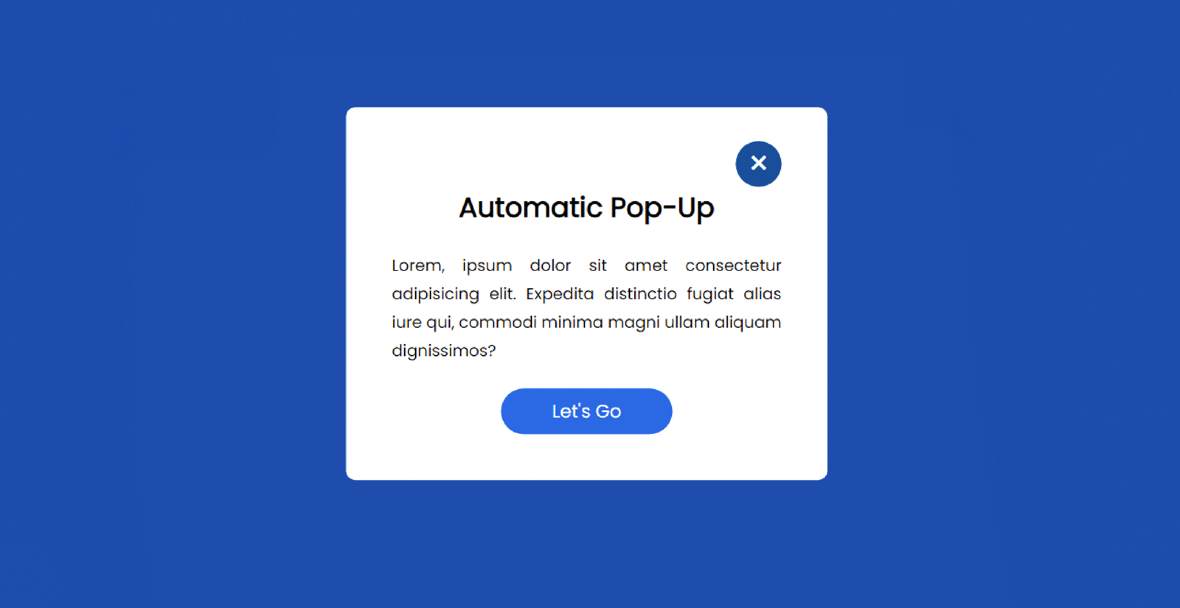
How to Create Automatic Popup Window using HTML & CSS
An automatic popup window is a javascript project that uses different javascript functions and loads as soon as the website loads on the user's browsers this type of automatic pop-up…
An automatic popup window is a javascript project that uses different javascript functions and loads as soon as the website loads on the user's browsers this type of automatic pop-up…


In this article, you will learn how to create a Simple Loan Calculator using HTML CSS, and JavaScript. JavaScript Loan Calculator will help you to calculate the loan amount, interest rate, and information of monthly payment.
Before that, I used JavaScript to create many types of calculator projects like Age calculator, Height calculator, weight calculator, etc. Now I am going to show you how to make a simple loan calculator using JavaScript. We basically use the general formula to calculate the interest rate and monthly payment of a loan amount. However, JavaScript will help you to make this task more perfect and easy.
Computer programming makes our tasks much easier. Similarly, this EMI calculator will help you to calculate the monthly payment of your loan. Here I have used HTML CSS and JavaScript. HTML and CSS helped create and design the basic structure of this JavaScript loan calculator. Here JavaScript helps to make it work.
First I used a heading that basically helped to enhance the beauty. Then I made 3 input boxes. To input the loan amount in the first input box, interest rate in the second input box, and information input of the third input box month. Below all is a small display where the calculations can be seen.
This loan calculator will help you know how much money you have to pay each month with interest.
For example, if you want to buy a product, the total value of this product is X and there is a Y % interest rate. You want to repay that loan in 6 months. In this case, you can easily find out how much money you have to pay per month from this calculator.
If you want to do it manually, you have to work a little harder.
See the Pen
Untitled by Foolish Developer (@foolishdevweb)
on CodePen.
Hopefully, the above demo has helped you to know how this interest rate calculator javascript works. If you only want to get the source code then you can copy the source code from the demo section above.
But keeping in mind the beginners, I have shared the complete step-by-step tutorial. If you want to know how to build this JavaScript loan calculator then you must follow our tutorials step by step.
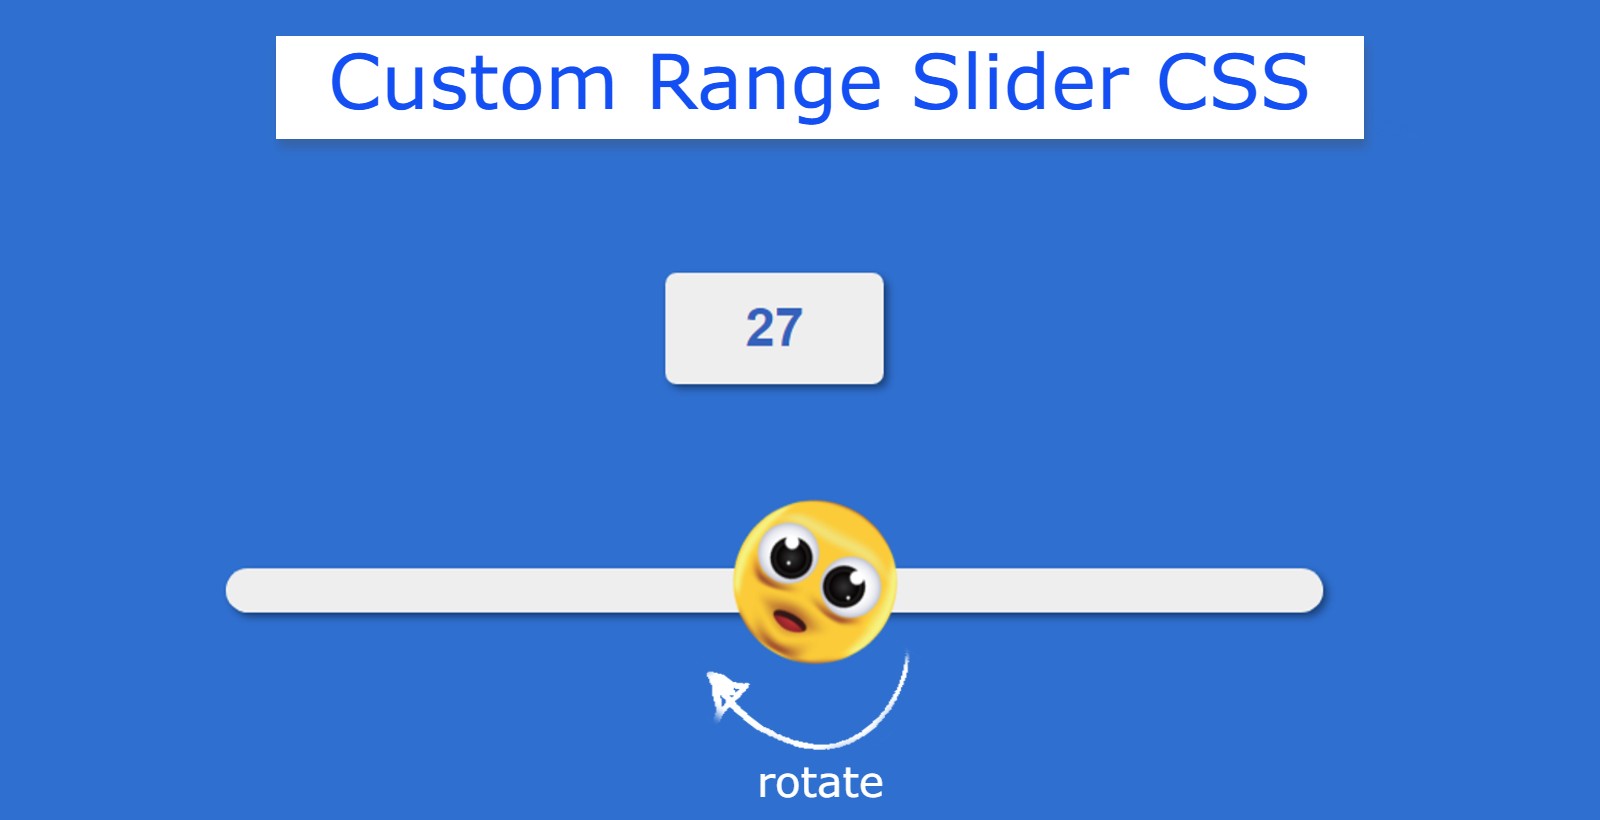

You will learn how to build a Custom Range Slider using HTML CSS and JavaScript. Custom Range Slider We see it in different types of e-commerce websites or different types of business websites. This type of HTML range slider is used to select a specific value in the slider.
This is a kind of input function of HTML. HTML has many types of inputs like text, password, file, slider, etc. This type of Custom Range Slider has a minimum and maximum value. The user can select any one of those values.
This type of range slider with min and max values is very important for an eCommerce site. I have used animation in this Custom Range Slider. The button that changes the value is designed with CSS. Emojis are used instead of buttons.
The emoji in the slider can rotate 360 degrees. The emoji will be at 0 degrees at the slider minimum value. It will rotate when you change the position of the emoji. If you are a beginner then this project (Custom Range Slider using HTML CSS) is very important for you.
See the Pen
Untitled by Foolish Developer (@foolishdevweb)
on CodePen.
First, we created the basic structure of the slider using HTML. Then JavaScript has been used to activate this Custom Range Slider.
This slider can be used in addition to JavaScript. However, JavaScript is important for activating the display. The value of the display will change when you change the position of the button on the slider.
To make this custom range slider HTML CSS you need to have a basic idea about HTML CSS. I have given a demo that will help you to know more about this custom range slider.


Show and Hide Password A JavaScript project helps to see and hide passwords in the input field. This article will help you to know how to show and hide passwords using jQuery. When we input a password into an input box, it appears as a bullet. As a result, those passwords can be easily protected from hackers.
The “Show and Hide Password” option is very important in case the user wants to see the password. This will allow the user to easily see the password in the input field.
When we use type = “password” in an input field, the characters input in that input box will appear as bullets. When type = “text” of input is used then the passwords will be converted to text and we will see.
There is a small button in the input box that can be clicked to see the password. In general, input type = “password”. Type = “text” of the input will be converted when that button is clicked.
This article will help you to know how to create password Show and Hide using JQuery. Very little JQuery has been used here. JQuery is an external JavaScript library. I took the help of HTML CSS JavaScript to create this project.
First, we created and designed the input field using HTML and CSS. Then he implemented it with the help of Jquery. First, we created a box on the webpage on which we created an area for input. There is a small button in the input box that will help to show and hide the password.
See the Pen
Untitled by Foolish Developer (@foolishdevweb)
on CodePen.
Hope the above demo has helped you to know how to create this JavaScript Show and Hide Password project. As I said before, I took the help of Jquery to make this project. So you must include the JQuery CDN link in your HTML file.
The basic design of this password input box is created using the following HTML and CSS codes. Here I first made a box on the webpage using the background color green.
I used white as the background color of the box and width: 320px. Along with this, a shadow has been used around the box which enhances the beauty.

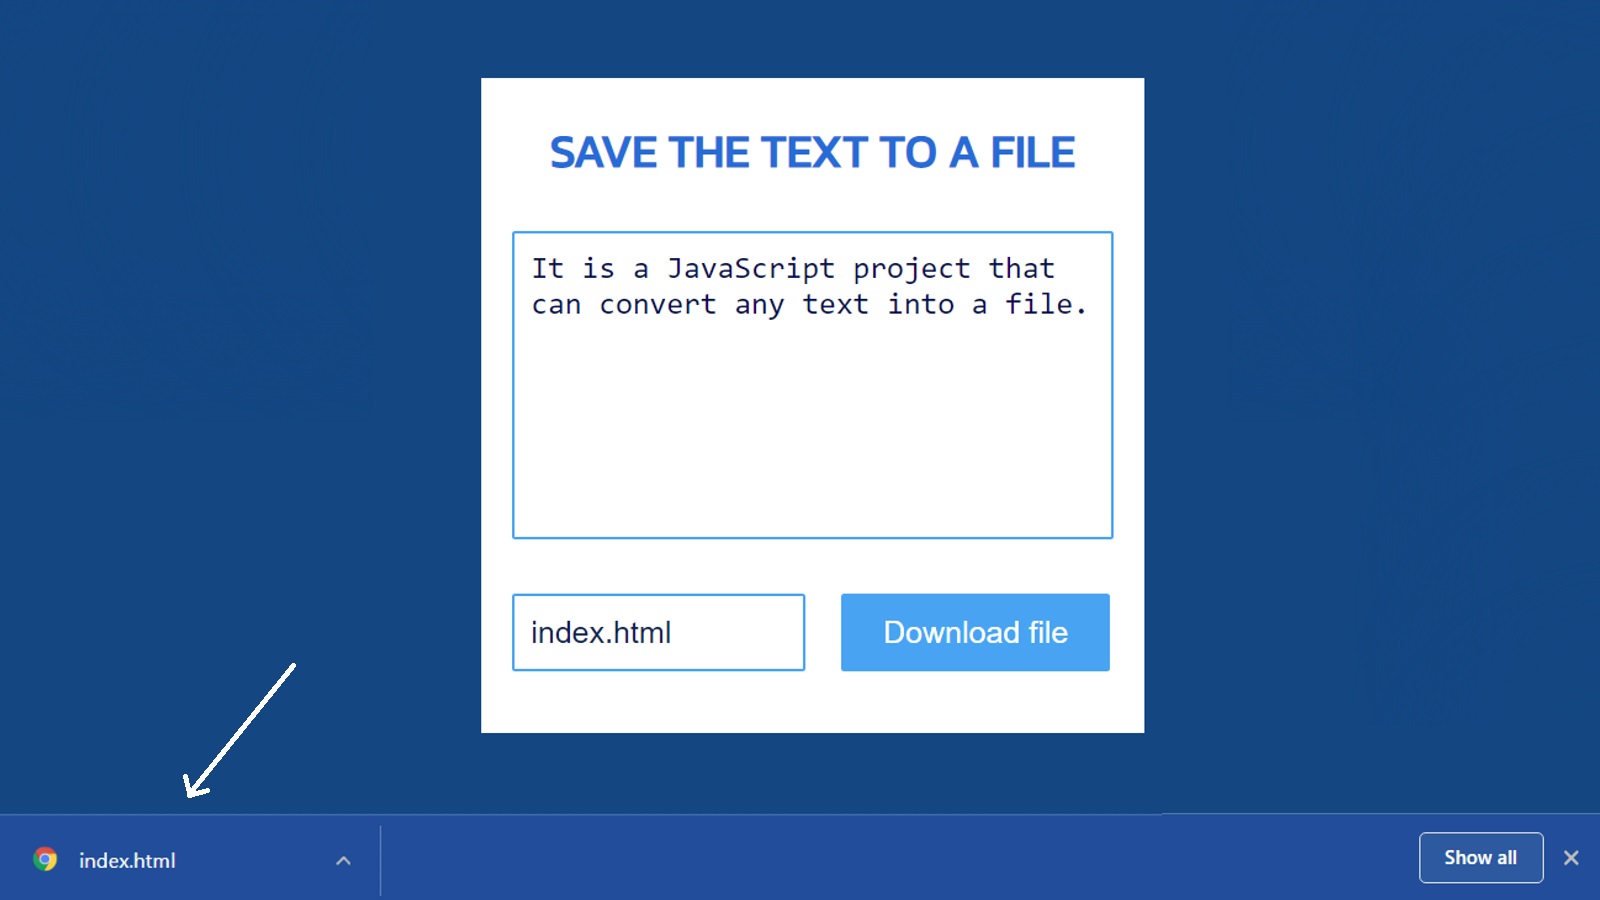

In this article, you will learn how to convert Textarea Text to File using JavaScript. This is a great project for beginners. There is a box here, you can convert the contents of that box into a file. Many times in a project you need to save the text content to the file later. In that case, you can use this JavaScript Create and Save text file project.
We usually use Notepad when we want to create any kind of files like HTML, CSS, or text. This project will make that task much easier. There is a small box in which you can input some text or information.
Then there is another small box where you can use the rename of your choice. Then there is a download button that will save the file by clicking on it.
I used JavaScript, HTML, and CSS to create this project. First, we created its basic structure using HTML CSS. Then I implemented this project (Create and Save the text file in JavaScript) using JavaScript.
See the Pen
Untitled by Code Media (@codemediaweb)
on CodePen.
First I designed the webpage and made a box on it. I added a heading at the beginning of this box. The h1 tag has been used to enhance this heading. Then I created a box using HTML’s Textarea. In this box, you can input some text. Then create another input box in which you can add the rename of the file of your choice. Here you can create any type of file.
If you open this Create and save a file project with a browser, your content will be downloaded automatically. If you open it using a code editor, you will be asked for permission to download the file.
To build it you need to have a basic idea about HTML CSS and JavaScript. The video below will help you learn how it works.
You can also use the demo section above to know How to save form data in a Text file using JavaScript. If you just want the source code, you can use the download button at the bottom of the article. However, I request you to follow the step-by-step tutorials below.
Below I have shown step-by-step how to save text to a client-side file using JavaScript. Hereafter each step I have given possible results which will help you to understand better.
I have created the basics of this project (Create and Save the text file in JavaScript) using the following HTML and CSS code.
A box has been created here with width: 430px and the background color is white. Here I have used the background-color blue of the webpage.

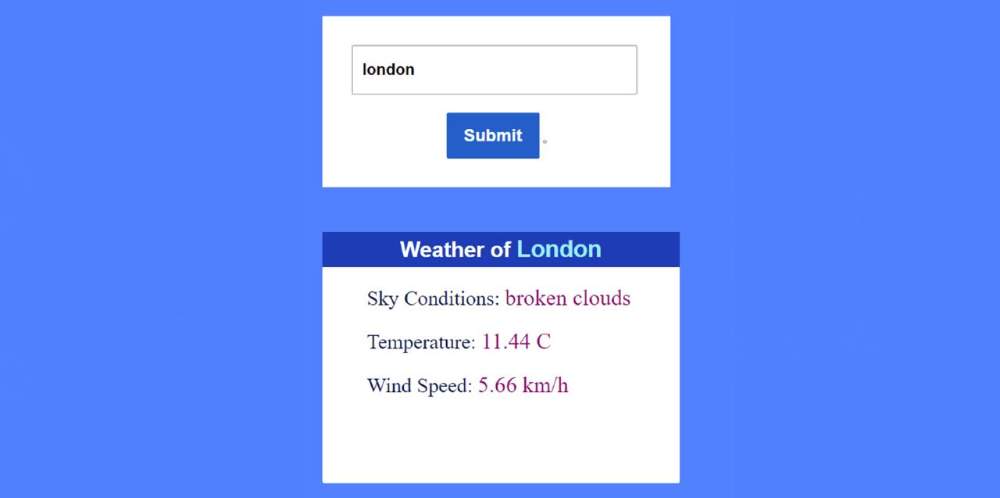

In this article, you will learn how to create a Simple Weather App using HTML CSS, and JavaScript. JavaScript Weather App is a great project that helps to find out the weather of any location.
In this project made here, you will be able to know the temperature, wind speed, sky condition, etc. First I created a box that contains an input box. If you input the name of any city in the input box, you will get all the information.
You will see all the information in another box. With the help of this simple weather application, you can easily know the weather of any city in the world. This design can be easily made with the help of Jquery. However, if you want, you can easily create this application using pure JavaScript.
No doubt you need to have a basic idea about JavaScript. If you know Basic JS then you can make it very easy. Because for beginners I have given a complete step-by-step explanation of why I used that code line.
Below is a live demo that will help you learn how this project (JavaScript Weather App) works. Here, after you input the name of any city, click on the submit button below, all the information can be seen in the box below. I have shown in the following tutorial how you can increase the amount of information if you want.
See the Pen
Untitled by Code Media (@codemediaweb)
on CodePen.
Hopefully, the demo above has helped you to know how it works (how to make a weather app in HTML). You will find the source code required to create it in the demo box above. There is also a download button at the bottom of the article.
Below is a step-by-step tutorial on how to build this application in this weather. First of all, I created a box using some amount of HTML. Then I created a box to input using the input function of HTML.
In this input box, you can input the name of any city. Then I have created the submit button which can be clicked to see all the information. All the information shown here will be collected with the help of the API link.
The information will be collected first with the help of the JavaScript fetch method. Then with the help of innerHTML all those information has been arranged to be displayed on the web page. First I arranged to show a small heading in the information box. Where you can find the name of the city you searched for.
Then all the other information in the box like sky condition, temperature, wind speed, etc. can be seen. First, you create an HTML CSS file. Then follow the step-by-step tutorial below. I have shared a video for your needs which will help you to know better.
The basic structure of this Weather App has been created using the following HTML and CSS code. This structure will contain all the information. The width of this area: 410px and margin: 50px auto has been used to keep it in the middle.
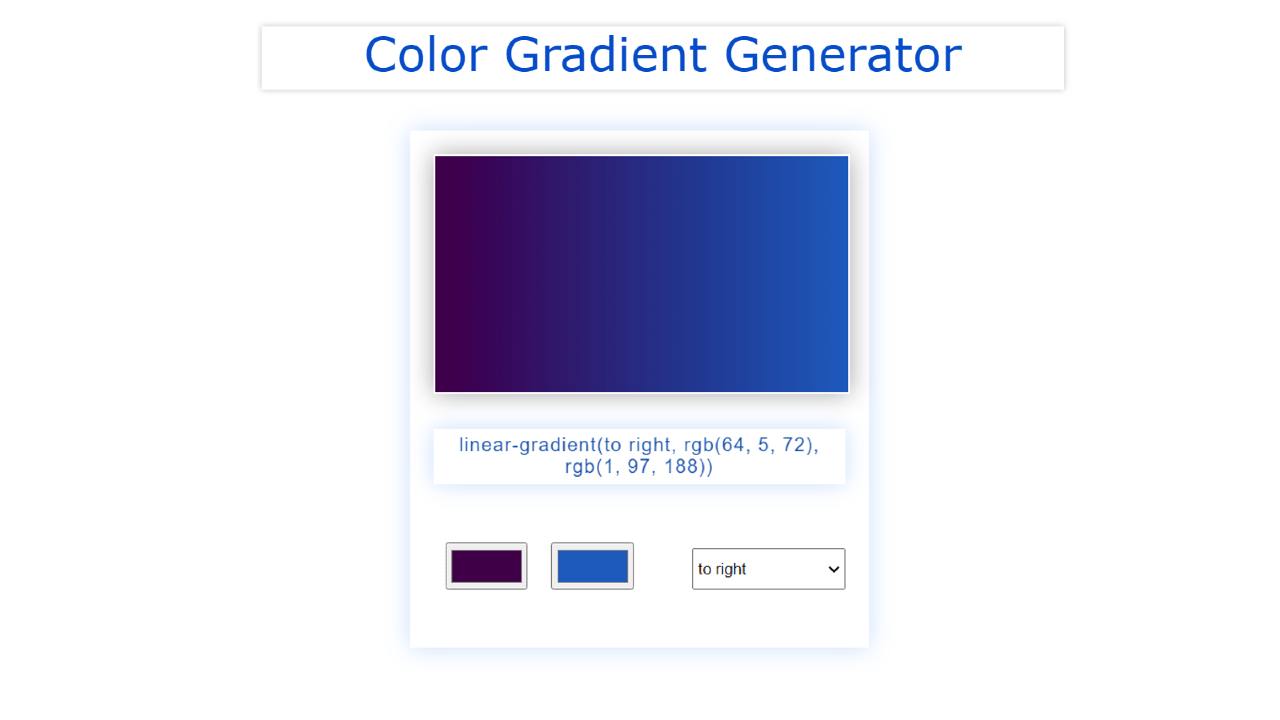

In this article, you will learn how to create a Gradient Color Generator using JavaScript. JavaScript Gradient Color Generator is a great project for beginners. If you know basic JavaScript, you can easily create such a project.
We use linear-gradient colors for various purposes. However, it is not always possible to create the perfect color. So this type of project will help you to create beautiful gradients by easily combining different colors with different angles.
With it, you will get all the color codes that you can add directly to the CSS file. Earlier I showed how to make different types of random color generators. But here you can add the color of your choice.
First I made a box at the top of the web page then I made a display. Colors can be seen in its display. Whenever you create a gradient using two colors, that color can be seen in the display. Then I made a box in which the color code can be found.
Then I created two color input spaces. For this, I have used the input function of HTML. If you know basic HTML then you must know that there are different types of inputs. Color is a kind of input function like password, email, text, file, etc. I have created a space to input two colors here. I have made a select box next to it where there are many angles.
Below I have shared a step-by-step tutorial on how to create this linear gradient Color Generator. For this, you need to have an idea about basic HTML CSS and JavaScript. HTML CSS has helped to create its basic structure. JavaScript has helped to make it fully functional.
When you input the color of your choice between the two-color input spaces. Then the colors can be seen in the display by connecting them with each other. You can select the angle of your choice using this select box. According to which angle the two colors will be connected to each other to make Gradient Color.
See the Pen
Untitled by Code Media (@codemediaweb)
on CodePen.
You can see the color code in the box. You can copy that code and add it directly to your CSS file.
Hopefully, the demo above has helped you get a live preview of this gradient generator javascript.
We’ve shared a video with the live demo that will help you understand the whole step-by-step. First, you create an HTML and CSS file.
Below the article, I have given the source code which you can download directly. But if you are a beginner, you must follow the step-by-step tutorial below.
We have created the basic structure for creating Gradient generators using this code. The basic structure is a box that contains all the information such as color input, display, and color code.
Box width: 350px and height: 400px have been used. I have added box-shadow to enhance its beauty.


In this article, I have shown you how to create Day and Night Mode Toggle using HTML CSS and JavaScript. Earlier I shared with you the design of many more types of CSS Toggle Switch. This is the first time we have created a Day and Night Mode design using toggle design.
Now, different types of websites use dark and light themes. This kind of feature undoubtedly enhances the quality and user satisfaction of the website. Various websites like YouTube, Facebook have introduced such dark mode features. If you want, you can easily create such designs with the help of HTML CSS, and JavaScript.
In the following tutorial, I have shown how to create a dark mode toggle. There is no reason to worry if you are a beginner. Here is a complete step-by-step tutorial for you. Here is an explanation of each code used.
Here JavaScript is just two lines and the rest is a little bit HTML and CSS. If you have an idea about basic HTML CSS and JavaScript then you can easily create a project (Day and Night Mode JavaScript) by following this tutorial.
Below is a demo that will help you learn how it works. Here you will find the required source code.
See the Pen
Day Night Toggle Switch to Changes Background Color by Raj Template (@RajTemplate)
on CodePen.
On the first, I have defined an area that will contain the contents. Then I created the toggle button which will change the dark and light mode. Then I added all the tests using the paragraph below.
I have created an area for this project using the code below. This area cannot be seen because the background color was not used. However, it will contain all the information. The width of this area 500px.


In this article, you will learn how to create Random Joke Generator using JavaScript and API. JavaScript Joke Generator is a basic project for beginners who can generate random jokes. For this type of project, you can add content manually or with the help of API.
This type of project (random joke generator API) is much easier to create through API. The API helps you retrieve content from any other website and display it in places you like. Various websites provide such API links.
This type of project has a generate button. When you click on it, different content will start to be generated.
I used JavaScript HTML and CSS to create this joke API javascript. First I used HTML CSS to create its basic structure. I created a box on the webpage called Basic Structure to which I added a heading.
See the Pen
Random Joke Generator using API by Raj Template (@RajTemplate)
on CodePen.
Created an area in which the content can be viewed and finally created a button that will generate a joke when clicked. I have also used JavaScript and API which will supply the content and activate the button.
I have used the following HTML code to create its basic structure. Here I used the box width: 400px and background-color: #fafdfd. With this, the four angles helped to make something round, border-radius: 5px.

display: block;
margin-block-start: 1em;
margin-block-end: 1em;
margin-inline-start: 0px;
margin-inline-end: 0px;
word-wrap: break-word;
line-height: 2em;}
h3{text-align: left;
font-family: Open Sans,Arial,sans-serif;
line-height: 1.7em;
color:black;
color:#333131;
font-weight: 520;
-webkit-font-smoothing: antialiased;
}
h2{text-align: left;
font-family: Open Sans,Arial,sans-serif;
line-height: 1.7em;
color:black;
font-weight: 620;
-webkit-font-smoothing: antialiased;
}
.class {
background:#edf0f2;
font-family: Consolas,Monaco,Lucida Console,monospace;
line-height: 1.65;
word-wrap: break-word;
border-radius: 5px;
color:#001d8f;
font-size:17.1px;
padding-left:10px;
white-space: pre-wrap;}
button.last-btn{
padding:14px 29px;
font-size:17px;
background-color:#0e87f0;
border-radius:6px;
color:white;
font-family: Open Sans,Arial,sans-serif;
border:none;
margin-left:35%;
}
@media only screen and (max-width: 400px) {
button.last-btn{
margin-left:0px;
margin-right:0px;
}
}
@media only screen and (max-width: 300px) {
button.last-btn{
margin-left:0px;
margin-right:0px;
}
}
@media only screen and (max-width: 600px) {
button.last-btn{
margin-left:0px;
margin-right:0px;
}
}
@media only screen and (max-width: 800px) {
button.last-btn{
margin-left:0px;
margin-right:0px;
}
}
@media only screen and (max-width: 400px) {
.copyButton {
width: 45%;
}

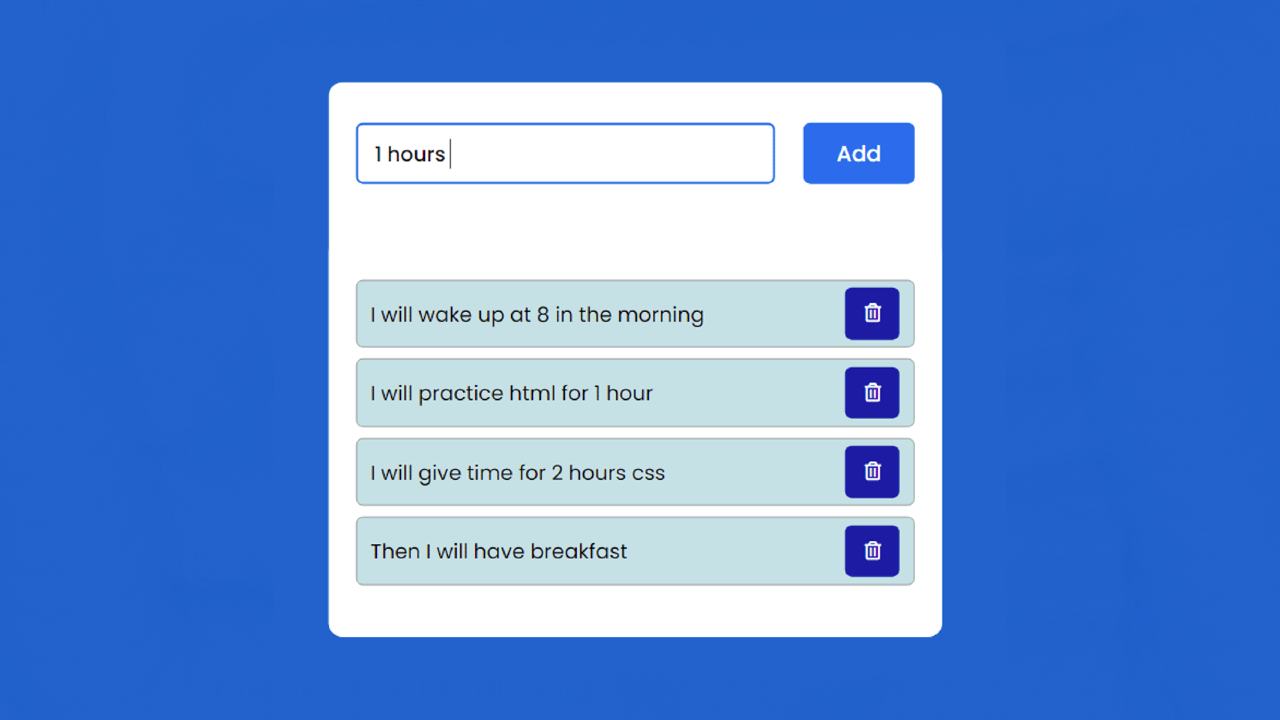
In this article, you will learn how to create Todo List using JavaScript. Todo List JavaScript is a wonderful project that will help beginners to increase their knowledge about JavaScript.
This type of JavaScript Todo List is mainly used to organize any of your information. Here you can create a list of many texts that you want to do later. Once you’ve done that, you can delete them. It can basically serve as a daily routine.
I have shown here complete information and tutorial on how to create a Todo List HTML using JavaScript. I took the help of HTML and CSS to design it. Implemented with the help of JavaScript.
Scientific Calculator in Java (Step by Step)
First I created an input space here. Here you can input any text. Then there is an ‘Add’ button which can be found in a list after clicking on it.
See the Pen
Untitled by Code Media (@codemediaweb)
on CodePen.
Next to each task or routine, there is a delete button which if clicked on the text will be deleted. Undoubtedly todo list HTML CSS is a great project.
Below I have shared the complete tutorial on how I created this todo list HTML. That’s why you must have a basic idea about JavaScript. First I designed a web page then I made a box. Then I created a place to input using the input of HTML.
Now you create an HTML and CSS file. Then follow the complete information and tutorials below step by step.
I created a box on the webpage using the HTML and CSS code below. This is basically the basic structure of todo list.
Using the CSS below, I first added blue color to the background color of the webpage. I have used a min-width of 450 px and a min-height of 100px for this box.
