
In this article, you will learn how to create a Simple Weather App using HTML CSS, and JavaScript. JavaScript Weather App is a great project that helps to find out the weather of any location.
In this project made here, you will be able to know the temperature, wind speed, sky condition, etc. First I created a box that contains an input box. If you input the name of any city in the input box, you will get all the information.
You will see all the information in another box. With the help of this simple weather application, you can easily know the weather of any city in the world. This design can be easily made with the help of Jquery. However, if you want, you can easily create this application using pure JavaScript.
No doubt you need to have a basic idea about JavaScript. If you know Basic JS then you can make it very easy. Because for beginners I have given a complete step-by-step explanation of why I used that code line.
JavaScript Weather App
Below is a live demo that will help you learn how this project (JavaScript Weather App) works. Here, after you input the name of any city, click on the submit button below, all the information can be seen in the box below. I have shown in the following tutorial how you can increase the amount of information if you want.
See the Pen
Untitled by Code Media (@codemediaweb)
on CodePen.
Hopefully, the demo above has helped you to know how it works (how to make a weather app in HTML). You will find the source code required to create it in the demo box above. There is also a download button at the bottom of the article.
How to Build a Weather App JavaScript
Below is a step-by-step tutorial on how to build this application in this weather. First of all, I created a box using some amount of HTML. Then I created a box to input using the input function of HTML.
In this input box, you can input the name of any city. Then I have created the submit button which can be clicked to see all the information. All the information shown here will be collected with the help of the API link.
The information will be collected first with the help of the JavaScript fetch method. Then with the help of innerHTML all those information has been arranged to be displayed on the web page. First I arranged to show a small heading in the information box. Where you can find the name of the city you searched for.
Then all the other information in the box like sky condition, temperature, wind speed, etc. can be seen. First, you create an HTML CSS file. Then follow the step-by-step tutorial below. I have shared a video for your needs which will help you to know better.
Step 1: Basic structure of the Weather App
The basic structure of this Weather App has been created using the following HTML and CSS code. This structure will contain all the information. The width of this area: 410px and margin: 50px auto has been used to keep it in the middle.
Step 2: Create a place to input the city name
Now I have created the first box that contains space and buttons for input. First I took the help of two input functions. The first input will help to input the name of the city. The second input will help to create the submit button.
No specific size of the box is specified here. It will determine its own size based on the size of the input box. However, padding: 2rem 0 2rem 0 has been used to keep some amount of space, and the background color white has been used.

Now I have designed a place to input text. A border of 2 pixels has been used around the input space width: 20rem and height: 3.5rem.
Now I have designed the submit button. I have already created an input box for this button. Now the following codes have helped to design it. Height: 3.2rem, width: 6.5rem, and background color blue is used.

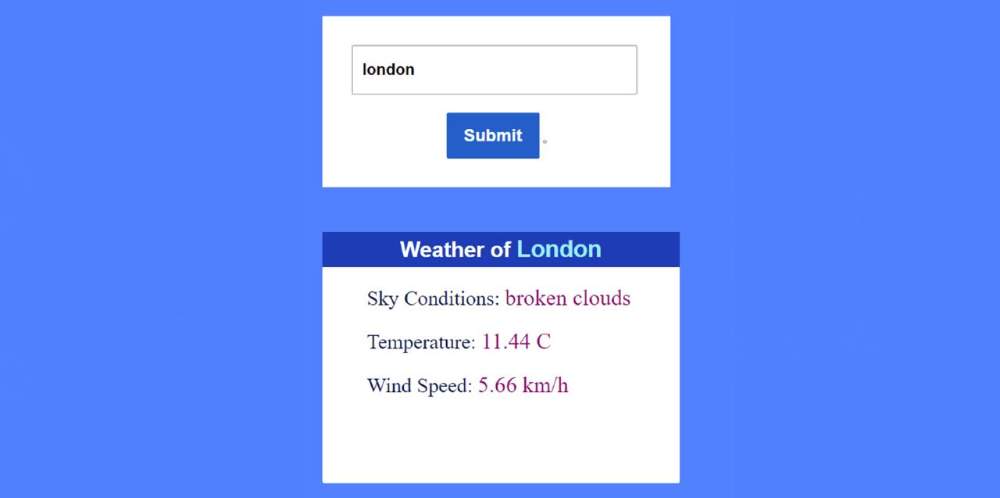
Step 3: Create a display to view the weather
Now I have created the second box. In which all the information can be found. It will basically act as a display. Whenever you input the name of the city of your choice in the input box, all the information can be found in this box.
First, in this box, I arranged to show a heading. Where you can see the name of the city input. Then I used three paragraphs where the weather-related information can be found.
The width of this display is 400px, height: 45vh, and the background color is white. Margin: 50px auto is used to keep this box a bit away from the input box.
Now I am adding the required CSS code for all the text information in the box. All this information is no longer available. All content can be viewed after using JavaScript code.

Step 4: Activate Simple Weather App using JavaScript
Above I have used the necessary HTML and CSS code to create this JavaScript Weather app. Now you need to activate it with JavaScript. You need JavaScript enabled to view it to make it work.
Using the following code, I have determined the constant of one of the required ID functions. Because I can’t use any ID or class function directly in JavaScript.
Now I have given the id of the API link. This id is different for everyone. You will receive this type of API id when you create an account. However, you can use this id.
Now with the help of the following codes, I have converted the temperature from Kelvin to Celsius. We know that 1 Kelvin is equal to -273 Celsius.
Below I have given all the calculations on how to implement this Simple Weather App. The following calculations will work when you click on the submit button.
➤ First, we have managed to collect all the information from the API link with the help of the fetch method.
➤ Then I collected the required information from the API link and stored it in different constants.
Then using “innerHTML” all the information has been arranged to be displayed on the webpage.
➤ I have arranged to show an alert message at the end of all. If the above calculation does not work, then that alert message can be seen.
➤ If you do not input anything in the input box or incorrectly input the city name then those calculations will not work. As a result, the message can be seen.

Hopefully from the above tutorial, you have easily learned how I created this simple JavaScript Weather application. If you have any problem understanding you can take the help of the video tutorial above.
We hope you find out from this article the question that was on your mind (how to make a weather app in HTML). Below is the source code needed to build this weather application that you can easily download.