Height Converter App using JavaScript – Free Source Code

Height Converter App using JavaScript

In this article, you will learn how to create a Height Converter App using JavaScript. JavaScript Height Converter will help to convert the number of feet and inches to cm.

Here, if you input your height in feet and inches, you can see how many cm it will be. This is a simple JavaScript project that will help you learn the basics of JavaScript. I have created many more types of JavaScript projects before. Like the others, I hope you enjoy this project.

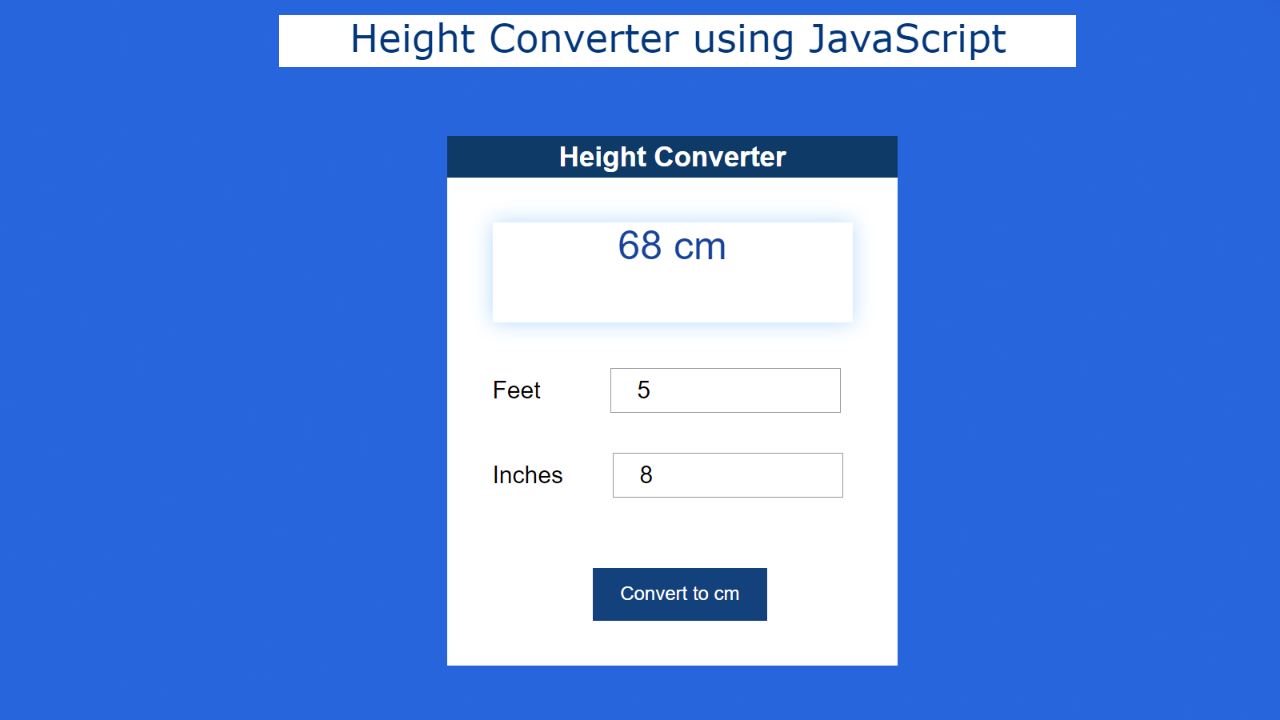
There are two inputs here. The first can be input in feet and the second in inches. It also has a display in which all the calculations can be seen. I took the help of HTML CSS and JavaScript to make this Height Converter App. HTML has designed the basics of CSS and JavaScript has made it work.

JavaScript Height Converter App

Below is a step-by-step tutorial on how I created this Height Converter project. First I made a box in which I put all the information. I have given a heading on the top of the box which will basically help to enhance the beauty. Then there is a display in which the calculated results can be seen.

 Below are two input spaces. There is a button at the end of all the clicks on which the calculation can be seen in the display.

See the Pen
Untitled
by Code Media (@codemediaweb)
on CodePen.

First, you create an HTML and CSS file then follow the tutorials below. Above I have given a demo which will help you to know how it works.

Step 1: Basic structure of Height Converter

We have created the basic structure of this height converter application using the following HTML and CSS code. This structure is basically a box containing all the information.

The background color of the web page is blue and the background color of the box is white. Box width: 450px and height: 530px.

<form action=”” id=”calculator”>
</form>
body{
    background: #076fde;
    font-family: sans-serif;
}
form{
    margin: 50px auto;
    width: 450px;
    height: 530px;
    background-color: white;
}
Basic structure of Height Converter

Step 2: Add a heading

Now a heading has been used in this box. This will basically help to enhance the beauty. The background color of the heading is blue and the text color is white. Font-size: 28px helped to increase the size a bit.

<h1>Height Converter</h1>
h1{
    text-align: center;
    color: white;
    background: #033d67;
    font-size: 28px;
    padding: 5px;
}
Add a heading

Step 3: Create a display

Now we have created a display in which calculations can be seen. All the calculations can be seen in this display when you add the information in the input box. Display width: 80%, height: 100px and box-shadow are used to understand the size.

<div id=”results”></div>
#results{
    color: #064999;
    text-align: center;
    width: 80%;
    height: 100px;
    margin: 10% auto;
    box-shadow: 0 0 20px rgba(0,139,253,0.3);
    font-size: 2.5em;
}
Create a display

Step 4: Create a box to input the height (more…)

Continue ReadingHeight Converter App using JavaScript – Free Source Code

Simple Weather App using JavaScript – Free Source Code

JavaScript Weather App

In this article, you will learn how to create a Simple Weather App using HTML CSS, and JavaScript. JavaScript Weather App is a great project that helps to find out the weather of any location.

In this project made here, you will be able to know the temperature, wind speed, sky condition, etc. First I created a box that contains an input box. If you input the name of any city in the input box, you will get all the information.

You will see all the information in another box. With the help of this simple weather application, you can easily know the weather of any city in the world. This design can be easily made with the help of Jquery. However, if you want, you can easily create this application using pure JavaScript.

No doubt you need to have a basic idea about JavaScript. If you know Basic JS then you can make it very easy. Because for beginners I have given a complete step-by-step explanation of why I used that code line.

JavaScript Weather App

 Below is a live demo that will help you learn how this project (JavaScript Weather App) works. Here, after you input the name of any city, click on the submit button below, all the information can be seen in the box below. I have shown in the following tutorial how you can increase the amount of information if you want.

See the Pen
Untitled
by Code Media (@codemediaweb)
on CodePen.

Hopefully, the demo above has helped you to know how it works (how to make a weather app in HTML). You will find the source code required to create it in the demo box above. There is also a download button at the bottom of the article.

How to Build a Weather App JavaScript

Below is a step-by-step tutorial on how to build this application in this weather. First of all, I created a box using some amount of HTML. Then I created a box to input using the input function of HTML. 

In this input box, you can input the name of any city. Then I have created the submit button which can be clicked to see all the information. All the information shown here will be collected with the help of the API link.

The information will be collected first with the help of the JavaScript fetch method. Then with the help of innerHTML all those information has been arranged to be displayed on the web page. First I arranged to show a small heading in the information box. Where you can find the name of the city you searched for. 

Then all the other information in the box like sky condition, temperature, wind speed, etc. can be seen. First, you create an HTML CSS file. Then follow the step-by-step tutorial below. I have shared a video for your needs which will help you to know better.

Step 1: Basic structure of the Weather App

The basic structure of this Weather App has been created using the following HTML and CSS code. This structure will contain all the information. The width of this area: 410px and margin: 50px auto has been used to keep it in the middle.

<div class=”container-fluid”>
  <section class=”main”>
  </section>
</div>
* {
    margin: 0;
    padding: 0;
    box-sizing: border-box;
}
body{
    background: #448aff;
}
.container-fluid{
 width: 410px;
 margin: 50px auto;
 padding: 10px;
}

Step 2: Create a place to input the city name (more…)

Continue ReadingSimple Weather App using JavaScript – Free Source Code

How to Create Stopwatch using HTML CSS JavaScript

JavaScript Stopwatch

Here, You will learn how to create a Stopwatch using JavaScript. JavaScript Stopwatch is a great project that will help beginners to learn more about JavaScript.

Earlier I shared with you how to make a simple stopwatch. We use a stopwatch for various purposes. Which helps us to run the countdown for a certain period of time. But there is a difference between a countdown timer and a stopwatch. 

The countdown timer cannot be turned off when you wish. However, you can turn this stopwatch on and off whenever you want. 

JavaScript Stopwatch

Here’s the basic structure I made a box and made three small displays in it. Counted time can be seen in this display. There are also two buttons that will help turn the stopwatch on and off.

See the Pen
Untitled
by Code Media (@codemediaweb)
on CodePen.

Hopefully, the demo above has helped you to get a live preview of the javascript time stopwatch. You will find the source code required for making this simple javascript stopwatch at the bottom of the article. However, there are many beginners who do not understand the code. I have shared step-by-step tutorials for them.

However, there is a problem with this design, you can not restart here. Because I made it so easy. You can see this design if you want to add a restart button.

How to Create a Stopwatch in JavaScript

Below I have shared a step-by-step tutorial on how to create this JavaScript Stopwatch. For this, you need to have a basic idea about HTML CSS, and JavaScript. First of all, HTML CSS has helped to create its basic structure.

Step 1: Basic structure of stopwatch

I have created a box using the following HTML and CSS code. I will add all the information to this box. The width of this box: 300px and height: 90px have been used. 

Here the background color I used is white and it helped margin: 100px auto to place it in the middle of the webpage.

<div id=”stopwatch”>
</div>
body {
  font-family: arial;
  background: #0776de;
}
#stopwatch {
  width: 300px;
  height: 90px;
  margin: 100px auto;
  background: white;
  color: #333;
  border-radius: 10px;
  padding: 60px 50px 100px;
  text-align: center;
  font-size: 30px;
}
Basic structure of stopwatch

Step 2: 3 countdown viewing boxes (more…)

Continue ReadingHow to Create Stopwatch using HTML CSS JavaScript

Gradient Color Generator using JavaScript (Free Code)

Gradient Color Generator using JavaScript

In this article, you will learn how to create a Gradient Color Generator using JavaScript. JavaScript Gradient Color Generator is a great project for beginners. If you know basic JavaScript, you can easily create such a project. 

We use linear-gradient colors for various purposes. However, it is not always possible to create the perfect color. So this type of project will help you to create beautiful gradients by easily combining different colors with different angles.

With it, you will get all the color codes that you can add directly to the CSS file. Earlier I showed how to make different types of random color generators. But here you can add the color of your choice.

JavaScript Gradient Color Generator

First I made a box at the top of the web page then I made a display. Colors can be seen in its display. Whenever you create a gradient using two colors, that color can be seen in the display. Then I made a box in which the color code can be found.

 Then I created two color input spaces. For this, I have used the input function of HTML. If you know basic HTML then you must know that there are different types of inputs. Color is a kind of input function like password, email, text, file, etc. I have created a space to input two colors here. I have made a select box next to it where there are many angles. 

Below I have shared a step-by-step tutorial on how to create this linear gradient Color Generator. For this, you need to have an idea about basic HTML CSS and JavaScript. HTML CSS has helped to create its basic structure. JavaScript has helped to make it fully functional.

 When you input the color of your choice between the two-color input spaces. Then the colors can be seen in the display by connecting them with each other. You can select the angle of your choice using this select box. According to which angle the two colors will be connected to each other to make Gradient Color.

See the Pen
Untitled
by Code Media (@codemediaweb)
on CodePen.

You can see the color code in the box. You can copy that code and add it directly to your CSS file.
Hopefully, the demo above has helped you get a live preview of this gradient generator javascript.

How to Make a Color Gradient in Javascript 

We’ve shared a video with the live demo that will help you understand the whole step-by-step.  First, you create an HTML and CSS file.

 Below the article, I have given the source code which you can download directly. But if you are a beginner, you must follow the step-by-step tutorial below.

Step 1: Basic structure of Gradient Generator

We have created the basic structure for creating Gradient generators using this code. The basic structure is a box that contains all the information such as color input, display, and color code.

<div class=”random-color”>
</div>
html {
  height: 100%;
  -webkit-background-size: cover;
  -moz-background-size: cover;
  -o-background-size: cover;
  background-size: cover;
  background-repeat:no-repeat;
}
body {
  color: #035aab;
  text-align: center;
}

Box width: 350px and height: 400px have been used. I have added box-shadow to enhance its beauty.

.random-color{
  width: 350px;
  box-shadow: 0 0 20px rgba(0,139,253,0.25);
  margin: 50px auto;
  padding: 20px; 
  height: 400px;
}
Make a box as its basic structure

Step 2: Display for Gradient Color viewing (more…)

Continue ReadingGradient Color Generator using JavaScript (Free Code)

Random Joke Generator using JavaScript & API

Random Joke Generator using JavaScript

In this article, you will learn how to create Random Joke Generator using JavaScript and API. JavaScript Joke Generator is a basic project for beginners who can generate random jokes. For this type of project, you can add content manually or with the help of API.

This type of project (random joke generator API) is much easier to create through API. The API helps you retrieve content from any other website and display it in places you like. Various websites provide such API links.

This type of project has a generate button. When you click on it, different content will start to be generated.

Joke Generator using Javascript Code

I used JavaScript HTML and CSS to create this joke API javascript. First I used HTML CSS to create its basic structure. I created a box on the webpage called Basic Structure to which I added a heading.

See the Pen
Random Joke Generator using API
by Raj Template (@RajTemplate)
on CodePen.

 Created an area in which the content can be viewed and finally created a button that will generate a joke when clicked. I have also used JavaScript and API which will supply the content and activate the button.

Step 1: Basic structure of Joke Generator

I have used the following HTML code to create its basic structure. Here I used the box width: 400px and background-color: #fafdfd. With this, the four angles helped to make something round, border-radius: 5px.

<div class=”wrapper”>
</div>
*{
    padding: 0;
    margin: 0;
    box-sizing: border-box;
    font-family: “Rubik”,sans-serif;
}
body{
    background-color: #0772a7;
}
.wrapper{
    width: 400px;
    padding: 50px 40px;
    background-color: #fafdfd;
    position: absolute;
    transform: translate(-50%, -50%);
    top: 50%;
    left: 50%;
    border-radius: 5px;
    box-shadow: 20px 20px 40px rgba(97,63,0,0.4);
}
Basic structure of Joke Generator

Step 2: Add headings to enhance the beauty (more…)

Continue ReadingRandom Joke Generator using JavaScript & API

Aspect Ratio Calculator Using HTML, CSS, and JavaScript

Aspect Ratio Calculator Using HTML, CSS And JavaScript

In this article, you will learn how to create an Aspect Ratio Calculator using HTML CSS, and JavaScript. Aspect Ratio is basically the relationship between the width and height of an element.

Any element formed by four angles has a certain aspect ratio. Today in this article I have shown you how to create JavaScript Aspect Ratio Calculator very easily. You can calculate it manually but this will be much easier with programming. I used some basic JavaScript to create this project.

See the Pen
JavaScript Aspect Ratio Calculator
by Code Media (@codemediaweb)
on CodePen.

There are two types of input fields. First, there are two input boxes to add the percentage of Aspect Ratio, that is, you have to input the percentage at which you want to calculate this. In place of the following two inputs, you can input width and height

For example, you want to make a box and you want to make that box on this 18: 9 ratio. In that case, you can easily know the other value by inputting any one of the lengths or heights here.

JavaScript Aspect Ratio Calculator

In this tutorial, we have shown how to create this CSS aspect ratio calculator program. That’s why you need to have an idea about basic JavaScript. First I designed the web page using some CSS code

Then I created a box using HTML code. I have added all the information to this box. Then I added some text that would serve as headings. Then I made two input boxes to input the ratio. Then there are two more input spaces where width and height can be input.

I did not use any external library or jQuery to create this project. I have made this Aspect Ratio Calculator using Pure JavaScript.

If you are a beginner, follow the step-by-step tutorial below. Below the article, you will find the source code needed to create it.

Step 1: Basic structure of Aspect Ratio calculator

I have created a box on the web page using the following HTML and CSS codes. First I designed the background of the webpage using some amount of CSS code.

 Here on that page, I used linear-gradient color at a 135-degree angle. The box here is width: 400px and the height depend on the padding.

<div class=”container”>
</div>
* {
    padding: 0;
    margin: 0;
    box-sizing: border-box;
    font-family: “Poppins”, sans-serif;
}
body {
     height: 100vh;
     background: linear-gradient(
        135deg,
        #9cc0e0 50%,
        #1b72b2 50%
    );
}
.container {
    width: 400px;
    background-color: #ffffff;
    padding: 50px 30px;
    position: absolute;
    transform: translate(-50%, -50%);
    top: 50%;
    left: 50%;
    border-radius: 10px;
    box-shadow: 0 30px 45px rgba(18, 8, 39, 0.2);
}
Basic structure of Aspect Ratio calculator

Step 2: Add a heading to the box (more…)

Continue ReadingAspect Ratio Calculator Using HTML, CSS, and JavaScript

How to Make a Todo List using JavaScript

display: block;
margin-block-start: 1em;
margin-block-end: 1em;
margin-inline-start: 0px;
margin-inline-end: 0px;
word-wrap: break-word;

line-height: 2em;}

h3{text-align: left;
font-family: Open Sans,Arial,sans-serif;
line-height: 1.7em;
color:black;
color:#333131;
font-weight: 520;

-webkit-font-smoothing: antialiased;
}

h2{text-align: left;
font-family: Open Sans,Arial,sans-serif;
line-height: 1.7em;
color:black;

font-weight: 620;
-webkit-font-smoothing: antialiased;
}

.class {
background:#edf0f2;
font-family: Consolas,Monaco,Lucida Console,monospace;
line-height: 1.65;
word-wrap: break-word;
border-radius: 5px;
color:#001d8f;
font-size:17.1px;
padding-left:10px;
white-space: pre-wrap;}

button.last-btn{
padding:14px 29px;
font-size:17px;
background-color:#0e87f0;
border-radius:6px;
color:white;
font-family: Open Sans,Arial,sans-serif;
border:none;
margin-left:35%;

}

@media only screen and (max-width: 400px) {
button.last-btn{
margin-left:0px;
margin-right:0px;
}
}
@media only screen and (max-width: 300px) {
button.last-btn{
margin-left:0px;
margin-right:0px;
}
}
@media only screen and (max-width: 600px) {
button.last-btn{
margin-left:0px;
margin-right:0px;
}
}
@media only screen and (max-width: 800px) {
button.last-btn{
margin-left:0px;
margin-right:0px;
}
}

@media only screen and (max-width: 400px) {
.copyButton {
width: 45%;
}

How to Make a Todo List using JavaScript

In this article, you will learn how to create Todo List using JavaScript. Todo List JavaScript is a wonderful project that will help beginners to increase their knowledge about JavaScript.

This type of JavaScript Todo List is mainly used to organize any of your information. Here you can create a list of many texts that you want to do later. Once you’ve done that, you can delete them. It can basically serve as a daily routine.

Todo List JavaScript

I have shown here complete information and tutorial on how to create a Todo List HTML using JavaScript. I took the help of HTML and CSS to design it. Implemented with the help of JavaScript.

Scientific Calculator in Java (Step by Step)

First I created an input space here. Here you can input any text. Then there is an ‘Add’ button which can be found in a list after clicking on it. 

See the Pen
Untitled
by Code Media (@codemediaweb)
on CodePen.

Next to each task or routine, there is a delete button which if clicked on the text will be deleted. Undoubtedly todo list HTML CSS is a great project.

How to Make a Todo List JavaScript

Below I have shared the complete tutorial on how I created this todo list HTML. That’s why you must have a basic idea about JavaScript. First I designed a web page then I made a box. Then I created a place to input using the input of HTML.

Now you create an HTML and CSS file. Then follow the complete information and tutorials below step by step.

Step 1: Basic structure of the project

I created a box on the webpage using the HTML and CSS code below. This is basically the basic structure of todo list.

 <div class=”container”>
 
 </div>

Using the CSS below, I first added blue color to the background color of the webpage. I have used a min-width of 450 px and a min-height of 100px for this box.

*,
*:before,
*:after{
    padding: 0;
    margin: 0;
    box-sizing: border-box;
}
body{
    height: 100vh;
    background: #066acd;
}
.container{
    width: 40%;
    min-width: 450px;
    position: absolute;
    min-height: 100px;
    transform: translate(-50%,-50%);
    top: 50%;
    left: 50%;
    background: white;
    border-radius: 10px;
}
Basic structure of the project

Step 2: Create a place to input using HTML

(more…)

Continue ReadingHow to Make a Todo List using JavaScript

BMI Calculator using Javascript, HTML & CSS

bmi calculator source code

In this article, you will learn how to create BMI Calculator using HTML CSS, and JavaScript. BMI stands for Body Mass Index. It basically helps to determine how much mass is in our body. 

According to science, a healthy and normal person should have a BMI between 18.5 and 25. If its value is less than 18 then it is underweight which is unhealthy. If its value is more than 25 then it is called fat or overweight.

There are specific formulas for manually calculating BMI. However, you can do this manual work much easier through programming. That’s why in this article you will know how to make BMI Calculator using Javascript.

For this type of project, there will be two input boxes where weight and height have to be input. Then this project will automatically calculate your BMI. Here you can see a text with the result of the calculation.

BMI Calculator Javascript [Live Demo]

 First I created a box at the top of the web page. I first added another title to that box. Then there is a small display. The results can be seen by calculation in that display. I used HTML’s range slider to input. As a result, minimum and maximum values ​​are set here. 

The first of the two sliders is for weight and the second is for hiding input. Then it will calculate and show how much BMI you have in that display. It will show a message where your BMI status can be known.

See the Pen
Untitled
by Code Media (@codemediaweb)
on CodePen.

Hopefully, the demo above has helped you get this project live experience. You can copy the source code needed to create it from above. Also, the download button at the bottom of the article will help.

How to calculate BMI in JavaScript

Below I have shared the complete step-by-step tutorial. If you are a beginner then follow the tutorial below to make it (BMI Calculator with Source Code).

Here is the formula for manually calculating BMI

BMI = (weight) / (height * height)

weight = the weight of your body
height = height of your body

For this, you need to have an idea about HTML and CSS. First, create an HTML and CSS file then follow the steps below.

Step 1: Create the basic structure of the calculator

I have created a box using the following code which is basically its basic structure.

<div class=”container”>
</div>

The following CSS has helped to design that webpage. Here I have used blue as the background color of the web page.

*,
*:before,
*:after{
    padding: 0;
    margin: 0;
    box-sizing: border-box;
}
body{
    height: 100vh;
    background: #046db9;
}

I designed the box with the following codes. The background color of the box uses white and the width: 400px.

.container{
    background-color: #ffffff;
    padding: 30px 30px;
    width: 50%;
    min-width: 400px;
    position: absolute;
    transform: translate(-50%,-50%);
    top: 50%;
    left: 50%;
    border-radius: 5px;
    font-family: ‘Poppins’,sans-serif;
    box-shadow: 25px 25px 30px rgba(0,0,0,0.15);
}
Create the basic structure of the calculator

Step 2: Add a heading using HTML (more…)

Continue ReadingBMI Calculator using Javascript, HTML & CSS