How to Detect Enter Key Press in JavaScript

How to Detect Enter Key Press in JavaScript (Free Code)

How to Detect Enter Key Press in JavaScript

In this tutorial, you will learn how to create detect pressed key javascript. This type of project will basically help you to know which key has been pressed on the keyboard.

detect enter key design can be seen in many large applications. If you want to create a project where the user needs to show the key entered. Then you can use this kind of design.

Detect Pressed key JavaScript

When you click a button on the keyboard, that key, key code can be seen here. If you do not understand what I am saying then you can see the preview below. 

From here you will get a live preview and source code of this project (Detect Enter Key Press in JavaScript).

See the Pen
Untitled
by Foolish Developer (@foolishdevweb)
on CodePen.

As you can see we have created a box at the top of a web page. When you press a key on your keyboard. Then all the information in the box can be seen.

How to Detect enter key in Javascript

Here you will find complete information and step-by-step tutorials. But to make this detect enter key project you need to have an idea about HTML, CSS, and javascript.

Below the article is a section on copying code. There is also a button to download the source code.

Step 1: Basic area of the project

First I created a box at the top of the web page in which all the information can be found. I have used blue color in the background of the web page and light white color has been used in the background of the box. 

<div class=”container”>
 
</div>
* {
box-sizing: border-box;
margin: 0;
padding: 0;
font-family: “Montserrat”, sans-serif;
}
body {
display: flex;
justify-content: center;
align-items: center;
text-align: center;
min-height: 100vh;
background: #1276d1; /* fallback for old browsers */
 }
.container {
display: flex;
width: 400px;
flex-direction: column;
padding: 2rem;
background: rgba(255, 255, 255, 0.25);
box-shadow: 0 8px 32px 0 rgba(31, 38, 135, 0.37);
backdrop-filter: blur(4px);
-webkit-backdrop-filter: blur(4px);
border-radius: 10px;
border: 1px solid rgba(255, 255, 255, 0.18);
}
Basic area of the project

Step 2: Display the view of the pressed key (more…)

Continue ReadingHow to Detect Enter Key Press in JavaScript (Free Code)

Drag and Drop Elements Using JavaScript & CSS

Drag and Drop Elements Using JavaScript

In this tutorial, you will learn how to create javascript drag and drop elements. We see drag and drop JavaScript elements in different web pages or applications. That means we can drag those elements as we wish and keep them wherever we wish.

This type of JavaScript Drag and Drop Sortable is very easy to make. This tutorial will help you if you know basic JavaScript.

The design I have shown here is relatively advanced. Many drag elements have been used here. Earlier I shared a tutorial where I created this project by an element.

JavaScript Drag and Drop

I have created an image gallery with many images here. You can drag each of those images to the place of your choice.

If you do not understand what I am saying then watch the demo below. This preview will help you understand how it works.

See the Pen
Untitled
by Foolish Developer (@foolishdevweb)
on CodePen.

As you can see I have created a small gallery of some images. Here are 6 images. Under normal circumstances, these images will stand side by side. Then you can drag and drop those images.

How to make drag and drop in javascript

Clicking on any image and dragging it will follow your mouse cursor. This type of design you can use in any of your applications or web pages. 

It will definitely give your user a new kind of experience. This javascript drag and drop is relatively easy to make.

I have given step by step tutorial below. If you only want the source code then you can see the following sections of the article. Here you will find live previews, step-by-step tutorials, and source code.

Step 1: Basic Area of Drag Elements

First created an area in which all the images can be seen in normal conditions.

<div class=”container”>
</div>

I designed the web page using the following codes. Here we have designed a background color and more on the web page.

* {
box-sizing: border-box;
margin: 0;
padding: 0;
font-family: “Recursive”, sans-serif;
}
body {
display: flex;
justify-content: center;
align-items: center;
min-height: 100vh;
flex-direction: column;
background-color: #333;
}

Now I will design the box in which all the images can be seen. The width of that area: 45vw, height: 40vh.

.container {
display: flex;
justify-content: center;
align-items: center;
width: 45vw;
height: 40vh;
max-width: 700px;
margin: 0 auto;
flex-wrap: wrap;
}

Step 2: Drag Elements have been added (more…)

Continue ReadingDrag and Drop Elements Using JavaScript & CSS

How to Create a Word Counter in JavaScript (Free Code)

How to Create a Word Counter in JavaScript

Many times word count needs to be done between different projects. In all these cases, this type of JavaScript Word Counter will help you completely. In this tutorial, you will learn how to create Word Counter JavaScript

A lot of times we show character limits or word limits in different input boxes. For example, in the case of Twitter, there is a character limit.

Although I have shared a tutorial before where I have shown how to create a character limit input box. This tutorial will show you how to count words and characters. That means you will see both a project word and a character.

Word Counter JavaScript

Below is a preview that will help you to know how this Word Counter javascript works. Below you will find the required source code. 

To create this JavaScript Word Counter project I first created an input box using HTML and created a display. The input box is created using Textarea. 

Then I designed using CSS. After all, I have implemented this project (word counter HTML code) with the help of JavaScript.

See the Pen
Untitled
by Foolish Developer (@foolishdevweb)
on CodePen.

As you can see above, I used the background-color blue of a webpage. I made a box on top of it. At the top of the box is a display. This display is divided into two parts. 

In the first part, you can see the information of Word Counter. In the second part, the information of the character counter can be seen. These values ​​will change when I change something in the input box. 

How to Make a Word Counter in JavaScript

This JavaScript Word Counter is very easy to make. I created it with some amount of HTML and some amount of CSS. A little bit of JavaScript has been used to make this counter project work.

The background of this input area is white and the text color is black. A shadow has been used around the box to create a beautiful banner that will further highlight this Word Counter in JavaScript on the webpage.

1. Basic structure of Word Counter

The basic structure of this word counter has been created using the following code. The background color of the webpage is blue.

<div class=”wrapper”>
</div>
* {
 padding: 0;
 margin: 0;
 box-sizing: border-box;
 font-family: “Poppins”, sans-serif;
}
body {
 background-color: #8bc1f7;
}
.wrapper {
 position: absolute;
 width: 75vmin;
 transform: translate(-50%, -50%);
 top: 50%;
 left: 50%;
}
Basic structure of Word Counter

2. Word Counter Result Box (more…)

Continue ReadingHow to Create a Word Counter in JavaScript (Free Code)

Random Quote Generator using JavaScript & CSS

Random Quote Generator using JavaScript

Javascript Random Quote Generator will basically help you to create a random quote using an API link. You can easily create this kind of simple Quote Generator if you know the basics of HTML, CSS, and javascript.

In this tutorial, I have shown how to create Random Quote Generator using JavaScript. Quote Generator can be made in two ways. In the first case, you will collect all the information from any other third-party source using an API link. Then you can show it in the place of your choice.

You can also manually add all the quota information here. Here I have used the API link. To make this Quote Generator Javascript you must have a basic idea about HTML, CSS, and JavaScript. If you are looking for Premium WordPress Host then you can use JustWP.

Javascript Random Quote Generator

Below I have given a demo that will help you to know how this Random Quote Generator HTML works. If you only want the source code, you can use the download button below the article.

See the Pen
Untitled
by Foolish Developer (@foolishdevweb)
on CodePen.

First I created a heading on a webpage with a blue background. Then I made a box with a display. Quote, and author’s name can be seen in that display. In the end, there is a button that will generate a different quote every time you click on it.

As I said before, all these quotes are not added manually. It has been collected and brought to other websites using API links.

First I added all the information using HTML and CSS and did the design work. Then I implemented Random Quote Generator using JavaScript.

How to Make a Random Quote Generator Javascript

Here I have used API links on a website. If you want you can use the API link on the website of your choice. There are many websites on the internet that provide such API links.

Below I have shared the complete step-by-step tutorial on how to create Javascript Random Quote Generator. I have shown the possible result of each step with a picture. Which will help you understand what kind of changes may occur after using any code.

Step 1: Design the webpage

I have created the basic structure of this Random Quote Generator using the following codes. Here the background color of the webpage is blue.

<div class=”wrapper”>
</div>
* {
 padding: 0;
 margin: 0;
 box-sizing: border-box;
 font-family: “Poppins”, sans-serif;
}
body {
 background-color: #aed7eb;
}
.wrapper {
 width: 400px;
 position: absolute;
 transform: translate(-50%, -50%);
 top: 50%;
 left: 50%;
}
Design the webpage

Step 2: Add a heading (more…)

Continue ReadingRandom Quote Generator using JavaScript & CSS

How to Create JavaScript Password Generator (Free Code)

How to Create JavaScript Password Generator

If you are a beginner and want to create a JavaScript Password Generator then this tutorial is for you. Here I have shown step-by-step and shared complete information on how to create a password generator using JavaScript

JavaScript Password Generator will help you create the password of your choice. Earlier I showed you how to create JavaScript Random Password Generator. However, this design will give you the option to create a password manually.

This simple password generator will help you create the password you want. There are different options and controls. This will allow you to create the password you need.

JavaScript Password Generator

You need JavaScript enabled to view it to make it. Here I have used HTML CSS and some amount of JavaScript.

See the Pen
Untitled
by Foolish Developer (@foolishdevweb)
on CodePen.

First, a box was created on the webpage. In that box, I first created a display where the generated passwords can be seen. 

Then an input box is created where you can control the width of the password. This means that the number of characters you want to create the password can be controlled by this slider.

Then there are the four smaller boxes. This select box created by the checkbox will help you to further customize your password. There is a button at the end of which clicks on which the password is generated and can be seen in the display.

How to create Password Generator using JavaScript

If you want to create this Password Generator JavaScript then you must have a basic idea about HTML, CSS, and javascript. 

But if you just want the source code then follow the part below the article. But if you are a beginner then follow the tutorial below.

This JavaScript Password Generator has a copy button. When you click on the Generate button, the password will be copied automatically.

1. Make a box on the webpage

I first created an area using the following HTML and CSS codes. In this area, you can see all the information of Password Generator with JavaScript.

<div id=”password-generator”>
</div>

The webpage has been designed using the following code. Here the background color of the webpage is blue.

* {
  box-sizing: border-box;
  font-family: sans-serif;
}
body {
  overflow: hidden;
  margin: 0;
  padding: 0;
  display: flex;
  align-items: center;
  text-align: center;
  height: 100vh;
  background: #0976d5;
}
webpage has been designed

I have used the background color of this box as white and width: 500px. Box shadows have been used to enhance beauty.

#password-generator {
  padding: 2rem;
  margin: 0 auto;
  width: 500px;
  border-radius: 3px;
  box-shadow: 0 0 2px #1f1f1f;
  border: 3px solid #d5d4ff;
  position: relative;
  background: white;
  white-space: nowrap;
}
Make a box on the webpage

2. Create a password viewing display (more…)

Continue ReadingHow to Create JavaScript Password Generator (Free Code)

Number Guessing Game Using JavaScript (Free Code)

Number Guessing Game Using JavaScript

JavaScript Number Guessing Game is a simple JavaScript game for beginners. I have shared many more types of JavaScript game tutorials with you before. However, this design is quite simple. 

This Number Guessing Game JavaScript will basically help you to know how to create JavaScript games. The number guessing game project will help you understand how accurate your input number is. That means there is a number limit here. 

You have to guess any one of those numbers. If your guess number is equal to the number guessed by the game then you will win.

The javascript guessing game is a simple project that will help you to learn more about javascript. If you want to make a JavaScript game for the first time then you can try to make this Number Guessing Game in JavaScript.

Number Guessing Game JavaScript

Below is a demo that will help you get a preview of this number guessing game HTML. Here I have shared step-by-step tutorials and source code. Use the button below the article if you want to download the source code.

See the Pen
Untitled
by Foolish Developer (@foolishdevweb)
on CodePen.

Has created a box on a web page as you can see above. In which a heading is used first then an input space. You will input the number you guessed in that input space.

Then there is a button that will submit the number you guessed. Then there is a display where you can see the results of this game. Below all is a heading that will help you to know if your input number is correct.

I did not use very complex JavaScript to create this Number Guessing Game JavaScript. If you know something about javascript then you can easily create this number guessing game HTML.

How To Make Number Guessing Game JavaScript

Hopefully watching the demo above has aroused your interest in making this project. To build it you must have a basic idea of ​​HTML CSS JavaScript

But if you are a beginner, there is no reason to worry. Here I have shared step-by-step tutorials and shown possible results with pictures after each step.

Step 1: Basic structure of Guessing Game

A basic structure of this project has been created using the following HTML and CSS codes. Basically, I made a box on the web page. 

Here we have used blue as the background color of the webpage and white as the background color of the box. Box min-width: 350px, max-width: 400px used.

<div class=”container”>
</div>
*,
*:before,
*:after{
  padding: 0;
  margin: 0;
  box-sizing: border-box;
}
body{
  height: 100vh;
  background: rgb(23, 99, 196);
}
.container{
  position: absolute;
  width: 50%;
  min-width: 350px;
  max-width: 400px;
  transform: translate(-50%,-50%);
  top: 50%;
  left: 50%;
  background-color: #ffffff;
  padding: 50px 10px;
  border-radius: 5px;
  display: grid;
  justify-items: center;
  font-family: ‘Poppins’,sans-serif;
}
Basic structure of Guessing Game

Step 2: Add a heading in the box (more…)

Continue ReadingNumber Guessing Game Using JavaScript (Free Code)

Days Between Two Dates Using JavaScript & CSS

Days Between Two Dates Using JavaScript

In this tutorial, you will learn how to create Days Between Two Dates JavaScript. This type of project helps to calculate the distance between two specific dates. A lot of times we have to find the data between two dates in a list. In that case, this project (get days between two dates javascript) will help you completely.

If you want you can calculate your age using this calculator. Although I have already shared many types of JavaScript age calculator tutorials for calculating age. 

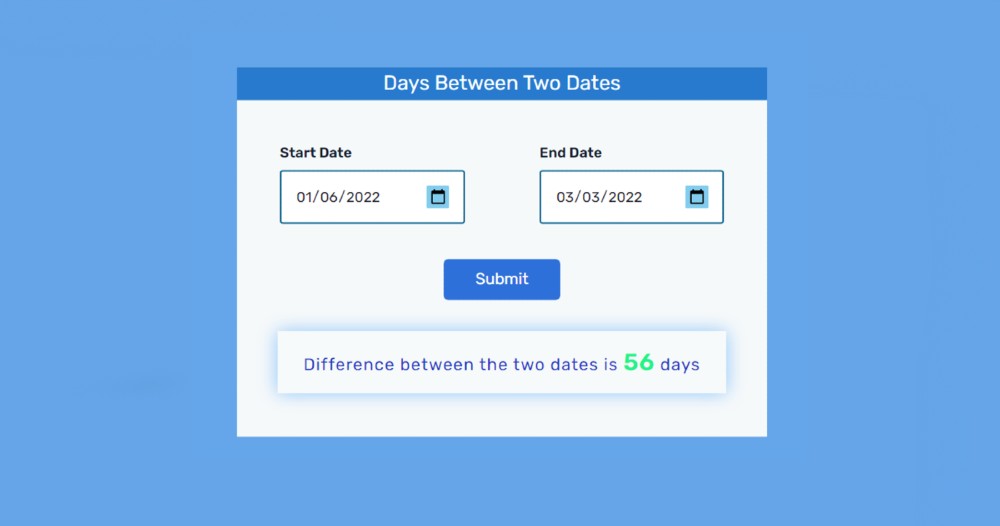
The calculated time here can only be seen in the form of days. That is, the number of days between the two dates can be seen here. You will not see any other type of time (hours, minutes, seconds) here.

Days Between Two Dates JavaScript

Below I have given a preview that will help you to know how this project (calculate days between two dates) works. Below you will find all the source codes. But for beginners, I have shared step-by-step tutorials. 

If you are a beginner then follow the tutorial below to make Days Between Two Dates calculator.

See the Pen
Untitled
by Foolish Developer (@foolishdevweb)
on CodePen.

As you can see above, the background color of a web page is blue. And a box has been made on it. I first used a heading in this box. The background color of this heading is blue and the text color is white. Then there are the two input boxes. 

Those input boxes are mainly for date input (type = “date”). The difference between the two dates will be calculated. We get many types of input functions in HTML. Notable among them are password (type = “password”), text (type = “text”), file (type = “file”), color (type = “color”), etc. 

A type of input with the same date is available. Which will basically help to select a date. Here you can select the date or manually input the date of your choice here.

How to get data between two dates in javascript

Then there is a button that can be clicked to know the difference between these two dates. At the end of all, there is a display in which the results can be seen. This means that when you click on the submit button, you can see the difference between the two dates in the display or box below.

I used only HTML, CSS, and JavaScript to create this Days Between Two Dates project. No jQuery was used here and I gave the necessary explanations for each line.

Step 1: Basic structure of calculator

I have created the basic structure of this project using the following HTML and CSS. The width of this project: 70vw and light blue color has been used in the background.

<div class=”container”>
</div>
* {
padding: 0;
margin: 0;
box-sizing: border-box;
font-family: “Rubik”, sans-serif;
}
body {
height: 100vh;
background: rgb(94, 169, 233);
}
.container {
width: 70vw;
max-width: 37.5em;
background-color: #f6f9fa;
padding: 3em 1em;
position: absolute;
transform: translate(-50%, -50%);
top: 50%;
left: 50%;
}
Basic structure of calculator

Step 2: Title of Days Between Two Dates calculator

Now I have added a heading using the following codes. This heading will only help to enhance the beauty. Using margins I determined the position of the heading. The background color is blue and the text color is white.

<div class=”heading”>Days Between Two Dates</div>
.heading{
background: rgb(18, 128, 207);
color: white;
margin: -48px -16px 50px -16px;
font-size: 23px;
padding: 5px;
text-align: center;
}
Title of Days Between Two Dates calculator

Step 3: Create two date input spaces (more…)

Continue ReadingDays Between Two Dates Using JavaScript & CSS

Simple Character Counter using JavaScript & CSS

Simple Character Counter using JavaScript

In this article, you will learn how to create a Character Counter using JavaScript. Earlier I shared with you tutorials on different types of JavaScript word counters, limit character input, etc. 

Here you will learn how to make simple character count javascript. The character counter basically helps to count how many characters are in an input box. You can use it to count every character and space in the input box.

The counted numbers can be seen in a small display. If you want you can put a limit in that input box. Earlier I shared a tutorial that has a limit on character input.

Character Count JavaScript

Below I have given a preview that will help you to know how this character count javascript works. If you only want the source code, use the button below the article.

See the Pen
Untitled
by Foolish Developer (@foolishdevweb)
on CodePen.

A box has been created on a web page as you saw above. The background color of this box is white. First of all, a heading has been used in the box which is basically to enhance the beauty. 

Then the character input space is created using textarea. Below all is a small box in which the amount of character can be seen. When you input something into the input box, the amount of that input will count. 

Create Character Counter using JavaScript

This project (Character Counter using JavaScript) is very easy to create if you have an idea about HTML CSS and JavaScript. Here is a step-by-step tutorial for beginners with pictures of possible results after each step.

Step 1: Basic structure of Character Counter

The basic structure of this character count javascript has been created using the following HTML and CSS codes. All the information can be found in this basic structure.

<div class=”container”>
 
</div>

I designed the web page using the following codes. Here I have used blue as the background color of the webpage. 

* {
  box-sizing: border-box;
  margin: 0;
  padding: 0;
}
body {
  display: flex;
  align-items: center;
  justify-content: center;
  min-height: 100vh;
  background-color:  #1193bd;
  font-family: ‘Roboto’, sans-serif;
}

Character counter width: 500px and height will depend on the amount of content. I used white as the background color and box-shadow to make it more attractive.

.container {
  width: 500px;
  padding: 40px;
  background-color: white;
  display: flex;
  flex-direction: column;
  box-shadow: 0 5px 15px rgba(0, 0, 0, 0.1);
  border-radius: 5px;
}
Basic structure of Character Counter

Step 2: Add a heading (more…)

Continue ReadingSimple Character Counter using JavaScript & CSS

How to Make a Simple Tip Calculator in JavaScript

How to Make a Simple Tip Calculator in JavaScript

Simple Tip Calculator is a great JavaScript project for beginners. If you know Basic JavaScript then of course this type of Javascript Tip Calculator is important enough for you. Tip Calculator is basically an application that will help to do Tip Calculation. 

For example, you and three of your friends went to eat at a hotel. And there’s a $ 100 bill. You have decided to give a 10% tip of the total bill to the waiter. And three of your friends will pay for that tip. In such a situation, there is no alternative to this type of project to calculate how much amount or how many dollars each person has to pay.

If you want to do this manually you have to work a lot harder. Since programming is to make our daily necessary work easier. So this kind of project will make your calculation much easier. Here you will only input information and it will automatically show the result.

Simple Tip Calculator in JavaScript

So if you are a beginner then you should definitely try this type of project. Here you will find complete source code and tutorial on how to create a Simple Tip Calculator using JavaScript. But yes, you need to have some basic idea about JavaScript. This is because some amount of JavaScript has been used to make this project work. 

However, I have done a complete step-by-step explanation. Even if you don’t know JavaScript, you can understand it. If you want the source code, you can use the download button below the article.

See the Pen
Untitled
by Foolish Developer (@foolishdevweb)
on CodePen.

Hopefully, the demo above has helped you to know the live preview of the project (Tip Calculator in JavaScript). But if you can copy the source code from the demo section. 

Related Post:

1. Loan Calculator using JavaScript 

2. Show and Hide Password Using jQuery

3. Save Text to a File using JavaScript

4. Simple Weather App using JavaScript

5. BMI Calculator using Javascript

6. Simple Stopwatch using JavaScript 

I would request you to follow the tutorial below. Because here you will know in full step by step how I made it. First, the background color of the webpage is blue. Then I made a box. At the beginning of this box, I used a heading which is basically to enhance the beauty of this project.

How to Make a Simple Tip Calculator in JavaScript

I created two input areas. In the first input box to input the amount of the bill and in the second input box to input the information of how many people will give this tip.

Then I created a range slider for the percentage of the tip. This means that you can determine what percentage of the total amount you want to give as a tip here. Below all there is a display in which the results can be seen. That is, after inputting the above information, the result of that calculation can be seen in the display below.

Step 1: Basic structure of Tip Calculator

We have created the basic structure of Simple Tip Calculator using the following HTML and CSS code. I have created a box here to tell the basic structure in which all the information can be found. 

First I used the background color blue of the webpage and then I created this box. I used background color white and width: 80% and max-width: 350px.

<div id=”tip-calculator”>
</div>
*,
*:before,
*:after {
margin: 0;
padding: 0;
box-sizing: border-box;
}
html {
font-size: 100%;
}
body {
width: 100%;
height: 100vh;
overflow: hidden;
display: grid;
place-items: center;
background: rgb(12, 141, 195);
font-family: “Lato”, sans-serif;
font-weight: 400;
line-height: 1.75;
}
#tip-calculator {
width: 80%;
max-width: 350px;
padding: 1rem;
background: white;
border-radius: 0.3rem;
}
Basic structure of Tip Calculator

Step 2: Add a heading using HTML (more…)

Continue ReadingHow to Make a Simple Tip Calculator in JavaScript