Image Magnifier plays an important role in any website. Image Magnifier JavaScript can be used to zoom an image.
Most developers use jquery to create image magnifier glasses. In this tutorial, I will show you how to make an image magnifier using HTML CSS, and JavaScript.
Earlier I created another image zoom effect using JavaScript. However, if you want to zoom the image with the help of a magnifier glass, then this design is for you.
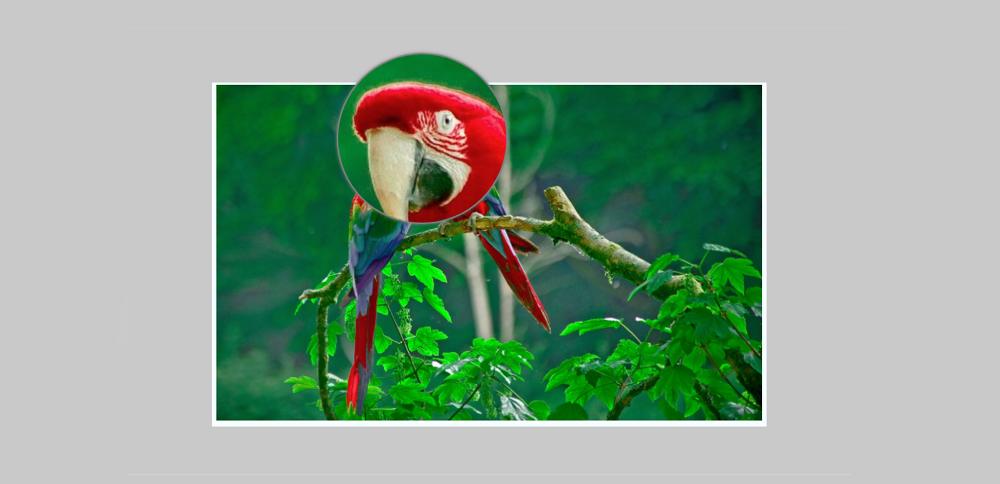
Here you can see a magnifier glass and the image can be zoomed in. In the case of different types of e-commerce sites or online service websites, this type of JavaScript image magnifier zoom is used to better zoom the image of the product.
Image Magnifier HTML CSS JavaScript
You will find many types of tutorials on the internet to create this design. But here I will show you how to make it easy and how to implement it in your project. With this, I will provide you complete source code.
Here you will find a live demo and step-by-step tutorial on how to make a simple JavaScript image magnifier glass. So this is a complete tutorial where you can learn how to make an image magnifier using HTML, CSS, and javascript.
See the Pen
image zoom by Foolish Developer (@fghty)
on CodePen.
Now if you want to create this magnify image on hover using JavaScript then follow the tutorial below. Of course, if you want, you can download it using the download button above the source code.
Step 1:
The basic structure of the Image Magnifier
Using the following HTML and CSS codes, a box was first created on the web page for this image magnifier HTML. You can see the image in this box. Here the width of the box: 650px, height: 400px has been used. It is surrounded by a 5px border.
<div class=”container”>
</div>
body,
html {
height: 100%;
width: 100%;
display: flex;
justify-content: center;
align-items: center;
overflow: hidden;
position: relative;
min-width: 700px;
background: rgb(202, 201, 201);
}
.container {
width: 650px;
height: 400px;
background: #fff;
display: flex;
align-items: center;
justify-content: center;
border: 5px solid rgb(244, 254, 255);
}
Step 2:
Add the image to the magnifier glass
Now an image has been added to this Simple Image Magnifier project. Here you can use the image of your choice.
<div id=”zoom”>
<img src=”https://i.pinimg.com/originals/6b/6b/69/6b6b69d024e696f8d928532edeeb676d.jpg” alt=””>
</div>
#zoom img{
width: 650px;
height: 400px;
}
Step 3:
Design magnifier lens by CSS
Now Magnifier glass has been created in which the image can be seen by zooming. I will add this element by JavaScript. Now I am just designing.
#lens {
position: absolute;
border: 2px solid grey;
border-radius: 50%;
overflow: hidden;
cursor: none;
box-shadow: inset 0 0 10px 2px grey;
filter: drop-shadow(0 0 2px grey);
}
#lens > * {
cursor: none;
}
Step 4:
Activate Image Magnifier using JavaScript
This CSS image magnifier glass needs some amount of JavaScript to work. No jQuery or external library was used. So if you know basic JavaScript you can build it.
//lensSize => width and height
const lensSize = 200;
function magnify(id, zoom){
const el = document.getElementById(id);
//cloneNode() method creates a copy of a node, and returns the clone
const copy = el.cloneNode(true);
//createElement() method creates the HTML element specified by tagName
const lens = document.createElement(“div”);
//setAttribute() Sets the value of an attribute on the specified element
lens.setAttribute(“id”,”lens”)
lens.style.width = lensSize + “px”;
lens.style.height = lensSize + “px”;
//appendChild() method is used to insert a new node
el.appendChild(lens);
//getBoundingClientRect() method returns the size of an element and its position
el.getBoundingClientRect();
copy.style.zoom = zoom;
lens.appendChild(copy);
copy.style.width = (el.offsetWidth * zoom) + “px”;
copy.style.heigth = (el.offsetHeight * zoom) + “px”;
copy.style.position = “absolute”;
//MouseMove is executed when a pointer is moving over an element
el.addEventListener(“mousemove”, (ev) => {
//preventDefault() method stops the default action of a selected element
ev.preventDefault();
ev.stopPropagation();
const pos = getCursorPos(ev);
lens.style.left = – (lensSize/2) + pos.x + “px”;
lens.style.top = – (lensSize/2) + pos.y + “px”;
copy.style.left = – (pos.x – el.offsetLeft) + (lensSize/zoom)*0.5 + “px”;
copy.style.top = – (pos.y – el.offsetTop) + (lensSize/zoom)*0.5 + “px”;
})
}
function getCursorPos(e) {
var x = (window.Event) ? e.pageX : event.clientX + (document.documentElement.scrollLeft ? document.documentElement.scrollLeft : document.body.scrollLeft);
var y = (window.Event) ? e.pageY : event.clientY + (document.documentElement.scrollTop ? document.documentElement.scrollTop : document.body.scrollTop);
return {x : x , y : y};
}
//zoom value
magnify(“zoom”, 4)

JavaScript image magnifier glass plays a very important role in any website. If you need to zoom any image in your project then you can use this type of image magnifier javascript.