Introduction
Welcome Back to another Amazing Tutorial. Today we’ll implement OTP Field using HTML, CSS, and JavaScript most efficiently. You must have seen the OTP Feature in many forms you’ve filled. That OTP Field makes forms more interesting and interactive. So Are you excited to build an OTP Field in your next Project? Let’s get started…..
Demo Of OTP Field
What is an OTP?
Before we start implementation you must have a question in your mind what is an OTP? How to implement OTP Field using HTML and CSS?, How to use JavaScript in implementing OTP Features? . By the end of the article, you’ll be able to find out the answer to every question.
Read Also:- 30+ HTML CSS and Javascript Projects
OTP stands for One Time Verification. It is the second step for two-factor authentication for any online transaction after you have entered your login and password credentials. If You’re building any form in your project you must need to implement this feature for better security and user experience.
HTML Code Part for OTP Input Field
<section>
  <div class="title">OTP</div>
  <svg width="250" height="200" viewBox="0 0 292 208" fill="none" xmlns="http://www.w3.org/2000/svg">
    <g clip-path="url(#clip0_1_45)">
      <path d="M152.106 208C201.536 208 241.606 167.93 241.606 118.5C241.606 69.0706 201.536 29 152.106 29C102.676 29 62.6058 69.0706 62.6058 118.5C62.6058 167.93 102.676 208 152.106 208Z" fill="#C5FFFF" />
      <path d="M117.144 64.4241C113.81 64.4241 111.108 67.1261 111.108 70.46V167.057C111.108 170.391 113.81 173.093 117.144 173.093H186.572C189.906 173.093 192.608 170.391 192.608 167.057V92.382L163.507 64.4241H117.144Z" fill="#91E4FF" />
      <path d="M192.608 92.382H169.544C166.21 92.382 163.508 89.68 163.508 86.3461V64.4241L192.608 92.382Z" fill="#0CB4EA" />
      <path d="M162.304 131.646C162.304 135.494 159.185 138.613 155.339 138.613H104.483C100.635 138.613 97.5186 135.494 97.5186 131.646V110.363C97.5186 106.515 100.635 103.397 104.483 103.397H155.339C159.185 103.397 162.304 106.515 162.304 110.363V131.646Z" fill="#0CB4EA" />
      <path d="M117.094 114.409C118.563 114.409 119.825 114.707 120.876 115.302C121.93 115.897 122.728 116.745 123.267 117.843C123.807 118.941 124.079 120.23 124.079 121.712C124.079 122.808 123.932 123.803 123.635 124.697C123.338 125.592 122.894 126.369 122.302 127.025C121.71 127.681 120.981 128.184 120.119 128.532C119.257 128.879 118.266 129.053 117.153 129.053C116.044 129.053 115.054 128.875 114.178 128.518C113.302 128.16 112.571 127.657 111.985 127.005C111.398 126.354 110.956 125.572 110.656 124.658C110.358 123.744 110.208 122.755 110.208 121.692C110.208 120.604 110.364 119.604 110.676 118.697C110.99 117.788 111.442 117.017 112.034 116.378C112.627 115.739 113.349 115.253 114.198 114.914C115.047 114.574 116.012 114.409 117.094 114.409ZM121.17 121.692C121.17 120.655 121.003 119.756 120.669 118.997C120.334 118.238 119.856 117.663 119.233 117.273C118.612 116.883 117.899 116.688 117.093 116.688C116.521 116.688 115.991 116.795 115.504 117.012C115.017 117.228 114.599 117.542 114.247 117.954C113.897 118.367 113.621 118.893 113.416 119.534C113.214 120.176 113.113 120.895 113.113 121.694C113.113 122.499 113.214 123.226 113.416 123.877C113.621 124.527 113.907 125.067 114.277 125.495C114.647 125.923 115.073 126.244 115.552 126.456C116.031 126.668 116.558 126.775 117.131 126.775C117.866 126.775 118.54 126.592 119.154 126.224C119.77 125.857 120.259 125.29 120.623 124.524C120.988 123.757 121.17 122.813 121.17 121.692Z" fill="white" />
      <path d="M134.976 117.018H131.846V127.306C131.846 127.898 131.713 128.338 131.45 128.625C131.187 128.912 130.844 129.054 130.425 129.054C130 129.054 129.654 128.909 129.388 128.619C129.121 128.33 128.987 127.892 128.987 127.305V117.017H125.856C125.366 117.017 125.003 116.909 124.765 116.693C124.528 116.477 124.408 116.192 124.408 115.838C124.408 115.47 124.532 115.181 124.779 114.969C125.028 114.757 125.387 114.649 125.858 114.649H134.977C135.473 114.649 135.842 114.76 136.082 114.977C136.326 115.196 136.446 115.483 136.446 115.836C136.446 116.189 136.323 116.475 136.078 116.691C135.834 116.907 135.466 117.018 134.976 117.018Z" fill="white" />
      <path d="M143.642 123.297H141.015V127.306C141.015 127.879 140.879 128.313 140.609 128.61C140.339 128.907 139.997 129.054 139.584 129.054C139.152 129.054 138.804 128.907 138.542 128.614C138.279 128.322 138.146 127.891 138.146 127.324V116.409C138.146 115.777 138.291 115.326 138.581 115.056C138.871 114.786 139.331 114.65 139.963 114.65H143.643C144.733 114.65 145.568 114.734 146.154 114.902C146.734 115.063 147.235 115.33 147.657 115.703C148.079 116.077 148.399 116.534 148.619 117.076C148.84 117.617 148.947 118.224 148.947 118.901C148.947 120.344 148.503 121.437 147.615 122.182C146.726 122.926 145.4 123.297 143.642 123.297ZM142.945 116.804H141.014V121.133H142.945C143.622 121.133 144.188 121.062 144.64 120.921C145.095 120.78 145.44 120.548 145.678 120.226C145.917 119.904 146.036 119.483 146.036 118.959C146.036 118.335 145.853 117.826 145.485 117.433C145.074 117.013 144.228 116.804 142.945 116.804Z" fill="white" />
      <rect x="233.582" y="79" width="10" height="10" rx="1" transform="rotate(27.2727 233.582 79)" fill="#91A3FF" />
      <circle cx="74" cy="139" r="5" fill="#FF91B9" />
      <circle cx="79" cy="43" r="5" fill="#91E5FF" />
      <circle cx="188" cy="203" r="5" fill="#FF9191" />
    </g>
    <circle cx="220" cy="15" r="5" fill="#FFC691" />
    <circle cx="119.606" cy="5" r="5" fill="#91FFAF" />
    <rect x="250.606" y="163" width="10" height="10" rx="1" fill="#E991FF" />
    <rect x="274" y="47.0925" width="10" height="10" rx="1" transform="rotate(-24.1576 274 47.0925)" fill="#FF9191" />
    <rect y="68.5666" width="10" height="10" rx="1" transform="rotate(-27.1716 0 68.5666)" fill="#91A3FF" />
    <path d="M33.0121 175.265L40.7499 180.821L32.0689 184.744L33.0121 175.265Z" fill="#FF9191" />
    <path d="M15.077 128.971L16.567 138.38L7.67356 134.966L15.077 128.971Z" fill="#FD91FF" />
    <path d="M286.447 120.204L287.505 129.672L278.777 125.854L286.447 120.204Z" fill="#FF91BF" />
    <defs>
      <clipPath id="clip0_1_45">
        <rect width="179" height="179" fill="white" transform="translate(62.6058 29)" />
      </clipPath>
    </defs>
  </svg>
  <div class="title">Verification Code</div>
  <p>We have sent a verification code
    to your mobile number</p>
  <div id='inputs'>
    <input id='input1' type='text' maxLength="1" />
    <input id='input2' type='text' maxLength="1" />
    <input id='input3' type='text' maxLength="1" />
    <input id='input4' type='text' maxLength="1" />
  </div>
  <button>Submit</button>
</section>
Let’s break down the HTML code key components:
- Verification Code Section: The HTML structure is wrapped inside an
<section>element. Created another<div>with the class “title” following the SVG, possibly serving as a subheading Verification Code. - SVG Clipping: The SVG graphics are clipped using a
<clipPath>element with the given id “clip0_1_45.” The clipping is applied to a white rectangle with a specific width and height, and that is translated to a certain fixed position.
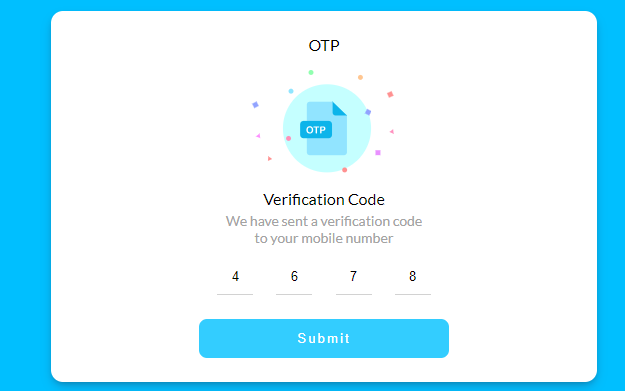
This HTML Code will create a visual representation of a mobile number verification section with an OTP input form. Let’s Add some style Parts in the next section.
HTML Code Output for OTP Field

CSS Code for OTP Field
Create a Separate file and paste the following code:
@import url("https://fonts.googleapis.com/css2?family=Lato:wght@100;300;400;700&display=swap");

html {
  background-color: deepskyblue;
  display: flex;
  justify-content: center;
  align-items: center;
  height: 100vh;
  text-align: center;
  font-family: "Lato", sans-serif;
}

section {
  display: flex;
  align-items: center;
  flex-direction: column;
  justify-content: space-around;
  width: 40vw;
  min-width: 350px;
  height: 80vh;
  background-color: white;
  border-radius: 12px;
  box-shadow: rgba(50, 50, 93, 0.25) 0px 6px 12px -2px,
    rgba(0, 0, 0, 0.3) 0px 3px 7px -3px;
  padding: 24px 0px;
}
svg {
  margin: 16px 0;
}
title {
  font-size: 20px;
  font-weight: bold;
}

p {
  color: #a3a3a3;
  font-size: 14px;
  width: 200px;
  margin-top: 4px;
}
input {
  width: 32px;
  height: 32px;
  text-align: center;
  border: none;
  border-bottom: 1.5px solid #d2d2d2;
  margin: 0 10px;
}

input:focus {
  border-bottom: 1.5px solid deepskyblue;
  outline: none;
}

button {
  width: 250px;
  letter-spacing: 2px;
  margin-top: 24px;
  padding: 12px 16px;
  border-radius: 8px;
  border: none;
  background-color: #33cdff;
  color: white;
  cursor: pointer;
}
Let’s Break down the CSS Code of the OTP input field and understand the key points:-
- Styling for Submit Button: Padding is added to the top and bottom and the button has a fixed width of 250px. Rest basic CSS styling has been used. For Further use, you can add an OnClick JavaScript Function on the button.
- Styling for Input Fields: For styling the input I’ve used two selector
input:focus and input. Inputs have a fixed width and height of 32px. When an input is focused, the bottom border changes to deep sky blue, and the default outline is removed. - Styling for Title: I’ve given the title to 20px font size and Font weight is set to bold.
The above styles property collectively creates a centered and visually appealing form with a specific color scheme, typography, and spacing that will increase user’s experience in your form.
CSS Code output
You’ll see output just similar to the below image after adding CSS:

JavaScript Code for OTP input Field
const inputs = ["input1", "input2", "input3", "input4"];

inputs.map((id) => {
  const input = document.getElementById(id);
  addListener(input);
});

function addListener(input) {
  input.addEventListener("keyup", () => {
    const code = parseInt(input.value);
    if (code >= 0 && code <= 9) {
      const n = input.nextElementSibling;
      if (n) n.focus();
    } else {
      input.value = "";
    }

    const key = event.key; // const {key} = event; ES6+
    if (key === "Backspace" || key === "Delete") {
      const prev = input.previousElementSibling;
      if (prev) prev.focus();
    }
  });
}
Let’s Breakdown and Understand the Key Components:-
- An array named
inputsis declared, containing the IDs of four input fields. - We’ve used an Event Listener property in JavaSript,
mapfunction that is used to iterate over each element (input ID) in theinputsarray. - For every input ID, It’ll retrieves the corresponding DOM element using
document.getElementById. - The
addListenerfunction is defined to add an event listener to an input element. This will be triggered on the `keyup` Event which occurs when the key is released. - Handling Backspace and Delete Keys:
if (key === "Backspace" || key === "Delete")This code checks if the pressed key is either the “Backspace” or “Delete” key. If so, it focuses on the previous input field usingpreviousElementSibling. You can learn more about Event Listener in JavaScript further from MDN Docs, the link I’ve provided below in the resources section.
That’s all for today, I hope you’ve learned some interesting things and you’ll use this in your next project for sure. If you’ve any queries or questions related to the above article you can drop comment below. I’ve attached the reference of the code below.
Resources
Credit :- Mohit Sharma
HAPPY CODING!


