In this article, I have shown how Image Comparison Slider is created using HTML, CSS, and JavaScript. Earlier I shared with you how to create different types of image galleries and sliders.
Image Comparison Slider basically helps to differentiate between two images or products. As a result, the user can easily understand which of the two products is better.

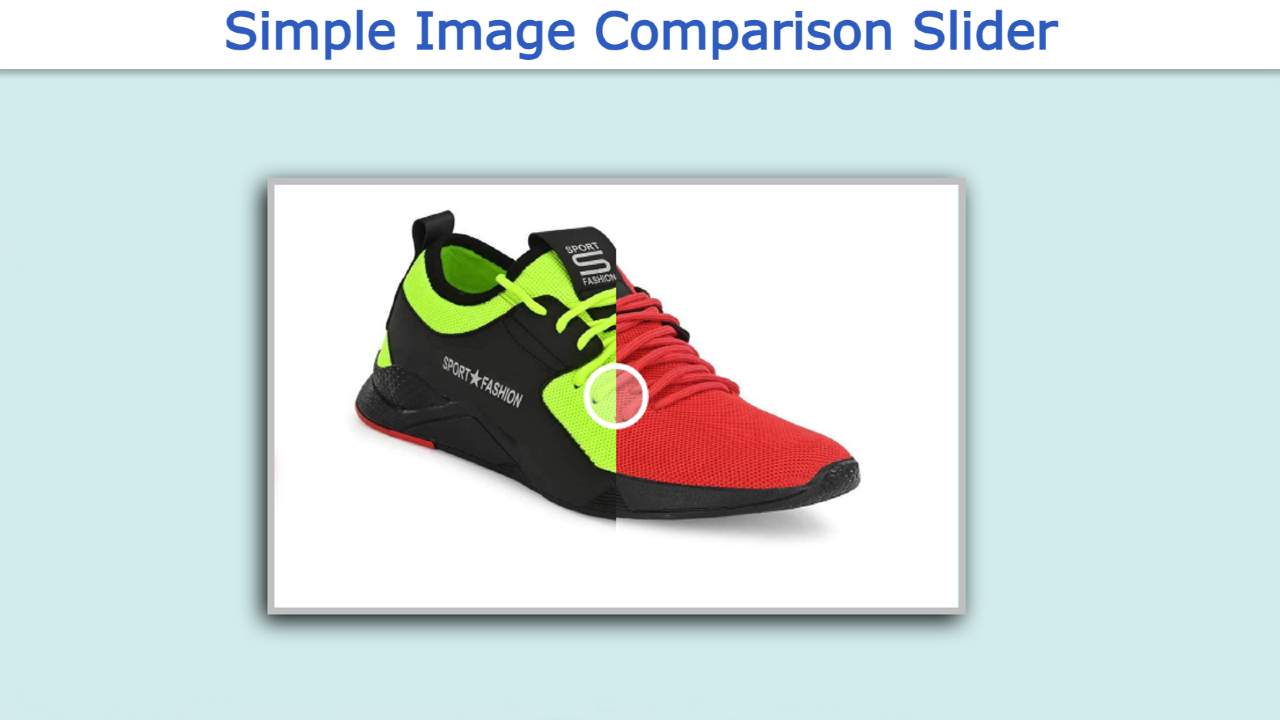
As you can see in the image above it is a beautiful one image comparison slider in HTML and CSS. The popularity of this type of design is slowly increasing.
This type of design is widely used in various industries such as e-commerce sites or product review sites. Here you can easily tell the difference between the two types of products or images.
The most important point of this slider is that the images can be made as big and small as needed. Below I have given a live demo of this design.
See the Pen
Awesome Image Comparison Slider by Foolish Developer (@fghty)
on CodePen.
Below the article is the required source code. If you want to download the source code, you can use the download button at the bottom of the article.
Simple Image Comparison Slider with Javascript
In the following tutorial, I have shown you how to create a beautiful image comparison slider using JavaScript. Let me tell you something about this design before sharing the tutorial.
First I designed that page. Then I made a beautiful box. That box is the basic structure of the slider where I used two images. There is a border in the middle of these two images and there is a control button.
I designed the whole slider with the help of HTML and CSS. Here we have used some amount of JavaScript to implement Comparison.
Step 1: Design the web page
I have used the following CSS codes to design the webpage. Here background-color I have used light blue and height 100vh has been used.

Step 2: Create the basic structure of the Image Comparison Slider
The following HTML and CSS codes are used to create most of the structure of the Image Comparison Slider. Here I have used the slider height 62.5vmin and width 100vmin. A border of 5 pixels and a box of shadows have been used to enhance the beauty.

Step 3: Add the first image in the slider
Now I have added the image first. Its length and height are kept equal with the slider.

Step 4: Add a second image in the Comparison slider
I have used the second image using the following codes. I have used a clip-path so that half of the second image can be seen here. If you do not know the basic concept of clip-path: polygon, then follow the image below.


Step 5: Create a range control button
Now I have created a control button that will control the range of this slider. Here the minimum value I gave is zero and the maximum is 100. Here value 50 is used which means by default it will be in the middle of the slider.

Step 6: Activate the Image Comparison Slider with JavaScript
I have implemented this Image Comparison Slider using the following JavaScript. First I set a constant of the id of the control button.
Below I have given a picture to better understand the structure of JavaScript.


Hopefully, you have learned from the above tutorial how I made this Image Comparison Slider using HTML CSS, and JavaScript. If you have any problems, you can definitely let me know by commenting.