Do you want to create Image Color Picker using JavaScript? If yes then this article will help you completely to create Color Picker using HTML CSS and JavaScript.
I used html to create the basic structure of this Image Color Picker. Designed using sys. Finally I activated this html color picker using javascript.

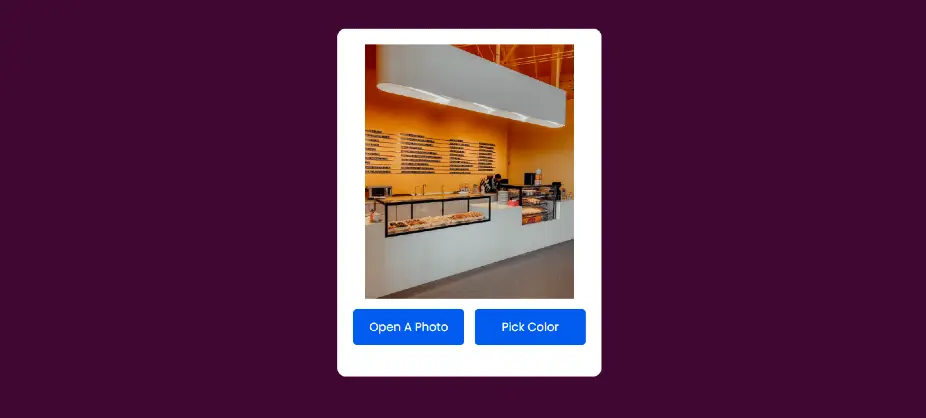
image color picker with JavaScript
Image Color Picker We see in many websites. This is a really great element that will help you get the color code of any color. We see these projects(Create Color Picker From Image Using HTML) mostly in image editing websites.
With this Image Color Picker JavaScript you can select the color in any image and get its color code. You can copy the color of any element, not just the color of the sudu image, with this project(image color picker with JS).
See the Pen Image Color Picker JavaScript by Ground Tutorial (@groundtutorial) on CodePen.
As you can see above to create this Image Color Picker HTML I first created a box on the webpage. Inside that box is the first place to upload an image. After uploading the image, the image can be viewed there. Then there is a Color Picker button. By which you can select the color.
The codes of the selected colors can be seen in an input box below. Not only that, the color you have selected can be seen in the color view box below.
Image Color Picker using HTML CSS & JavaScript
Now if you want to create this Image Color Picker then follow the tutorial below. Here I have shared step by step tutorial and complete source code.
If you just want the source code then you can download the complete source code using the download button below the article.
Step 1: Basic structure of Color Picker
First I created a basic structure on the web page using my own html and css. On the webpage I used background-color: #400734 and white color was used for the background of the box.
					<div class="wrapper">

</div>
					* {
  padding: 0;
  margin: 0;
  box-sizing: border-box;
  font-family: "Poppins", sans-serif;
}
body {
  background-color: #400734;
}
					.wrapper {
  background-color: #ffffff;
  width: 90%;
  max-width: 400px;
  position: absolute;
  transform: translateX(-50%);
  left: 50%;
  top: 0.5em;
  padding: 1.5em;
  border-radius: 0.8em;
}

Step 2: Place to view uploaded images
Now create an image display. In this Image Color Picker you have to decide where the image will be displayed. Here is a default image I have selected.
					      <div class="image-container">
        <img data-lazyloaded="1" src="data:image/gif;base64,R0lGODdhAQABAPAAAMPDwwAAACwAAAAAAQABAAACAkQBADs=" decoding="async" id="image" data-src="demo-image-3.jpg" />
      </div>
					img {
  display: block;
  width: 90%;
  margin: auto;
}

Step 3: Image upload and color picker button
Now we need to create two buttons in this JavaScript Image Color Picker project. A button to select file ie which image i want to upload. Another is to select the color.
I used blue for the background color of the buttons and used padding around them to define some size as well.
					<div class="btns-container">
    <input type="file" id="file" accesskey="image/*" />
    <label for="file">Open A Photo</label>
    <button id="pick-color">Pick Color</button>
</div>
					.btns-container {
  display: grid;
  grid-template-columns: 1fr 1fr;
  gap: 1em;
  margin: 1em 0 1.5em 0;
}
input,
label,
button {
  border: none;
  outline: none;
}
input[type="file"] {
  display: none;
}
label,
button {
  display: block;
  font-size: 1.1em;
  background-color: #025bee;
  color: #ffffff;
  text-align: center;
  padding: 0.8em 0;
  border-radius: 0.3em;
  cursor: pointer;
}
Step 4: Create input boxes to view color codes
Now create two input boxes to view the color codes. Color codes can be seen in this input box. Each input box has a copy button which will help to copy the information contained in that input box.
Here is a small box that will act as a color box. The color you select will appear in this box.
					      <div id="result" class="hide">
        <div>
          <input type="text" id="hex-val-ref" />
          <button onclick="copy('hex-val-ref')">
            <i class="fa-regular fa-copy"></i>
          </button>
        </div>
        <div>
          <input type="text" id="rgb-val-ref" />
          <button onclick="copy('rgb-val-ref')">
            <i class="fa-regular fa-copy"></i>
          </button>
        </div>
        <div id="picked-color-ref"></div>
      </div>
					#result {
  /* display: grid; */
  grid-template-columns: 1fr 1fr;
  grid-gap: 1em;
}
#result div {
  position: relative;
  display: flex;
  align-items: center;
  justify-content: space-between;
}
					#result input {
  background-color: transparent;
  font-size: 1em;
  padding: 0.5em;
  width: 100%;
  color: #313b4c;
  border-bottom: 0.1em solid #021637;
}
#result button {
  position: absolute;
  right: 0.6em;
  background-color: transparent;
  color: #7c8696;
}
#picked-color-ref {
  grid-column: 2;
  grid-row: 1 / 3;
  border: 0.6em solid #d9e8ff;
  border-radius: 0.5em;
}

I designed the alert option here with my own CSS. When you copy the color color code by this Image Color Picker html you will see this alert message below.
					#custom-alert {
  transform: scale(0);
  transition: 0.5s;
  transform-origin: center;
  background-color: #d9e8ff;
  color: #025bee;
  text-align: center;
  padding: 0.5em;
  margin-top: 1.5em;
}
.hide {
  display: none;
}
#error {
  color: #ff725a;
  text-align: center;
}
Step 5: Activate the Image Color Picker with JavaScript
Now it’s time to implement the Image Color Picker with JavaScript. Here I have used a lot of javascript but it is very simple. If you know basic JavaScript then you should have no problem understanding the following code.
					//Create Initial references
let pickColor = document.getElementById("pick-color");
let error = document.getElementById("error");
let fileInput = document.getElementById("file");
let image = document.getElementById("image");
let hexValRef = document.getElementById("hex-val-ref");
let rgbValRef = document.getElementById("rgb-val-ref");
let customAlert = document.getElementById("custom-alert");
let pickedColorRef = document.getElementById("picked-color-ref");
let eyeDropper;

//Function On Window Load
window.onload = () => {
  //Check if the browser supports eyedropper
  if ("EyeDropper" in window) {
    pickColor.classList.remove("hide");
    eyeDropper = new EyeDropper();
  } else {
    error.classList.remove("hide");
    error.innerText = "Your browser doesn't support Eyedropper API";
    pickColor.classList.add("hide");
    return false;
  }
};

//Eyedropper logic
const colorSelector = async () => {
  const color = await eyeDropper
    .open()
    .then((colorValue) => {
      error.classList.add("hide");
      //Get the hex color code
      let hexValue = colorValue.sRGBHex;
      //Convert Hex Value To RGB
      let rgbArr = [];
      for (let i = 1; i < hexValue.length; i += 2) {
        rgbArr.push(parseInt(hexValue[i] + hexValue[i + 1], 16));
        console.log(rgbArr);
      }
      let rgbValue = "rgb(" + rgbArr + ")";
      console.log(hexValue, rgbValue);
      result.style.display = "grid";
      hexValRef.value = hexValue;
      rgbValRef.value = rgbValue;
      pickedColorRef.style.backgroundColor = hexValue;
    })
    .catch((err) => {
      error.classList.remove("hide");
      //If user presses escape to close the eyedropper
      if (err.toString().includes("AbortError")) {
        error.innerText = "";
      } else {
        error.innerText = err;
      }
    });
};

//Button click
pickColor.addEventListener("click", colorSelector);

//Allow user to choose image of their own choice
fileInput.onchange = () => {
  result.style.display = "none";
  //The fileReader object helps to read contents of file stored on computer
  let reader = new FileReader();
  //readAsDataURL reads the content of input file
  reader.readAsDataURL(fileInput.files[0]);
  reader.onload = () => {
    //onload is triggered after file reading operation is successfully completed
    //set src attribute of image to result/input file
    image.setAttribute("src", reader.result);
  };
};

//Function to copy the color code
let copy = (textId) => {
  //Selects the text in the <input> element
  document.getElementById(textId).select();
  //Copies the selected text to clipboard
  document.execCommand("copy");
  //Display Alert
  customAlert.style.transform = "scale(1)";
  setTimeout(() => {
    customAlert.style.transform = "scale(0)";
  }, 2000);
};

Hopefully from the above tutorial you have learned how to create an Image Color Picker using HTML, CSS and JavaScript.
Earlier I shared with you how to create more types of color generators, random background color generators. Comment how you like this JavaScript Image Color Picker project.
If you want to find more color pickers then you can follow this site. Here is a list of many types of JavaScript and jQuery image color pickers.
If you want to create image color picker then this tutorial will be best for you. Here you will find source code step by step tutorial to create color picker.
It is not possible to create color picker by html only. With this you need to use javascript or jquery or a separate cdn. But here I have seen how to create color picker with html, css and javascript.