This is a simple JavaScript tutorial that will teach you how to create a JavaScript Virtual Keyboard. The virtual keyboard is a kind of on-screen input method.
If you’re using the Windows operating system, I’m sure you’ll be using the default virtual keyboard in Windows. This design I made is a bit like that. It is made in such a modern way that you will be amazed.
This virtual keyboard can be used for desktop as well as mobile. In other words, in the case of the touch screen, this on-screen visual interface works beautifully.
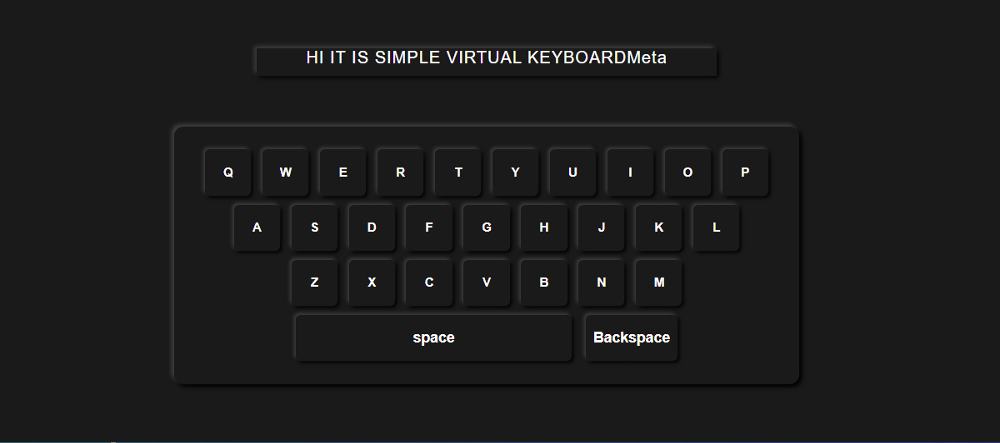
It’s not just designed. It is implemented by JavaScript which means there is a small result box. If you click on the buttons on this on-screen keyboard, the input text will appear in the result box.
JavaScript Virtual Keyboard
In this tutorial, you will learn how to create a virtual keyboard using Vanilla JavaScript. This virtual keyboard can be compared to the Android keyboard.
You can watch the demo below to know how this virtual keyboard works. Here you will find the live demo and source code of the JavaScript virtual keyboard.
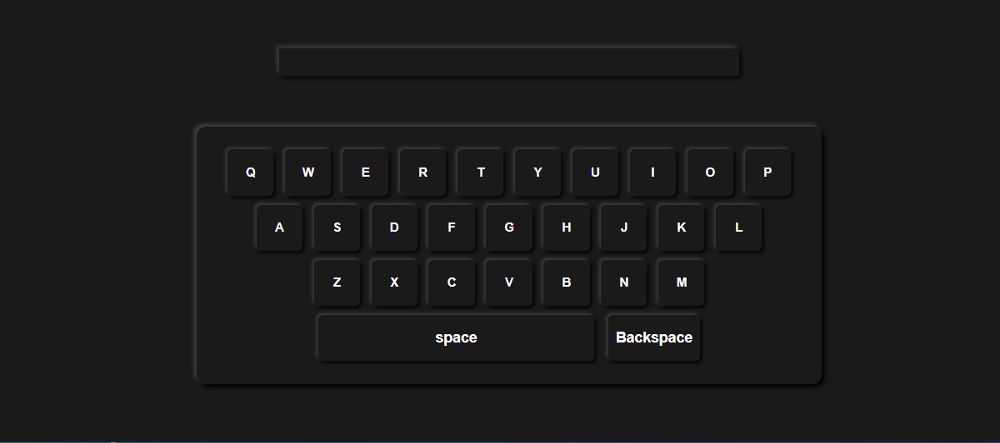
As you can see, this JavaScript Virtual Keyboard is made using the Neumorphism style. This makes the design look more attractive and the buttons more functional.
First, a result box has been created in which the input characters can be seen. Simply put, a display in which we can see all the information. There is another box that has many buttons on this Virtual Keyboard. There are basically a number of buttons, a space, and a backspace button.
This Modern Javascript Virtual Keyboard is very easy to create. But for this, you need to have a basic idea about HTML, CSS, and javascript.
Step 1:
Display of JavaScript Virtual Keyboard
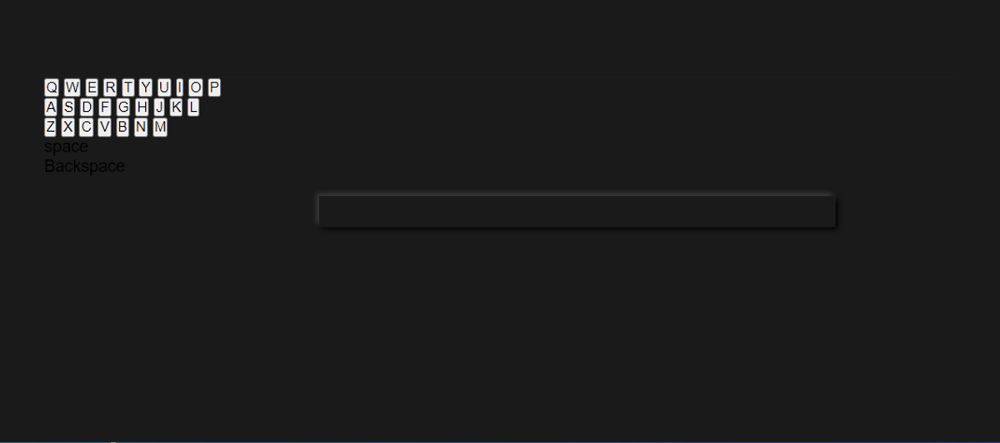
Now I have created the display. The width of the display of this javascript numeric keypad is 500px. Since Neumorphism design has been used here, shadows have been used around the display.
<p id=”ip”></p>
*{
padding: 0;
margin: 0;
box-sizing: border-box;
}
body{
background-color: rgb(26, 26, 26);
font-family: sans-serif;
}
#ip{
width: 500px;
min-height: 30px;
box-shadow: -3px -3px 5px rgb(63, 63, 63) , 3px 3px 5px black;
text-align: center;
color: white;
letter-spacing: 1px;
position: absolute;
top: 165px;
left: 50%;
margin: -50px auto;
transform:translateX(-50%) ;
font-size: 18px;
text-transform: capitalize;
}
Step 2:
The buttons of the Virtual Keyboard
Now all the buttons have to be added to the virtual keyboard. Here I have added some buttons as per my requirement.
<div class=”keybord”>
<div class=”row row1″>
<button>Q</button>
<button>W</button>
<button>E</button>
<button>R</button>
<button>T</button>
<button>Y</button>
<button>U</button>
<button>I</button>
<button>O</button>
<button>P</button>
</div>
<div class=”row row2″>
<button>A</button>
<button>S</button>
<button>D</button>
<button>F</button>
<button>G</button>
<button>H</button>
<button>J</button>
<button>K</button>
<button>L</button>
</div>
<div class=”row row3″>
<button>Z</button>
<button>X</button>
<button>C</button>
<button>V</button>
<button>B</button>
<button>N</button>
<button>M</button>
</div>
<div class=”row row4″>
<div class=”space” id=”space”>space</div>
<div class=”backspace” id=”backspace”>Backspace</div>
</div>
</div>
Step 3:
Keyboard Button Design by CSS
First, the background of the buttons is given the shape of a box with width: 680px used. The width of each button: 50px, height: 50px.
.keybord{
box-shadow: -3px -3px 5px rgb(63, 63, 63) , 3px 3px 5px black;
width: 680px;
margin:200px auto 50px;
display: flex;
flex-direction: column;
align-items: center;
padding:20px 20px;
border-radius: 10px;
}
.row{
margin:5px ;
user-select: none;
}
button{
width: 50px;
height: 50px;
font-weight: bold;
margin: 0 4px;
border: none;
background-color: transparent;
color:white;
box-shadow: -2px -2px 4px rgb(63, 63, 63) , 2px 2px 4px black;
border-radius: 5px;
cursor: pointer;
}
The space and backspace buttons are not yet designed in this javascript mobile keyboard. I have designed those buttons with the following CSS.
.row4 , .backspace , .space{
display: flex;
align-items: center;
justify-content: center;
}
.keybord .backspace , .space{
color: white;
font-weight: bold;
cursor: pointer;
/* user-select: none; */
}
.backspace , .space{
border-radius: 5px;
box-shadow: -2px -2px 4px rgb(63, 63, 63) , 2px 2px 4px black;
}
.keybord .space{
width: 300px;
height: 50px;
}
.keybord .backspace {
width: 100px;
height: 50px;
margin-left: 15px;
}
The onclick effect has been added to the button by the CSS below. That is, when you click on the button, the button will change.
.keybord .active{
box-shadow:inset -2px -2px 4px rgb(63, 63, 63) ,
inset 2px 2px 4px black;
color: yellow;
}
Step 4:
Activate Virtual Keyboard using JavaScript
Create the design of the onscreen virtual keyboard above. However, it is not yet effective. First, the constants of some HTML elements are determined. As we know we cannot use any HTML element directly in JavaScript.
Before implementing this virtual keyboard HTML, and CSS let me give you some information. We will activate these buttons in three ways. This means that this virtual keyboard can be controlled in 3 ways, such as with the mouse, with the external keyboard, and touch.
let button = document.getElementsByTagName(‘button’)
let p = document.getElementById(‘ip’);
let space =document.getElementById(‘space’)
let Backspace = document.getElementById(‘backspace’)
I have arranged to activate this Virtual Keyboard with the external keyboard using the JavaScript below. This allows you to control this javascript virtual keyboard with your computer’s keyboard.
document.body.addEventListener(‘keydown’ , function(index){
for (let i=0 ; i <button.length ; i++) {
//UpperCase() method returns the value of the string converted to uppercase
if(button[i].innerHTML==index.key.toUpperCase()){
button[i].classList.add(‘active’)
};
}
//innerHTML property is part of the Document Object Model
p.innerHTML+=index.key
if(index.key==’Backspace’){
p.innerHTML=p.innerHTML.slice(0 , -10)
}
})
document.body.addEventListener(‘keyup’ , function(index){
for(let j=0 ; j<button.length ; j++){
if(button[j].innerHTML == index.key.toUpperCase()){
button[j].classList.remove(‘active’)
}
}
})
Now you have to execute the buttons with the mouse. This means that you can manually click on those buttons using the mouse and that button can be found in the information result box.
for(let x of button){
//MouseDown occurs when the user presses the mouse button
x.addEventListener(‘mousedown’ , function(){
x.className=’active’
p.innerHTML+=x.innerHTML
})
}
//MouseUp occurs when the user releases the mouse button
for(let y of button){
y.addEventListener(‘mouseup’ , function(){
y.className=”
})
}
space.addEventListener(‘mousedown’,function(){
space.classList.add(‘active’)
p.innerHTML+=” “
})
space.addEventListener(‘mouseup’,function(){
space.classList.remove(‘active’)
})
function back(){
Backspace.className+=’ active’
p.innerHTML=p.innerHTML.slice(0 , -1)
}
//onmousedown attribute fires when a mouse button is pressed down on the element
Backspace.onmousedown=back
//onmouseup event occurs when a user releases a mouse button over an element
Backspace.onmouseup=function(){
Backspace.classList.remove(‘active’)
}
Now is the time to implement this simple virtual keyboard for touch screens. This allows you to control this digital keyboard by mobile.
for(let x of button){
//touchstart event occurs when the user touches an element
x.addEventListener(‘touchstart’ , function(){
x.className=’active’
})
}
for(let y of button){
//touchend event occurs when the user removes the finger from an element
y.addEventListener(‘touchend’ , function(){
space.classList.remove(‘active’)
})
}
space.addEventListener(‘touchstart’,function(){
space.classList.add(‘active’)
})
space.addEventListener(‘touchend’,function(){
space.classList.remove(‘active’)
})
Backspace.addEventListener(‘touchstart’,function(){
Backspace.className+=’ active’
})
Backspace.addEventListener(‘touchend’,function(){
Backspace.classList.remove(‘active’)
})

Above we have activated this virtual onscreen keyboard in three ways. Please comment on how you like this Virtual Keyboard component. Use the download button below for the source of JavaScript Virtual Keyboard.


