WhatsApp is a social media platform where many people can chat, voice call, and video call over the internet. This app helps us connect with our family members who live far away.
Almost everyone around the world uses WhatsApp to connect with different people with the help of mobile numbers. WhatsApp can be used for personal purposes or for business purposes for promoting the business over the internet. WhatsApp has a dedicated app called “Whatsapp Bussiness,” where sellers can display information about their business.

However, have you ever thought about how WhatsApp was developed, what technologies and tools were used in its design, and how it was made? We are going to build a WhatsApp clone that will have similarities to the web-based version of the app.
30+ HTML CSS and Javascript Projects
In this post, we’ll use HTML and CSS to create the webpage’s structure and CSS to style our clone of WhatsApp. However, let’s have a look at our WhatsApp clone’s live demo first before getting started on our project.
Live Demo of Whatsapp Clone:
Before starting with our project, we need to understand some of the basic concepts of the WhatsApp clone project.
What is a Clone App?
A cloned app is an exact copy of any software or website. It is a type of design that is created for understanding the design concepts of real-world projects and helps increase our website development skills.
Adding the Structure: (HTML)
Adding Important links:
We need to add some of the important links inside the header section of our HTML file before starting with our project. In this project, we need some icons for creating the WhatsApp clone. For that, we will be using the font-awesome icons inside our project,so to add them inside our project, we need to add the import link of the font-awesome icons, and for adding the styling of the WhatsApp web, we will create a CSS file and link with our HTML file. Then, using the <title> tag, we will add the title of our webpage.
  <meta http-equiv="X-UA-Compatible" content="IE=edge">
  <meta name="viewport" content="width=device-width, initial-scale=1.0">
  <script src="https://kit.fontawesome.com/391827d54c.js" crossorigin="anonymous"></script>
  <link rel="stylesheet" href="styles.css">
  <title>Whatsapp Clone</title>
Creating the header:
Using the block-level element div, we will create the main container of our WhatsApp, where the first container will hold the background of the WhatsApp and the second main container will contain all the elements of the WhatsApp clone.
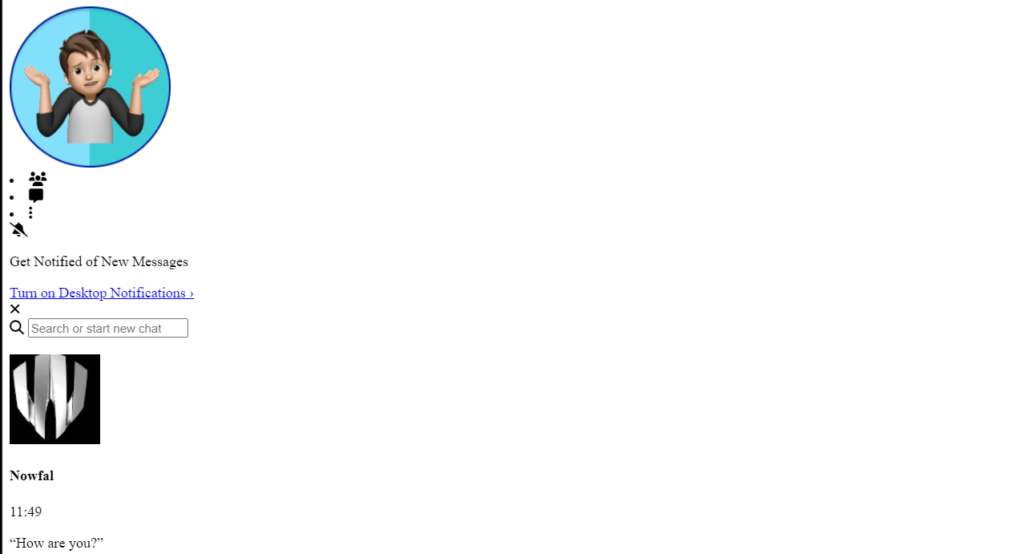
Next, using the div tag with the class header, we will create a container for our WhatsApp header. Using the div tag, we will create a small container where we will be adding the user image. and using the <img> with src, we will add the profile picture of the user.
Then we will create another container where we will add the icons for the message and group.
  <div class="background-green"></div>


  <div class="main-container">
    <div class="left-container">

<!--header -->
      <div class="header">
        <div class="user-img">
          <img class="dp" src="https://www.codewithfaraz.com/InstaPic.png" alt="">
        </div>
        <div class="nav-icons">
          <li><i class="fa-solid fa-users"></i></li>
          <li><i class="fa-solid fa-message">
 </i></li>
          <li><i class="fa-solid fa-ellipsis-vertical"></i></li>
        </div>
      </div>
Creating notification ,Searchbar and Chats:
Using the div tag with the class notif-box, we will create the container for the notification icon using Fontawsome. We will use the <p> tag for adding the text for notification, and we will use the anchor tag for adding the link to turn on desktop notification.
Now we will create the searchbar of our WhatsApp using the form input type text and the button tag with the awesome search icon.
In the chat section, we will create a main container for the multiple chats and then a child container for individual chats, inside which we will add the user image and a heading tag for the name of the user. We will create similar child containers with different names.
!--notification -->
<div class="notif-box">
<i class="fa-solid fa-bell-slash"></i>
<div class="notif-text">
<p>Get Notified of New Messages</p>
<a href="#">Turn on Desktop Notifications ›</a>
</div>
<i class="fa-solid fa-xmark"></i>
</div>
<!--search-container -->
<div class="search-container">
<div class="input">
<i class="fa-solid fa-magnifying-glass"></i>
<input type="text" placeholder="Search or start new chat "></div>
<i class="fa-sharp fa-solid fa-bars-filter"></i>
</div>
<!--chats -->
<div class="chat-list">
<div class="chat-box">
<div class="img-box">
<img class="img-cover" src="https://lh5.googleusercontent.com/-7ssjf_mDE1Q/AAAAAAAAAAI/AAAAAAAAASo/tioYx2oklWEHoo5nAEyCT-KeLxYqE5PuQCLcDEAE/s100-c-k-no-mo/photo.jpg" alt="">
</div>
<div class="chat-details">
<div class="text-head">
<h4>Nowfal</h4>
<p class="time unread">11:49</p>
</div>
<div class="text-message">
<p>“How are you?”</p>
<b>1</b>
</div>
</div>
</div>
<div class="chat-box">
<div class="img-box">
<img class="img-cover" src="https://images.pexels.com/photos/2379005/pexels-photo-2379005.jpeg?auto=compress&cs=tinysrgb&w=1260&h=750&dpr=1" alt="">
</div>
<div class="chat-details">
<div class="text-head">
<h4>Rohan</h4>
<p class="time unread">10:49</p>
</div>
<div class="text-message">
<p>“I’ll be there.”</p>
<b>4</b>
</div>
</div>
</div>
<div class="chat-box">
<div class="img-box">
<img class="img-cover" src="https://images.pexels.com/photos/8367221/pexels-photo-8367221.jpeg?auto=compress&cs=tinysrgb&w=1260&h=750&dpr=1" alt="">
</div>
<div class="chat-details">
<div class="text-head">
<h4>Zoya</h4>
<p class="time unread">09:49</p>
</div>
<div class="text-message">
<p>“Make somebody’s day.”</p>
<b>2</b>
</div>
</div>
</div>
<div class="chat-box">
<div class="img-box">
<img class="img-cover" src="https://images.pexels.com/photos/1382731/pexels-photo-1382731.jpeg?auto=compress&cs=tinysrgb&w=1260&h=750&dpr=1" alt="">
</div>
<div class="chat-details">
<div class="text-head">
<h4>Ava</h4>
<p class="time">08:49</p>
</div>
<div class="text-message">
<p>“Dreams come true.”</p>
</div>
</div>
</div>
<div class="chat-box active">
<div class="img-box">
<img class="img-cover" src="https://images.pexels.com/photos/2474307/pexels-photo-2474307.jpeg?auto=compress&cs=tinysrgb&w=1260&h=750&dpr=1" alt="">
</div>
<div class="chat-details">
<div class="text-head">
<h4>Leo</h4>
<p class="time">07:49</p>
</div>
<div class="text-message">
<p>Awesome! I'll start a vid..</p>
</div>
</div>
</div>
<div class="chat-box">
<div class="img-box">
<img class="img-cover" src="https://images.pexels.com/photos/3564412/pexels-photo-3564412.jpeg?auto=compress&cs=tinysrgb&w=1260&h=750&dpr=1" alt="">
</div>
<div class="chat-details">
<div class="text-head">
<h4>Azariah</h4>
<p class="time">06:49</p>
</div>
<div class="text-message">
<p>“Love, light, laughter.”</p>
</div>
</div>
</div>
<div class="chat-box">
<div class="img-box">
<img class="img-cover" src="https://images.pexels.com/photos/2919367/pexels-photo-2919367.jpeg?auto=compress&cs=tinysrgb&w=1260&h=750&dpr=1" alt="">
</div>
<div class="chat-details">
<div class="text-head">
<h4>Oliver</h4>
<p class="time unread">Yesterday</p>
</div>
<div class="text-message">
<p>“Appreciate the mome..”</p>
<b>2</b>
</div>
</div>
</div>
<div class="chat-box">
<div class="img-box">
<img class="img-cover" src="https://images.pexels.com/photos/14526673/pexels-photo-14526673.jpeg?auto=compress&cs=tinysrgb&w=1260&h=750&dpr=1" alt="">
</div>
<div class="chat-details">
<div class="text-head">
<h4>Jeslin</h4>
<p class="time">Yesterday</p>
</div>
<div class="text-message">
<p>“Now or never.”</p>
</div>
</div>
</div>
</div>
</div>
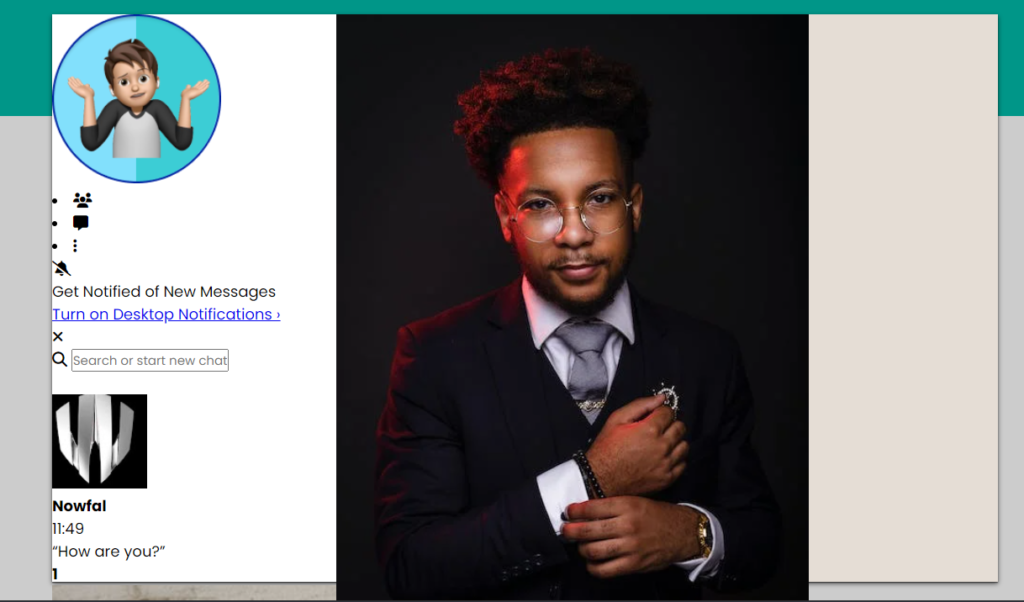
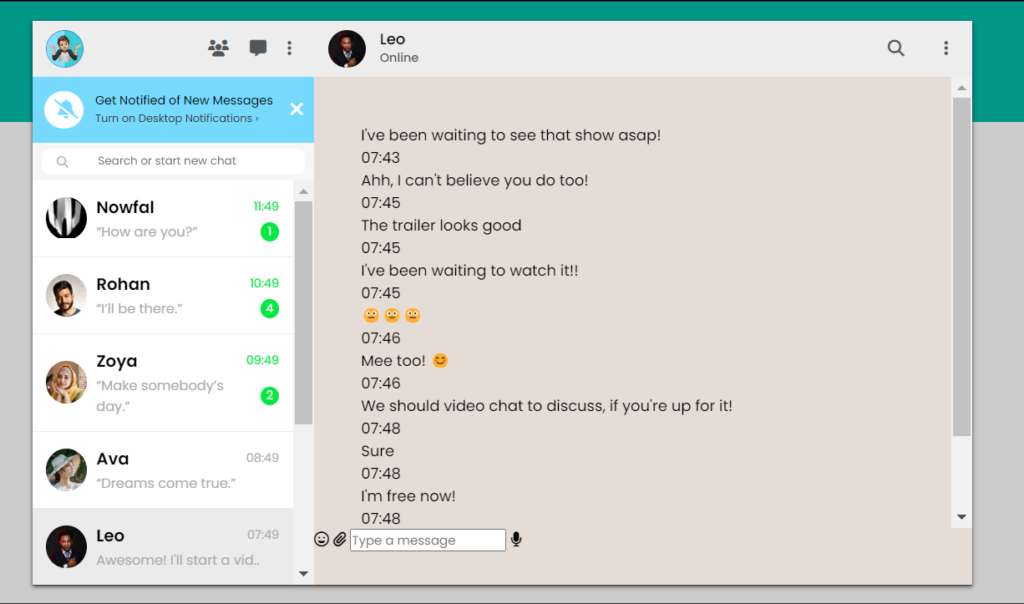
<div class="right-container">Creating Single Chat Window and Input elements:
Using the div tag with class header, we will create a container for the user image, a heading tag for the user name, and on the right side, we will be creating two containers, one for video calling and one for voice calling icons.
Now we will create a chat container using the div tag with different child containers inside, and we will be using the <p> tag for adding messages from different sides.
Then, at the bottom of the chat window, we will create a container for the media item icons, a small blank text box, and the microphone icon in the bottom right corner of the WhatsApp window using the Awesome Icon classes.
<!--header -->
      <div class="header">
        <div class="img-text">
          <div class="user-img">
          <img class="dp" src="https://images.pexels.com/photos/2474307/pexels-photo-2474307.jpeg?auto=compress&cs=tinysrgb&w=1260&h=750&dpr=1" alt="">
        </div>
          <h4>Leo<br><span>Online</span></h4>
        </div>
        <div class="nav-icons">
          <li><i class="fa-solid fa-magnifying-glass"></i></li>
          <li><i class="fa-solid fa-ellipsis-vertical"></i></li>
        </div>
      </div>

<!--chat-container -->
      <div class="chat-container">
        <div class="message-box my-message">
          <p>I've been waiting to see that show asap!<br><span>07:43</span></p>
        </div>
        <div class="message-box friend-message">
          <p>Ahh, I can't believe you do too!<br><span>07:45</span></p>
        </div>
        <div class="message-box friend-message">
          <p>The trailer looks good<br><span>07:45</span></p>
        </div>
        <div class="message-box friend-message">
          <p>I've been waiting to watch it!!<br><span>07:45</span></p>
        </div>
        <div class="message-box my-message">
          <p>😐😐😐<br><span>07:46</span></p>
        </div>
        <div class="message-box my-message">
          <p>Mee too! 😊<br><span>07:46</span></p>
        </div>
      <div class="message-box friend-message">
          <p>We should video chat to discuss, if you're up for it!<br><span>07:48</span></p>
        </div>
        <div class="message-box my-message">
          <p>Sure<br><span>07:48</span></p>
        </div>
        <div class="message-box my-message">
          <p>I'm free now!<br><span>07:48</span></p>
        </div>
      <div class="message-box friend-message">
          <p>Awesome! I'll start a video chat with you in a few.<br><span>07:49</span></p>
        </div>
      </div>

<!--input-bottom -->
      <div class="chatbox-input">
        <i class="fa-regular fa-face-grin"></i>
        <i class="fa-sharp fa-solid fa-paperclip"></i>
        <input type="text" placeholder="Type a message">
        <i class="fa-solid fa-microphone"></i>
      </div>
    </div>

  </div>
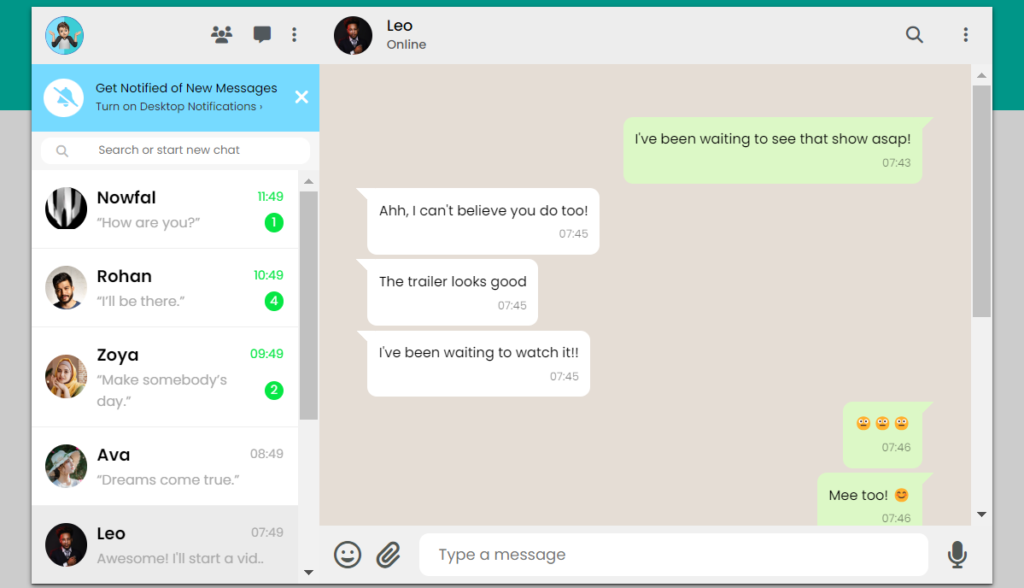
HTML Output:
Styling Whatsapp Clone (CSS):
Styling Container:
Using the Google import link, we will add the import link for the “Poppins” font type, which we will be using inside our CSS properties to add the Poppins font style to our WhatsApp clone.
Then, using the universal tag selector (*), we will set the padding and margin to zero from the browser’s default padding and margin. Also, using the font family property, we will set the font family to “Poppins” to change the text style.
Now, using the background color property through the class sector, we will set the background of the whatsapp as dark green, and using the align item property, we will align all the items to the center of the webpage.
Now we will be adding the styling to our container using the class selector. We will set the width and height to 100% and 20%, respectively. Also, using the child class selector, we will add the position relative to the main container of our WhatsApp clone.
@import url('https://fonts.googleapis.com/css2?family=Poppins:wght@300;400;500;600;700;800;900&display=swap');

* {
  margin: 0;
  padding: 0;
  box-sizing: border-box;
  font-family: 'Poppins', sans-serif;
}

body {
  display: flex;
  justify-content: center;
  align-items: center;
  min-height: 100vh;
  background: #ccc;
}

.background-green {
  position: absolute;
  top: 0;
  width: 100%;
  height: 20%;
  background-color: #009688;
}

.main-container {
  position: relative;
  width: 1000px;
  max-width: 100%;
  height: calc(100vh - 40px);
  background: #fff;
  display: flex;
  box-shadow: 0px 1px 1px  0 rgba(0,0,0,0.5), 0px 2px 5px 0 rgba(0,0,0,0.6);
}

.main-container .left-container {
  position:relative;
  width: 30%;
  height:100%;
  flex: 30%;
  background: #fff;
}

.main-container .right-container {
  position: relative;
  width: 70%;
  height: 100%;
  flex: 70%;
  background: #e5ddd5;
}

.main-container .right-container::before {
  content: '';
  position: absolute;
  top: 0;
  left: 0;
  width: 100%;
  height: 100%;
  background: url(https://camo.githubusercontent.com/854a93c27d64274c4f8f5a0b6ec36ee1d053cfcd934eac6c63bed9eaef9764bd/68747470733a2f2f7765622e77686174736170702e636f6d2f696d672f62672d636861742d74696c652d6461726b5f61346265353132653731393562366237333364393131306234303866303735642e706e67);
  opacity: 0.5;
}
Styling header and its elements:
Now using the class selector(.header), we will set the position of the header relative to the main container, and using the display type (flex), we will align the items to the center, with the width of the header set to 100% and the background to offwhite.
Similarly, we will add styling to the user image; we will set the width and height to 40 pixels, respectively, and using the border radius property, we will make the photo in the circle.
We will be using the class selector property for each element, whether it is an image or an icon. We will style each element individually for a better understanding of the styling. Just go through the CSS styling properties that we have used in our WhatsApp clone.
.header {
  position: relative;
  display: flex;
  align-items: center;
  width: 100%;
  height: 60px;
  background: #ededed;
  padding: 0 15px;
}

.user-img {
  position:relative;
  width: 40px;
  height: 40px;
  overflow: hidden;
  border-radius: 50%;
}

.dp {
  position:absolute;
  top: 0;
  left: 0;
  width: 100%;
  height: 100%;
  object-fit: cover;
  cursor: pointer;
}

.nav-icons {
  display:flex;
  justify-content: flex-end;
  padding-left: 110px;
}

.nav-icons li {
  backgroud-color:pink;
  list-style: none;
  display: flex;
  cursor: pointer;
  color: #51585c;
  margin-left: 22px;
  font-size: 18px;
}

.notif-box {
  position: relative;
  display: flex;
  width: 100%;
  height: 70px;
  background: #76daff;
  align-items: center;
  font-size: 0.8em;
  text-decoration: none;
}

.notif-box i {
  position:relative;
  left: 13px;
  background:#fff;
  padding:10px;
  width: 42px;
  height: auto;
  font-size: 20px;
  border-radius: 55%;
  cursor: pointer;
  color:#76daff;
}

.notif-box .fa-xmark {
  position: absolute;
  left: 260px;
  text-align:center;
  background:#76daff;
  color: #fff;
}

.notif-text {
  margin: 25px;
}

.notif-text a {
  text-decoration: none;
  color: #333;
  font-size: 0.9em;
}

.search-container {
  position:relative;
  width: 100%;
  height: 40px;
  background: #f6f6f6;
  display: flex;
/*   justify-content: center; */
  align-items: center;
}

.search-container .input input {
  width: 121%;
  outline: none;
  border: none;
  background: #fff;
  padding: 5px;
  height: 30x;
  border-radius: 10px;
  font-size: 12px;
  padding-left: 60px;
  margin: 10px
}

.search-container .input i {
  position: absolute;
  left: 26px;
  top: 14px;
  color:#bbb;
  font-size: 0.8em;
}
Styling chat list and container:
Using the class selector (.chat-list), we will set the position of the chat list relative to the WhatsApp container, and using the height property, we will apply the property to calculate the height according to the height of the container.
Now using the child class selector, we will style the chat box and set its position as relative, the width of the webpage as 100%, and the display type as “flex.” We will be styling all the elements of our chat list, such as the user name, their profile images, and the <p> tag, which is used to display the message from the user. We will style the elements individually with CSS properties and align them in such a way that they look clear and user-interactive.
.chat-list {
  position: relative;
  height:calc(100% - 170px);
  overflow-y: auto;
}

.chat-list .chat-box {
  position: relative;
  width: 100%;
  display:flex;
/*   justify-content: center; */
  align-items:center;
  cursor: pointer;
  padding: 15px;
  border-bottom: 1px solid #eee;
}

.chat-list .chat-box .img-box {
  position:relative;
  width: 55px;
  height:45px;
  overflow:hidden;
  border-radius: 50%;
}

.chat-list .chat-box .chat-details {
  width: 100%;
  margin-left: 10px;
}

.chat-list .chat-box .chat-details .text-head {
  display:flex;
  justify-content: space-between;
  align-items: center;
  margin-bottom:2px;
}

.chat-list .chat-box .chat-details .text-head h4 {
  font-size: 1.1em;
  font-weight: 600;
  color: #000;
}

.chat-list .chat-box .chat-details .text-head .time {
  font-size: 0.8em;
  color: #aaa;
}

.chat-list .chat-box .chat-details .text-message {
  display: flex;
  justify-content: space-between;
  align-items: center;
}

.chat-list .chat-box .chat-details .text-message p {
  color: #aaa;
  font-size: 0.9em;
  overlay: hidden;
}

img {
  width: 100%;
  object-fit: cover;
}

.chat-list .chat-box .chat-details .text-message b {
  background: #06e744;
  color: #fff;
  min-width: 20px;
  height: 20px;
  border-radius: 50%;
/*   text-align: center; */
  font-size: 0.8em;
  font-weight: 400;
  display:flex;
  justify-content:center;
  align-items:center;
}

.chat-list .active {
  background: #ebebeb;
}

.chat-list .chat-box:hover {
  background: #f5f5f5;
}

.chat-list .chat-box .chat-details .text-head .unread {
  color: #06e744;
}


/* right-container */


.right-container .header {
  display: flex;
  justify-content: space-between;
  align-items: center;
}

.right-container .header .img-text .user-img .dp {
  position:relative;
  top: -2px;
  left: 0px;
  width: 40px;
  height:auto;
  overflow:hidden;
  object-fit: cover;
}

.right-container .header .img-text {
  position: relative;
  display: flex;
  justify-content: center;
  align-items: center;
  cursor: pointer;
}

.right-container .header .img-text h4 {
  font-weight: 500;
  line-height: 1.2em;
  margin-left: 15px;
}

.right-container .header .img-text h4 span {
  font-size: 0.8em;
  color: #555;
}

.right-container .header .nav-icons {
  position: relative;
  margin-right:0px;
/*   padding: 5px; */
}

.right-container .header .nav-icons i {
  padding: 10px;
}

.chat-container {
  position:relative;
  width: 100%;
  height: calc(100% - 120px);  /*60+60*/
  padding: 50px;
  overflow-y: auto;
}
Styling the message box:
In the class selector (.message-box), we will set the position to relative, and the display type of the message box is flex. Using the width property, we will set the width of the image to 100%, and using the margin property, we will set the margin to 5 pixels.
Now we will add the stling to the elements of our message box. We will set the right space to zero, and using the max-width property, we will set the maximum width of the paragraph to 65%.
We will style all the chat boxes inside our message box container and align them in different positions, alternatively to the right and left, for displaying the message replies. We will increase the font size of the bottom icons and text box.
.message-box {
  position:relative;
  display: flex;
  width:100%;
  margin: 5px 0;
}

.message-box p {
  position:relative;
  right: 0;
  text-align: right;
  max-width: 65%;
  padding: 12px;
  background: #dcf8c6;
  border-radius: 10px;
  font-size: 0.9em;
}

.message-box.my-message p::before {
  content : '';
  position: absolute;
  top: 0;
  right: -12px;
  width: 20px;
  height: 20px;
  background: linear-gradient(135deg, #dcf8c6 0%, #dcf8c6 50%, transparent 50%, transparent);
}

.message-box p span {
  display: block;
  margin-top: 5px;
  font-size: 0.8em;
  opacity: 0.5;
}

.my-message {
  justify-content: flex-end;
}

.friend-message p {
  background: #fff;
}

.friend-message {
  justify-content: flex-start;

}

.chat-container .my-message i {
  color: yellow;
}

.message-box.friend-message::before {
  content : '';
  position: absolute;
  top: 0;
  left: -12px;
  width: 20px;
  height: 20px;
  background: linear-gradient(225deg, #fff 0%, #fff 50%, transparent 50%, transparent);
}

.chatbox-input {
  position:relative;
  width: 100%;
  height: 60px;
  background: #f0f0f0;
  display: flex;
  justify-content: space-between;
  align-items: center;
}

.chatbox-input i {
  cursor: pointer;
  font-size: 1.8em;
  color: #515855;
}

.chatbox-input i:nth-child(1) {
   margin: 15px;
}

.chatbox-input i:last-child {
  margin-right: 25px;
}

 .chatbox-input input {
    position: relative;
    width: 90%;
    margin: 0 20px;
    padding: 10px 20px;
    border-radius:10px;
    font-size: 1em;
    border:none;
    outline:none;
 }
Final video Output:
Conclusion:
Hopefully, the above tutorial has helped you to know how to create this Whatsapp Clone using HTML and CSS.
Here we have learned how to use a WhatsApp Clone using HTML and CSS. Next time, I am going to write an article on how to create a 5-star rating project using HTML and CSS. Please give us your valuable feedback on how you like this WhatsApp Clone using HTML and CSS.
If you like the project, don’t forget to follow our website, foolishdeveloper.com.
Codepen by: Mohammed
Author: Arun