The Internet is a collection of multiple websites that help in getting information,listening to music, and watching movies. All these things can happen with the help of a website. Today, most people visit hundreds of different websites on a daily basis. The most common thing is that most modern websites have a unique and modern welcome page that looks more user-friendly and unique.

The welcome page is the first page that appears on the screen when we visit any website. The welcome is designed in a more advanced and unique way to attract users. They use different types of media graphics and animation that attract users and force them to look for different services on the website. These modern features and unique designs remind me of the famous quote “First reaction is the last reaction.” Keeping in mind that most companies pay more attention to creating a unique and interactive welcome page.
30+ HTML CSS and Javascript Projects
As a developer, if you want to create some unique designs for your website welcome page, then, my friend, you are on the right website
Today we will be creating a welcome page with the help of HTML and CSS for creating the structure of our welcome page and CSS for styling our welcome page.
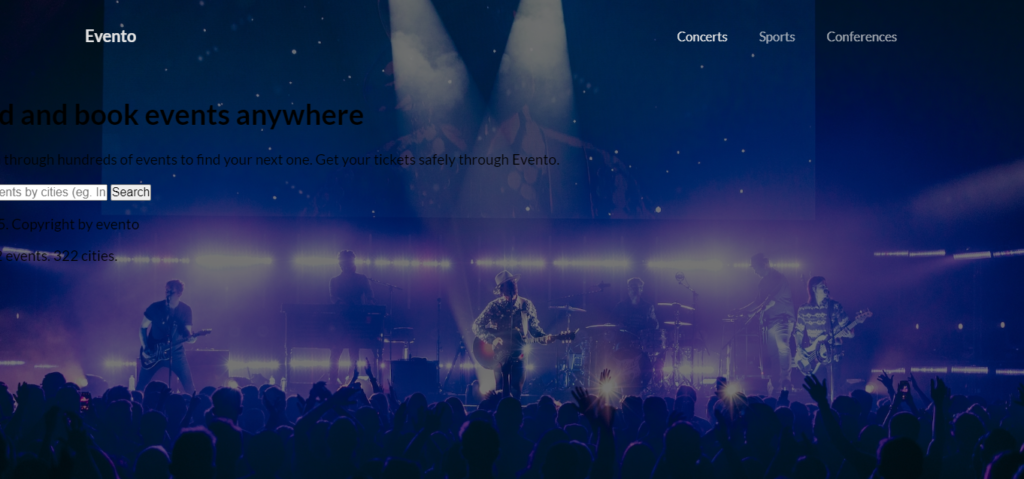
Live Project output:
Before we start with our project, let us understand some of the basic concepts about our welcome page project using HTML
What is a Welcome Page?
A welcome page is the first page that appears to the user whenever they visit any website. The welcome page contains unique and interactive designs for the website and a navbar where the website developer adds links for different sections of the website that help the user move to different sections with ease.
Adding the Structure (HTML):
Creating Header:
An HTML header is a predefined markup tag which helps in creating the website’s top section. For our welcome page, we will add a header section with a class header, which will help with CSS styling of the header section. The name of the welcome page and the logo will be included inside the header section using the tag.
We will create the navigation bar for our welcome page using the <nav> tag, and add links to the various sections of the website inside our navbar. We will create a list of multiple navigation menus in the navigation bar by using the unordered list element.
<header class="header">
  <p class="logo">Evento</p>
  <nav class="nav">
    <ul class="nav-list">
      <li class="nav-item">
        <a href="#" class="nav-link">Concerts</a>
      </li>
      <li class="nav-item">
        <a href="#" class="nav-link">Sports</a>
      </li>
      <li class="nav-item">
        <a href="#" class="nav-link">Conferences</a>
      </li>
    </ul>
  </nav>
</header>
Creating Main Section and footer:
The main tag inside the HTML helps tell the browser that all the important information is stored in this section, which helps in SEO optimization. Using the tag, we will create the container for the main section.
Then, using the different heading tags, we will add the heading for our welcome page, and then, using the
tag, we will add some unique lines about our website on the welcome page. The user can also add different types of links and contact information on the welcome page.
Now, using the footer tag, we will create the bottom section of any website. Here, inside the footer section, we will add the details about the website’s copyright and all other details using the<p>tag.
<main class="main">
<h1 class="heading">Find and book events anywhere</h1>
<p class="text">Search through hundreds of events to find your next one. Get your tickets safely through Evento.</p>
<form class="form">
<input type="text" class="input" placeholder='Find events by cities (eg. India)'>
<button class="btn">Search</button>
</form>
</main>
<footer class="footer">
<p class="copyright">© 2025. Copyright by evento</p>
<p class="stats">24,452 events. 322 cities.</p>
</footer>
Styling Welcome Page (CSS):
Basic Styling:
Universal tag selector that helps in adding styling to the whole website at once. Using the universal tag selector (*), we will set the padding and margin of the website to zero from the browser’s default padding and margin.
/* PRESETS  */
* {
  marign: 0;
  padding: 0;
  box-sizing: border-box;
}
Styling unorder list with animation:
Using the tag selector, we will select the unordered list and set its list style to none. This helps in changing the list items into normal text.
Then, using the keyframes property, we will set the keyframes at different frames. Here, we will add the fade in animation at 0% keyframe. We will set the opacity to 0 so that the navbar is hidden for a particular time, and then at 100%, the opacity changes to 1 for clear visibility.
ul {
  list-style: none;
}

li {
  text-decoration: none;
}

a {
  texte-decoration: none;
  color: inherit;
}

/*   KEYFRAMES */
@keyframes fade-in {
  0% {
    opacity: 0;
    transform: translateY(15px);
  }

  100% {
    opacity: 1;
    transform: translate(0);
  }
}
body and navbar Styling:
The body tag selector helps in styling the body of the webpage of any website. Inside the body tag selector, using the font-family property, we will set the font family or the font face of the text as “lato,” and using the background color property, we will add an image background to our page using the URL.
Now using the class selector properties, we will add the styling to the header section of our welcome page. We will align the items to the center of the webpage using the align item property, and also using the navbar list items with hover property, we will add a hover property in which, as the user hovers over the element, the font color of the navigation link changes
body {
  font-family: 'Lato', sans-serif;
  background-image: url("https://images.unsplash.com/photo-1583795484071-3c453e3a7c71?ixlib=rb-1.2.1&auto=format&fit=crop&w=1920&q=100");
  background-position-y: -120px;
  background-size: cover;
  background-repeat: no-repeat;
  background-color: rgba(0, 0, 0, 0.5);
  background-blend-mode: darken;
  height: 100vh;
  overflow-y: hidden;
  margin: 0;
  display: flex;
  flex-direction: column;
}

/* HEADER  */

.header {
  display: flex;
  align-items: center;
  justify-content: space-between;
  width: 900px;
  margin: 0 auto;
  animation: fade-in 0.4s;

}

.logo {
  color: rgba(225, 225, 225, 1);
  font-size: 18px;
  font-weight: 700;

}
.nav {
  padding: 20px 0;

}
.nav-list {
  display: flex;
  column-gap: 10px;
}
.nav-item {
  margin-left: 25px;
}
.nav-link {
  text-decoration: none;
  color: rgba(225, 225, 225, 0.7);
  font-size: 14px;
  font-weight: 500;
  transition: all 0.3s;
}
.nav-link:hover {
  color: rgba(225, 225, 225, 1);
}
Styling Main part and Footer:
Class selector property (.main), we will set the main container of the welcome page. We will set the font color to white, and using the text align property, we will align the items to the center. We will also add an animation fade, which we have already initialized at the start of the styling part.
We will be styling each element of the main section individually to create a unique and user-interactive design with different animations.
footer section. In this, we will set the font color of the text inside the footer section to white, and using the text align property, we will align the text to the center. Using the font size property, we will set the font size of the text to 12 pixels.
We will use the media query property to make our welcome page responsive for different sizes of screen devices.
* MAIN  */

.main {
  color: #fff;
  text-align: center;
  margin-top: 0px;
  animation: fade-in 0.4s 0.1s backwards;

}

.heading {
  font-size: 65px;
  font-weight : 700;
  max-width: 800px;
  margin-left: auto;
  margin-right: auto;
  margin-bottom: 25px;
  line-height: 0.9;
}
.text {
  max-width: 630px;
  font-size: 25px;
  line-height: 1.4;
  margin-left: auto;
  margin-right: auto;
  opacity: 0.7;

}

.form {
  margin-top: 40px;
}
.input {
  width: 511px;
  height: 64px;
  outline: none;
  border: none;
  border-radius: 3px;
  opacity: 0.8;
  font: inherit;
  padding: 0;
  padding-left: 10px;
  font-size: 17px;
  transition: all 0.3s;

}
.input:focus {
  opacity: 1;
}
.input::placeholder {
  color: #000;
}
.btn {
  height: 64px;
  width: 130px;
  color: #fff;
  border: none;
  border-radius: 3px;
  background-color: #000;
  font: inherit;
  margin-left: 5px;
  text-transform: uppercase;
  letter-spacing: 1;
  padding: 0;
  font-size: 14px;
  font-weight: 500;
  transition: all 0.3s;
}

.btn:hover {
  cursor: pointer;
  background-color: #353535;
}

/* FOOTER */

.footer {
  display: flex;
  align-items: center;
  width: 900px;
  margin-left: auto;
  margin-right: auto;
  color: #fff;
  opacity: 0.8;
  justify-content: space-between;
  font-size: 12px;
  margin-top: auto;
  padding-top: 10px;
  padding-botton: 10px;
  border-top: 1px solid rgba(255, 255, 255, 0.3);
  animation: fade-in 0.4s 0.2s backwards;

}

/* MEDIA QUERIES */
@media (max-width : 985px) {

  body {
    background-size: auto;
    background-position: center;
     background-color: rgba(0, 0, 0, 0.5);
  background-blend-mode: darken;
    overflow-x: hidden;

  }
  .header {
    width: 600px;
    font-size: 10px;

  }

  .heading {
    font-size: 55px;
    width: 450px;
  }
  .text {
    font-size: 15px;
    width: 380px;
  }

  .input {
    width:450px;
    height: 54px;
  }
  .btn {
    width: 100px;
    height: 54px;
  }
  .footer {
    margin-top: auto;
    width: 600px;
  }
}

@media (max-width: 650px) {
  .header {
    flex-direction: column;

  }
  .nav {
    padding: 0;
  }

  .heading {
    font-size: 40px;
    width: 450px;
  }
  .input {
    display: block;
    margin: 0 auto;
    margin-bottom: 10px;
  }
  .btn {
    display: block;
    width: 450px;
    margin: 0 auto;
  }
  .footer {
    width: 500px;
  }
}

@media (max-width: 500px) {
  .header {
    width: 350px;
    margin: 0 auto;
  }

  .footer {
    flex-direction: column;
  }
}
Final Video Output:
Conclusion:
So, you saw how we created the welcome page for our website in a step-by-step manner, explaining all the important concepts, starting from creating the structure for the website to styling the website to make it look more interactive.
For more such projects stay connected with Foolish Developer and become an expert in coding. If you have any queries feel free to ask in the comment section.
Thank you!!
Author: Arun
Codepen by: Amarnath