Registration is an account-creating form that helps users gain access to the private page on the website, where they can add and delete their data and use the services of the website by protecting their data. In the registration form, users need to fill in their name and other basic details, as well as their personal email ID and unique password, to login to the website again in the future.
In this article, you will learn how to create a simple registration form using HTML and CSS. The registration form is an important webinar. This type of HTML CSS registration form is used to create new accounts on different types of websites.
Login and Registration Form Using HTML, CSS and JavaScript

There are many types of registration forms. Some registration forms are simple and some are very complex. Most of the login forms are common where the account is created using the name, email id, city, country, etc.
Earlier I shared with you the tutorials for almost all types of login and registration forms. This Simple Registration Form has been created with the help of HTML and CSS only.
However, it is not responsive. You need to use some CSS code separately to generate responses.
See the Pen Untitled by Foolish Developer (@foolishdevweb) on CodePen.
Registration Form in HTML CSS
This tutorial will definitely help you if you want to create an HTML registration form. I have provided a live demo that will help you to know how this HTML CSS registration form works.
<div> <p style="text-align: left;">First I made a box on the web page then I used a heading. First I created a box to input the name. Then I created an input box to input email id, city, country, etc. </p> <p style="text-align: left;">Then I created two checkboxes using <span style="color: #2b00fe;">HTML checkboxes</span>. This is mainly for selecting gender. Then there is a <span style="color: #2b00fe;">registration button</span> which, when clicked, will be used to register a new account with all this information.</p> <h2 style="text-align: left; font-size: 27px;">How to Create a Registration Form in HTML</h2> <p style="text-align: left;">I have already shared a step-by-step tutorial on how to create such a <b>simple registration form</b>. I have not shared any tutorial here, only the source code given here. If you want tutorials then you can follow my previous designs. </p> <p style="text-align: left;">To make it (Simple Registration Form Source Code) you need to have a basic idea about HTML and CSS. First, create an HTML and CSS file then copy the code below and add it to that file.</p> </div>
HTML Code for Registration Form
We have created the basic structure of this registration form using the following HTML and CSS codes.
<div class="wrapper">
  	<div class="registration_form">
  		<div class="title">
  			Registration Form
  		</div>

  		<form>
  			<div class="form_wrap">
  				<div class="input_grp">
  					<div class="input_wrap">
  						<label for="fname">First Name</label>
  						<input type="text" id="fname">
  					</div>
  					<div class="input_wrap">
  						<label for="lname">Last Name</label>
  						<input type="text" id="lname">
  					</div>
  				</div>
  				<div class="input_wrap">
  					<label for="email">Email Address</label>
  					<input type="text" id="email">
  				</div>

  				<div class="input_wrap">
  					<label for="city">City</label>
  					<input type="text" id="city">
  				</div>
  				<div class="input_wrap">
  					<label for="country">Country</label>
  					<input type="text" id="country">
  				</div>

          <div class="input_wrap">
  					<label>Gender</label>
  					<ul>
  						<li>
  							<label class="radio_wrap">
  								<input type="radio" name="gender" value="male" class="input_radio" checked>
  								<span>Male</span>
  							</label>
  						</li>
  						<li>
  							<label class="radio_wrap">
  								<input type="radio" name="gender" value="female" class="input_radio">
  								<span>Female</span>
  							</label>
  						</li>
  					</ul>
  				</div>


  				<div class="input_wrap">
  					<input type="submit" value="Register Now" class="submit_btn">
  				</div>


  			</div>


  		</form>
  	</div>
  </div>
If you can’t add all these codes together, you can take the help of the demo section above. All of the above source codes are linked together.
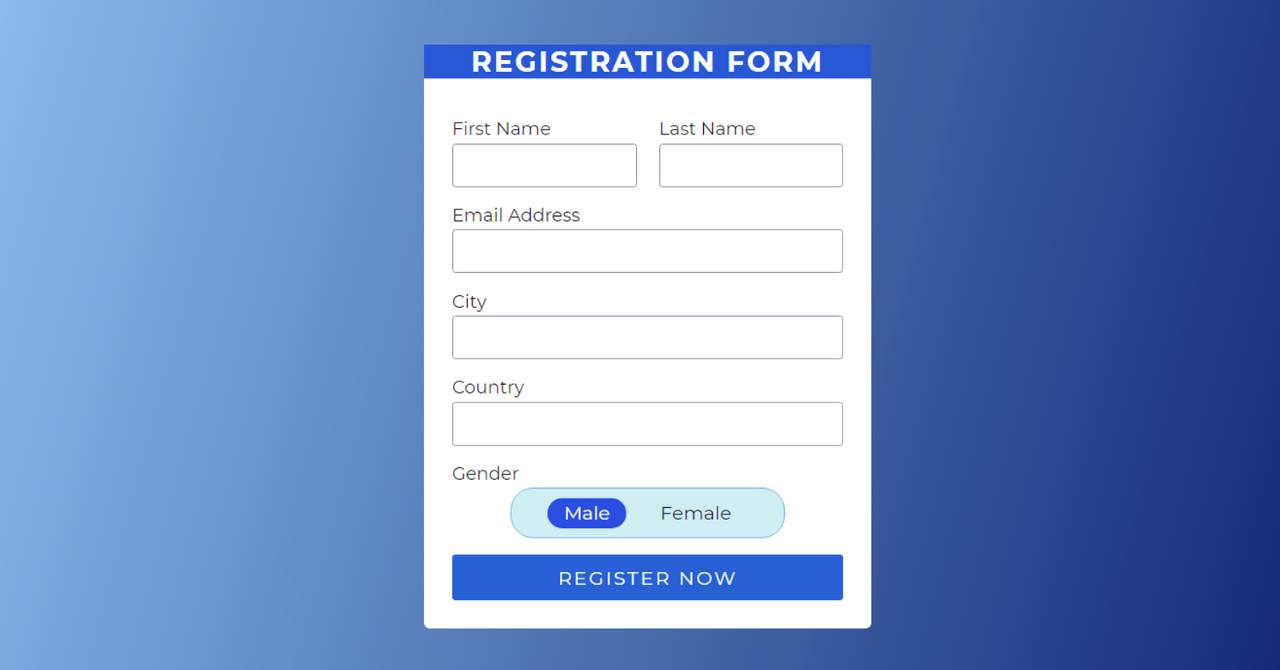
HTML Output:

Design the registration form with CSS
The following CSS codes have helped to design this HTML registration form. Here are the required CSS codes. First I designed the webpage.
Then he designed the titles and the places to input. I have designed the registration button at the end of all. Copy the following CSS codes and input them into your CSS file.
 @import url('https://fonts.googleapis.com/css2?family=Montserrat:wght@400;700&display=swap');

*{
	margin: 0;
	padding: 0;
	box-sizing: border-box;
	list-style: none;
	font-family: 'Montserrat', sans-serif;
}

body{
  background: linear-gradient(
     105deg,
     #88beee ,
     #0a2e73
 );
}

.wrapper{
	min-height: 100vh;
	display: flex;
	justify-content: center;
	align-items: center;
}

.registration_form{
	background: white;
	padding: 25px;
	border-radius: 5px;
	width: 400px;
}

.registration_form .title{
	text-align: center;
	font-size: 25px;
	text-transform: uppercase;
	color: white;
  background:rgb(13, 98, 215);
	letter-spacing: 2px;
	font-weight: 700;
  margin-top: -25px;
  margin-left:-25px;
  margin-right:-25px;
}

.form_wrap{
	margin-top: 35px;
}

.form_wrap .input_wrap{
	margin-bottom: 15px;
}

.form_wrap .input_wrap:last-child{
	margin-bottom: 0;
}

.form_wrap .input_wrap label{
	display: block;
	margin-bottom: 3px;
	color: #1a1a1f;
}

.form_wrap .input_grp{
	display: flex;
	justify-content: space-between;
}

.form_wrap .input_grp  input[type="text"]{
	width: 165px;
}

.form_wrap  input[type="text"]{
	width: 100%;
	border-radius: 3px;
	border: 1.3px solid #9597a6;
	padding: 10px;
	outline: none;
}

.form_wrap  input[type="text"]:focus{
	border-color: #063abd;
}

.form_wrap ul{
 border:1px solid rgb(115, 185, 235);
  width:70%;
  background: rgb(206, 238, 242);
  margin-left: 15%;
	padding: 8px 10px;
	border-radius: 20px;
	display: flex;
	justify-content: center;
}

.form_wrap ul li:first-child{
	margin-right: 15px;
}

.form_wrap ul .radio_wrap{
	position: relative;
	margin-bottom: 0;
}

.form_wrap ul .radio_wrap .input_radio{
	position: absolute;
	top: 0;
	right: 0;
	opacity: 0;
}

.form_wrap ul .radio_wrap span{
	display: inline-block;
	font-size: 17px;
	padding: 3px 15px;
	border-radius: 15px;
	color: #101749;
}

.form_wrap .input_radio:checked ~ span{
	background: #105ce2;
  color:white;
}

.form_wrap .submit_btn{
	width: 100%;
	background: #0d6ad7;
	padding: 10px;
	border: 0;
  color:white;
  font-size:17px;
	border-radius: 3px;
	text-transform: uppercase;
	letter-spacing: 2px;
	cursor: pointer;
}

.form_wrap .submit_btn:hover{
	background: #051c94;
}
CSS Output:
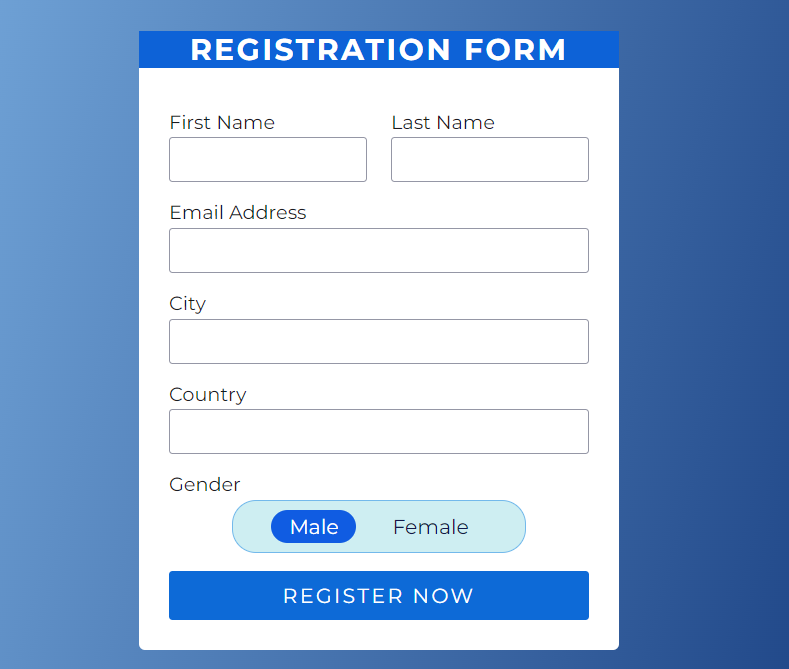
Final Video Output:
Conclusion:
I hope you have been able to create this registration or application form using the above codes. If there is any problem then you can definitely take the help of the download button below.