In this article, I will show you how to create a Blog Post Card Design using HTML and CSS. You must have seen it on various blogs or news websites where the articles are neatly arranged according to the columns.
This type of design puts the articles on the website nicely on the homepage. If you know basic HTML and CSS, you can easily create such designs. Here is a demo and source code on how it is made. Are you having trouble creating professional content? If yes then you can take the help of MakeVu.
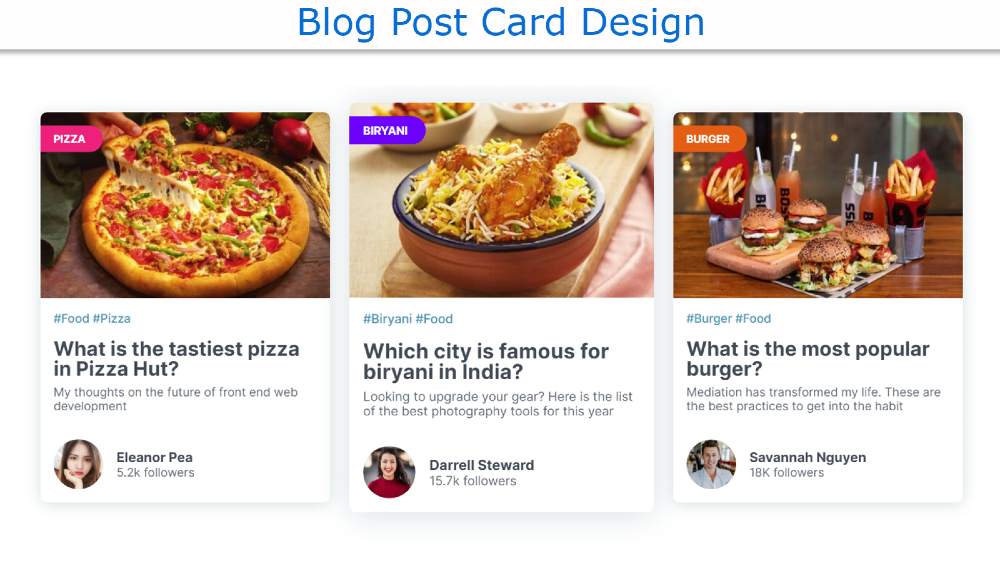
Here I have basically taken three blog posts and arranged them neatly in three columns. This portfolio card CSS contains everything such as images, headings, information, categories, etc. The design I showed in this article was originally created as a food delivery website. I gave pictures, categories, and headings of three different foods for the three cards.
Responsive Blog Post Card using HTML and CSS
These Blog article cards are fully Responsive so that any device user can use them. If you are new to the web design world, you must try to create a Responsive Element. Currently, most users use mobile or small devices. So it is very important to be responsive to every element of the website.
However, I did not use any separate code to make the blog article cards responsive. Because I made it with the help of CSS flexbox. flexbox helps to divide the display into specific parts. Here I have divided the display into three columns. The number of columns decreases according to the size of the display.
As a result, in the case of desktop users, three posts will appear in the same row. In the case of tablet users, two posts can be seen in the same row, and in the case of mobile users, one blog post can be seen.
In this project (Blog Post Card Design using HTML CSS) I first gave a profile image. Then I gave a category text on the image. Below the image, I have given some descriptions where I have given the heading, basic text, profile image, name of the profile image, and follower of that article.
All in all, it is a beautiful blog postcard made with HTML and CSS. Below is a live demo of this design that lets you know how it works.
Step 1: Create the basic structure of the Blog Post Card
The following HTML code is basically to create the basic structure of this design and to add some information. I have given a complete explanation for each code.
<div class=”wrapper”>
<!– 1st blog post –>
<div class=”card”>
<!– banner image and text –>
<div class=”card-banner”>
<p class=”category-tag popular”>Pizza</p>
<img class=”banner-img” src=’post1.jpg’ alt=”>
</div>
<!– #tags,heading,description –>
<div class=”card-body”>
<p class=”blog-hashtag”>#Food #Pizza</p>
<h2 class=”blog-title”>What is the tastiest pizza in Pizza Hut?</h2>
<p class=”blog-description”>Lorem ipsum dolor sit amet, consectetur adipisicing</p>
<!– Profile image, name, followers –>
<div class=”card-profile”>
<img class=”profile-img” src=’profile-1′ alt=”>
<div class=”card-profile-info”>
<h3 class=”profile-name”>Eleanor Pea</h3>
<p class=”profile-followers”>5.2k followers</p>
</div>
</div>
</div>
</div>
<!– 1st blog post – The End –>
<!– 2nd blog post –>
<div class=”card”>
<!– banner image and text –>
<div class=”card-banner”>
<p class=”category-tag technology”>Biryani</p>
<img class=”banner-img” src=’post2.jpg’ alt=”>
</div>
<!– #tags,heading,description –>
<div class=”card-body”>
<p class=”blog-hashtag”>#Biryani #Food</p>
<h2 class=”blog-title”>Which city is famous for biryani in India?</h2>
<p class=”blog-description”>Lorem ipsum dolor sit amet, consectetur adipisicing</p>
The following is the code I designed for this blog postcard using CSS code. You copy these codes then add them to your CSS file. You can also use these codes with style tags in the head section of the HTML file.
* {
box-sizing: border-box;
font-family: “Inter”, sans-serif;
margin: 0;
padding: 0;
}
body {
margin: 2rem;
color: #414b56;
}
/* Basic design of blog card */
.wrapper {
display: flex;
flex-wrap: wrap;
justify-content: center;
}
/* Blog post design starts from here */
.card {
overflow: hidden;
box-shadow: 0px 2px 20px #d7dfe2; /* Card outline shadow */
background: white; /* post background color */
border-radius: 0.5rem;
position: relative;
width: 350px; /* post card width */
margin: 1rem;
transition: 250ms all ease-in-out;
cursor: pointer;
}
.card:hover { /* blog post hover */
transform: scale(1.05);
box-shadow: 0px 2px 40px #d7dfe2;
}
/*Design banner image*/
.banner-img {
position: absolute;
object-fit: cover;
height: 14rem; /* image height */
width: 100%;
}
/* Design catagory text */
.category-tag {
font-size: 0.8rem;
font-weight: bold;
color: white; /* text color */
background: red; /* text background color */
padding: 0.5rem 1.3rem 0.5rem 1rem;
text-transform: uppercase;
position: absolute;
z-index: 1;
top: 1rem;
border-radius: 0 2rem 2rem 0;
}
/* 1st catagory text background color */
.popular {
background: #ef257a;
}
/* 2st catagory text background color */
.technology {
background: #651fff;
}
/* 3st catagory text background color */
.psychology {
background: #e85808;
}
/* Design of # tags, heading, description starts from here */
.card-body {
margin: 15rem 1rem 1rem 1rem;
}
/* #tags design */
.blog-hashtag {
font-size: 0.9rem;
font-weight: 500;
color: #4d97b2;
}
/* heading design */
.blog-title {
line-height: 1.5rem;
margin: 1rem 0 0.5rem;
}
/* description design */
.blog-description {
color: #616b74;
font-size: 0.9rem;
}
/*Design of profile image, name, followers starts from here*/
.card-profile {
display: flex;
margin-top: 2rem;
align-items: center;
}
/* Profile image */
.profile-img {
width: 60px; /* image width */
height: 60px;
object-fit: cover;
border-radius: 50%;
}
.card-profile-info {
margin-left: 1rem;
}
/* profile name */
.profile-name {
font-size: 1rem;
}
/*Profile followers */
.profile-followers {
color: #616b74;
font-size: 0.9rem;
}
I have given the basic explanation for the above HTML and CSS code. If you still don’t understand then you can let me know by commenting I will definitely help you.
Hopefully, this article has helped you learn how to create a Responsive Blog Post Card using HTML and CSS. Below I have given the download button to download the source code. You must comment on how you like this design.