Introduction
Welcome Back to another brand-new Tutorial. Today we’ll build a Weather App using HTML, CSS, and JavaScript. In this tutorial, you’ll learn How to use APIs ?. and some deep concepts of JavaScript. By the end of the tutorial, you’ll be able to answer the question Like, How do APIs work? and how to Build a Weather app using Weather API In JavaScript.
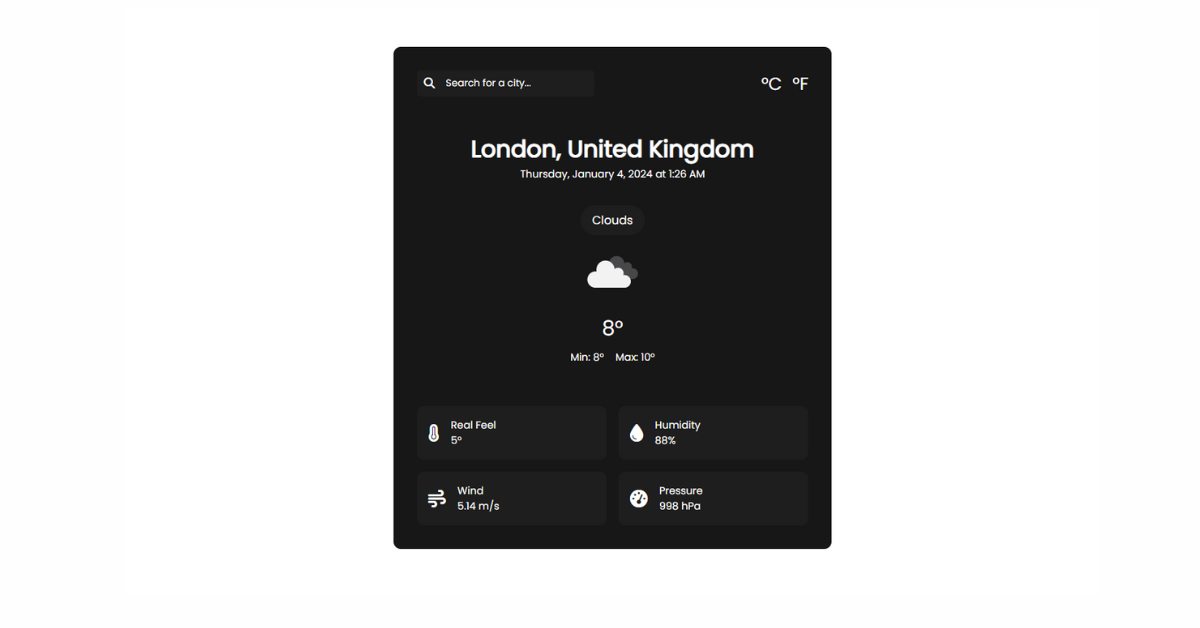
Weather APP Preview

What is a Weather App?
The Weather App project is a web application that leverages HTML, CSS, and JavaScript to fetch weather data from a weather API and display the current weather of a specific location. You’ll be more amazed when you see How APIs Work with Frontend ? .
The Weather App uses an API to retrieve the Forecast data according to the user’s input. The application will dynamically fetch the current Climate details and the forecast. It then presents this data in a user-friendly format for which we will create UI using CSS, making it easy for users to understand and interact.
Demo For Weather APP
What is an API?
Wait before starting to build the application you need to understand the few terms that are an API. So what is an API? . An API, or Application Programming Interface, is a set of rules that define how devices and applications can communicate with each other. APIs are a way to extract and share data within and across organizations. It is used as a third-party tool for our application to get the data. We’ll also learn How to call API in JavaScript ?.
Step 1:- HTML Code For Weather APP
Create a new folder on your computer and give it a name (e.g. “weather–app”). · Inside the folder, create three new files: “index.html” and paste the following code:-
<!DOCTYPE html>
<html lang="en">
<head>
<meta charset="UTF-8">
<meta http-equiv="X-UA-Compatible" content="IE=edge">
<meta name="viewport" content="width=device-width, initial-scale=1.0">
<title>Weather App</title>
<link rel="stylesheet" href="style.css">
</head>
<body>
<div class="container">
<div class="weather__header">
<form class="weather__search">
<input type="text" placeholder="Search for a city..." class="weather__searchform">
<i class="fa-solid fa-magnifying-glass"></i>
</form>
<div class="weather__units">
<span class="weather_unit_celsius">°C</span>
<span class="weather_unit_farenheit">°F</span>
</div>
</div>
<div class="weather__body">
<h1 class="weather__city"></h1>
<div class="weather__datetime">
</div>
<div class="weather__forecast"></div>
<div class="weather__icon">
</div>
<p class="weather__temperature">
</p>
<div class="weather__minmax">
<p>Min: 12°</p>
<p>Max: 16°</p>
</div>
</div>
<div class="weather__info">
<div class="weather__card">
<i class="fa-solid fa-temperature-full"></i>
<div>
<p>Real Feel</p>
<p class="weather__realfeel">18°</p>
</div>
</div>
<div class="weather__card">
<i class="fa-solid fa-droplet"></i>
<div>
<p>Humidity</p>
<p class="weather__humidity">18°</p>
</div>
</div>
<div class="weather__card">
<i class="fa-solid fa-wind"></i>
<div>
<p>Wind</p>
<p class="weather__wind">18°</p>
</div>
</div>
<div class="weather__card">
<i class="fa-solid fa-gauge-high"></i>
<div>
<p>Pressure</p>
<p class="weather__pressure">18°</p>
</div>
</div>
</div>
</div>
<script src="https://kit.fontawesome.com/a692e1c39f.js" crossorigin="anonymous"></script>
<script src="app.js"></script>
</body>
</html>Let’s BreakDown the Above Code and understand the key points:-
The head section contains the metadata such as character set, compatibility settings, viewport configuration, and a link to an external stylesheet of the CSS File.
The body section contains the main content of the webpage. We’ve created container div with different sections for the application header, main body, and additional information cards. Icons from Font Awesome are used, and a custom JavaScript file (app.js) is included.
The Above HTML code will provide the structure for a Forcast app interface, and other functionality will be implemented in the further tutorial.
HTML Code Output

Step 2:- CSS Code For Weather-App
Create another separate file inside the same folder and add the following code:-
@import url('https://fonts.googleapis.com/css2?family=Poppins&display=swap');

* {
    margin: 0;
    padding: 0;
    box-sizing: border-box;
    font-family: 'Poppins', sans-serif;
}

.container {
    background: #171717;
    color: #fff;
    padding: 2rem;
    width: 40%;
    margin: 4rem auto;
    border-radius: 10px;
}

.weather__header {
    display: flex;
    justify-content: space-between;
    align-items: center;
}

input {
    border: none;
    background: #1e1e1e;
    outline: none;
    color: #fff;
    padding: 0.5rem 2.5rem;
    border-radius: 5px;
}

input::placeholder {
    color: #fff;
}

.weather__search {
    position: relative;
}

.weather__search i {
    position: absolute;
    left: 10px;
    top: 10px;
    font-size: 15px;
    color: #fff;
}

.weather__units {
    font-size: 1.5rem;
}

.weather__units span {
    cursor: pointer;
}

.weather__units span:first-child {
    margin-right: 0.5rem;
}

.weather__body {
    text-align: center;
    margin-top: 3rem;
}

.weather__datetime {
    margin-bottom: 2rem;
    font-size: 14px;
}

.weather__forecast {
    background: #1e1e1e;
    display: inline-block;
    padding: 0.5rem 1rem;
    border-radius: 30px;
}

.weather__icon img {
    width: 100px;
}

.weather__temperature {
    font-size: 1.75rem;
}

.weather__minmax {
    display: flex;
    justify-content: center;
}

.weather__minmax p {
    font-size: 14px;
    margin: 0.5rem;
}

.weather__info {
    display: grid;
    grid-template-columns: repeat(2, 1fr);
    grid-gap: 1rem;
    margin-top: 3rem;
}

.weather__card {
    display: flex;
    align-items: center;
    background: #1e1e1e;
    padding: 1rem;
    border-radius: 10px;
}

.weather__card i {
    font-size: 1.5rem;
    margin-right: 1rem;
}

.weather__card p {
    font-size: 14px;
}

@media(max-width: 936px){
    .container {
        width: 90%;
    }

    .weather__header {
        flex-direction: column;
    }

    .weather__units {
        margin-top: 1rem;
    }
}


@media(max-width: 400px){
    .weather__info {
        grid-template-columns: none;
    }
}
Let’s break down the CSS Code part and understand he working:-
Temperature Units Styles: .weather__units Sets the font size for temperature units and makes them clickable with a cursor pointer.
Search Icon Styles: .weather__search i Styles for the search icon within the search form..
Responsive Design with Media Queries:We’ve designed the reponsiveness for different screens. In screens up to 936px width, the container width will be reduced. In screens up to 400px width, the info cards switch in a single column layout.
CSS Code Output

Step 3:- JavaScript Code for Weather App
The below JavaScript code is responsible for managing the state of the weather-app including the handling user interactions, making API requests to retrieve Forecast data, and updating the HTML elements accordingly. We’ll see the implementation of JavaScript in Weather App. Let’s break down the code:
// state
let currCity = "London";
let units = "metric";
// Selectors
let city = document.querySelector(".weather__city");
let datetime = document.querySelector(".weather__datetime");
let weather__forecast = document.querySelector('.weather__forecast');
let weather__temperature = document.querySelector(".weather__temperature");
let weather__icon = document.querySelector(".weather__icon");
let weather__minmax = document.querySelector(".weather__minmax")
let weather__realfeel = document.querySelector('.weather__realfeel');
let weather__humidity = document.querySelector('.weather__humidity');
let weather__wind = document.querySelector('.weather__wind');
let weather__pressure = document.querySelector('.weather__pressure');
// search
document.querySelector(".weather__search").addEventListener('submit', e => {
let search = document.querySelector(".weather__searchform");
// prevent default action
e.preventDefault();
// change current city
currCity = search.value;
// get weather forecast
getWeather();
// clear form
search.value = ""
})
// units
document.querySelector(".weather_unit_celsius").addEventListener('click', () => {
if(units !== "metric"){
// change to metric
units = "metric"
// get weather forecast
getWeather()
}
})
document.querySelector(".weather_unit_farenheit").addEventListener('click', () => {
if(units !== "imperial"){
// change to imperial
units = "imperial"
// get weather forecast
getWeather()
}
})
function convertTimeStamp(timestamp, timezone){
const convertTimezone = timezone / 3600; // convert seconds to hours
const date = new Date(timestamp * 1000);
const options = {
weekday: "long",
day: "numeric",
month: "long",
year: "numeric",
hour: "numeric",
minute: "numeric",
timeZone: `Etc/GMT${convertTimezone >= 0 ? "-" : "+"}${Math.abs(convertTimezone)}`,
hour12: true,
}
return date.toLocaleString("en-US", options)
}
// convert country code to name
function convertCountryCode(country){
let regionNames = new Intl.DisplayNames(["en"], {type: "region"});
return regionNames.of(country)
}
function getWeather(){
const API_KEY = '64f60853740a1ee3ba20d0fb595c97d5'
fetch(`https://api.openweathermap.org/data/2.5/weather?q=${currCity}&appid=${API_KEY}&units=${units}`).then(res => res.json()).then(data => {
console.log(data)
city.innerHTML = `${data.name}, ${convertCountryCode(data.sys.country)}`
datetime.innerHTML = convertTimeStamp(data.dt, data.timezone);
weather__forecast.innerHTML = `<p>${data.weather[0].main}`
weather__temperature.innerHTML = `${data.main.temp.toFixed()}°`
weather__icon.innerHTML = ` <img src="http://openweathermap.org/img/wn/${data.weather[0].icon}@4x.png" />`
weather__minmax.innerHTML = `<p>Min: ${data.main.temp_min.toFixed()}°</p><p>Max: ${data.main.temp_max.toFixed()}°</p>`
weather__realfeel.innerHTML = `${data.main.feels_like.toFixed()}°`
weather__humidity.innerHTML = `${data.main.humidity}%`
weather__wind.innerHTML = `${data.wind.speed} ${units === "imperial" ? "mph": "m/s"}`
weather__pressure.innerHTML = `${data.main.pressure} hPa`
})
}
document.body.addEventListener('load', getWeather())State Initialization: At the we’ve intialized the state that is
let currCity = "London"; let units = "metric";
DOM Element Selection: They will represent different parts of the weather app interface where data will be displayed. I’ve add comment on this part of code as Selectors.
let city = document.querySelector(".weather__city");
let datetime = document.querySelector(".weather__datetime");
let weather__forecast = document.querySelector('.weather__forecast');
let weather__temperature = document.querySelector(".weather__temperature");
let weather__icon = document.querySelector(".weather__icon");
let weather__minmax = document.querySelector(".weather__minmax")
let weather__realfeel = document.querySelector('.weather__realfeel');
let weather__humidity = document.querySelector('.weather__humidity');
let weather__wind = document.querySelector('.weather__wind');
let weather__pressure = document.querySelector('.weather__pressure');Event Listeners for User Interactions: Event listeners will handle user interactions. The first one is triggered when the user submits the search form, and the others respond to clicks on the Celsius and Fahrenheit units, respectively.
// search
document.querySelector(".weather__search").addEventListener('submit', e => {
})

// units
document.querySelector(".weather_unit_celsius").addEventListener('click', () => {
})

document.querySelector(".weather_unit_farenheit").addEventListener('click', () => {
})
Functions for Data Conversion and API Request: The getWeather function makes an API request to OpenWeatherMap using the fetch function.
It defines two utility functions (convertTimeStamp and convertCountryCode) for converting timestamp and country code, respectively.
It will then processes the received data from the API Call and updates the HTML elements with the relevant received information for that we’ve used innnerHtml tag.
The API key (API_KEY) is used for authentication with the OpenWeatherMap API. You can generate your API key from Open WeatherMap API.
Final Demo of Weather-App
The Above video demonstrate the HTML,CSS and JavaScript Code output for weather-app.The all need tobe understand in the above Article was How to call an API in JavaScript?.
That’s All for today I hope you’ve learnt Something new in this tutorial. This application will retrieved the Forecast informatiion for all seacrhed citiesin the card. If you’ve any queries or questions related to the above article you can drop comment below. I’ve attached the useful reference of the code below. keep growing, keep learning.
Resources
Credit:- ope
HAPPY CODING!