Read More Button Preview


Read More Button Demo
Introduction
Welcome Back, Coder! Today we’ll be creating the most common and useful mini-element that is being used in many websites nowadays Read More Button. You must have visited a website that contains a long paragraph but full content is fully loaded until you click on that small button that says Read More. After you click on that it just opens the hole of hidden content for you. It seems interesting right? So yes today we’ll be creating the same Read More button using only Javascript, HTML, and a little bit of CSS.
Responsive Navigation Menu Bar in Using HTML and CSS
HTML Code For Read More Button
Create a file as “index.html” and add the following code:-
<div
x-data="readMore()"
class="flex min-h-screen p-8 bg-gradient-to-r from-gray-500 to-gray-600"
>
<div class="m-auto flex flex-col">
<h1 class="inline-block text-white text-4xl font-bold">
Alpine.js Read More
</h1>
<div class="mt-6 flex flex-wrap max-w-xl m-auto bg-white p-6 rounded shadow-md">
<div class="space-y-4 overflow-hidden"
:style="{
lineHeight: `${lineHeight}px`,
maxHeight: `${truncateHeight}px`
}"
x-ref="content">
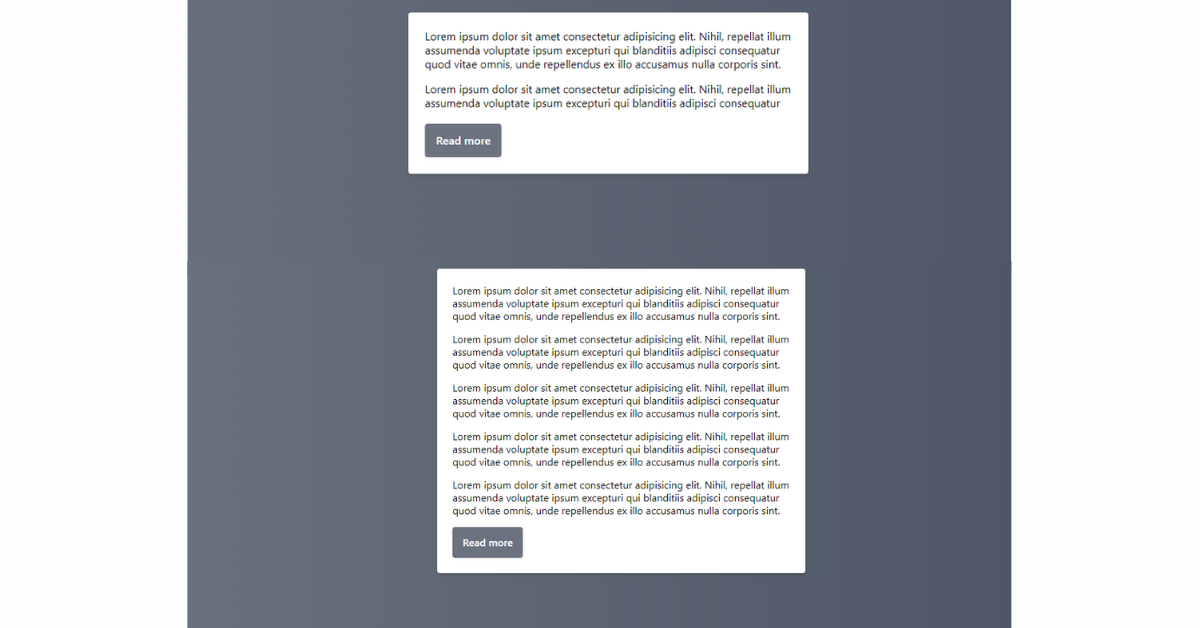
<p>Lorem ipsum dolor sit amet consectetur adipisicing elit. Nihil, repellat illum assumenda voluptate ipsum excepturi qui blanditiis adipisci consequatur quod vitae omnis, unde repellendus ex illo accusamus nulla corporis sint.</p>
<p>Lorem ipsum dolor sit amet consectetur adipisicing elit. Nihil, repellat illum assumenda voluptate ipsum excepturi qui blanditiis adipisci consequatur quod vitae omnis, unde repellendus ex illo accusamus nulla corporis sint.</p>
<p>Lorem ipsum dolor sit amet consectetur adipisicing elit. Nihil, repellat illum assumenda voluptate ipsum excepturi qui blanditiis adipisci consequatur quod vitae omnis, unde repellendus ex illo accusamus nulla corporis sint.</p>
<p>Lorem ipsum dolor sit amet consectetur adipisicing elit. Nihil, repellat illum assumenda voluptate ipsum excepturi qui blanditiis adipisci consequatur quod vitae omnis, unde repellendus ex illo accusamus nulla corporis sint.</p>
<p>Lorem ipsum dolor sit amet consectetur adipisicing elit. Nihil, repellat illum assumenda voluptate ipsum excepturi qui blanditiis adipisci consequatur quod vitae omnis, unde repellendus ex illo accusamus nulla corporis sint.</p>
</div>
<button type="button"
class="px-4 py-3 bg-gray-500 text-white font-medium rounded shadow mt-4"
x-show="isTruncated"
@click="
open = !open;
truncateHeight = open ? 1000 : getTruncateHeight()
"
x-cloak>
Read more
</button>
</div>
</div>
</div>Breakdown of the Above code and understanding of the functionality:-
Here we didn’t create the Separte CSS file instead we used the inline CSS. If you look closely in the code you will see the component is styled using Tailwind CSS classes like flex,min-h-screen,p-8 etc.
The :style binding is used to dynamically set the style of the content <div>.
The “Read more” button is a <button> element that is conditionally displayed (x-show="isTruncated") only if the content is truncated.
We’ve used the Tailwind CSS classes for styling, such as mt-6,mt-6, max-w-xl, bg-white, rounded, and shadow-md. You can learn and explore more about the Railwind CSS From here.
JavaScript Code For Read More Button
Create another file in the same folder and name as “script.js”. Add the following code:-
<script>
	function readMore() {
		return {
			open: false,
			isTruncated: false,
			lineNumber: 6,
			lineHeight: 20,
			truncateHeight: 0,
			init() {
				this.truncateHeight = this.getTruncateHeight();
				this.isTruncated = this.$refs.content.offsetHeight > this.truncateHeight;
			},
			getTruncateHeight() {
				return this.lineNumber * this.lineHeight;
			}
		}
	}
</script>
Breakdown of the Above code and understanding of the functionality:-
The read more function , returns an object with various properties and methods. The main purpose of this script is to handle the functionality of a “Read More” feature. It is used for truncating and expanding content dynamically on a webpage.
The open is a boolean indicating whether the content is currently expanded or not and it is initially set to “false”.
linenumber: This describes the number of lines to be displayed before truncation.
lineheight:- This will tell the Height of a single line of text.
Final Output
50+ Resume Template using HTML and CSS(Free code + Demo)
Conclusion
Congratulations!!! you have just completed Another mini-project for your portfolio that you can use on your next website. This is completely beginner-friendly code. Further, you can modify this as per your needs and ideas. You must do the experiments by adding hovering effects and transition effects and make it more impressive. Also for more such mini projects keep visiting our platform. You can also read about gradient, transition, effects, and shadow effects for interactive in CSS from here.
Resources
Credit:- Benoit Alix