
In this article, you will learn how to create a Login and Registration Form using HTML and CSS. I have shared many more tutorials on login and registration forms with you before. However, JavaScript was used in those designs. I didn’t use any javascript or jQuery here. This registration and login form is created by Pure HTML and CSS.
You can log in and register in the same form. There are two separate buttons for it. Clicking on the login button will open the login form. Clicking on the registration button will open the registration form. The HTML checkbox has been used to activate it.
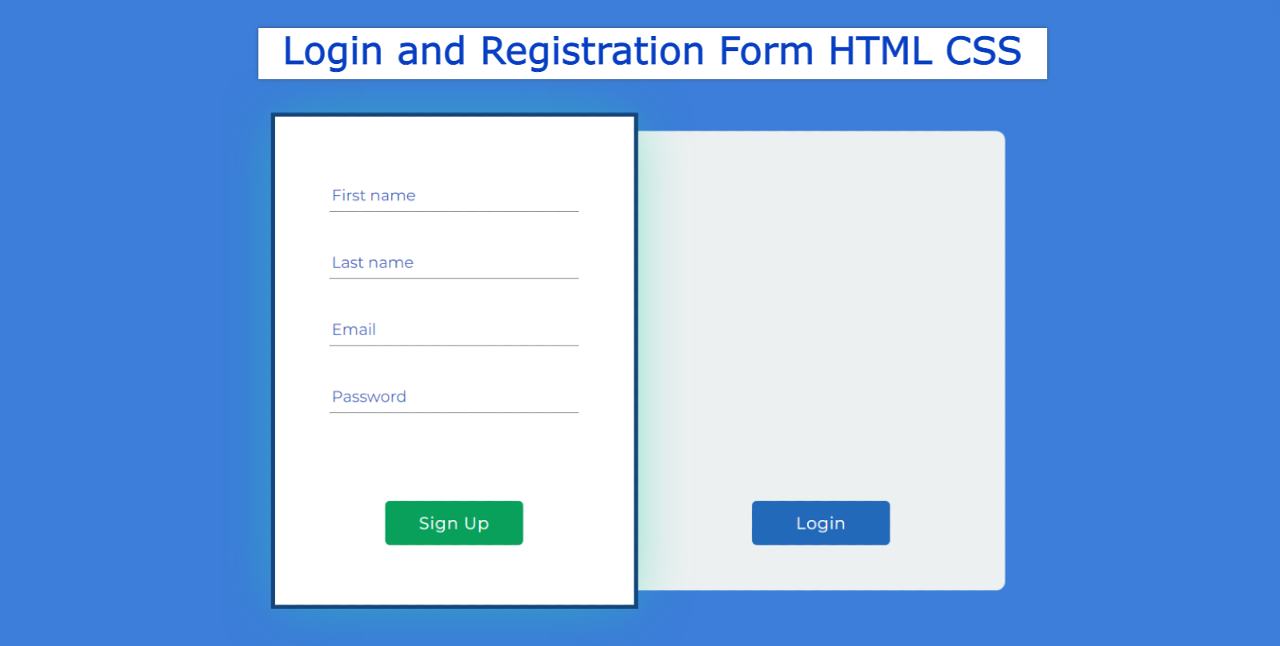
In the case of the registration form, first name, first name, last name, email, password, etc. have to be input. In the case of the login form, only email and password are input.
Login and Registration Form
The first blue color was used in the background. Then an area has been created for the Login and Registration Form. That area has been divided into two parts. In the first part, you can see the registration form and in the second part, you can see the login form.
However, the two forms cannot be seen together. The login form will be hidden when the registration form is available. And when the login form is available, the HTML registration form will be hidden. In addition, a small amount of animation has been used here.
Below I have given a demo that will help you to know how this simple login and registration form works.
See the Pen
Untitled by Foolish Developer (@foolishdevweb)
on CodePen.
As you can see above, I first used blue as the background color for the webpage. Then I created an area of white color. Shadows have been used to enhance the beauty of the area. Then the first part contains all the information of the registration form. The second part contains all the information on the login form.
How To Make Login And Registration Form in HTML
To make it, you must have a basic idea about HTML and CSS. I have not shared any tutorial here because the code used here is very simple.
To create it, you first need to create an HTML and CSS file. To create an HTML file, open Notepad and save it using the index.html rename. To create a similar CSS file, save the file using style.css Rename.
Below I have given the required source code. You will add those codes to your HTML and CSS files.
The following codes are the HTML code with which the information of registration and login form has been added. You copy the following codes and add them directly to your HTML file.
The first two input boxes used in the HTML code will act like radio buttons. These radio buttons play a very important role in converting from login form to registration form and from registration form to login form.
Then I made the input boxes. Four input boxes have been created here. However, in the case of the login form, only two inputs can be seen.
CSS Code ( style.css ):
The code below is the CSS code that will help you design it. You copy these codes and add them to your CSS file. Be sure to use the rename style.css of your CSS file.
Hopefully using the above codes you have learned how this login and registration form was created using HTML and CSS. Earlier I shared various step-by-step tutorials. If you are a beginner, you can watch those tutorials.
If you have any difficulty in assembling the above codes, you can take the help of the download button below. Be sure to comment on how you like this Login and Registration Form.