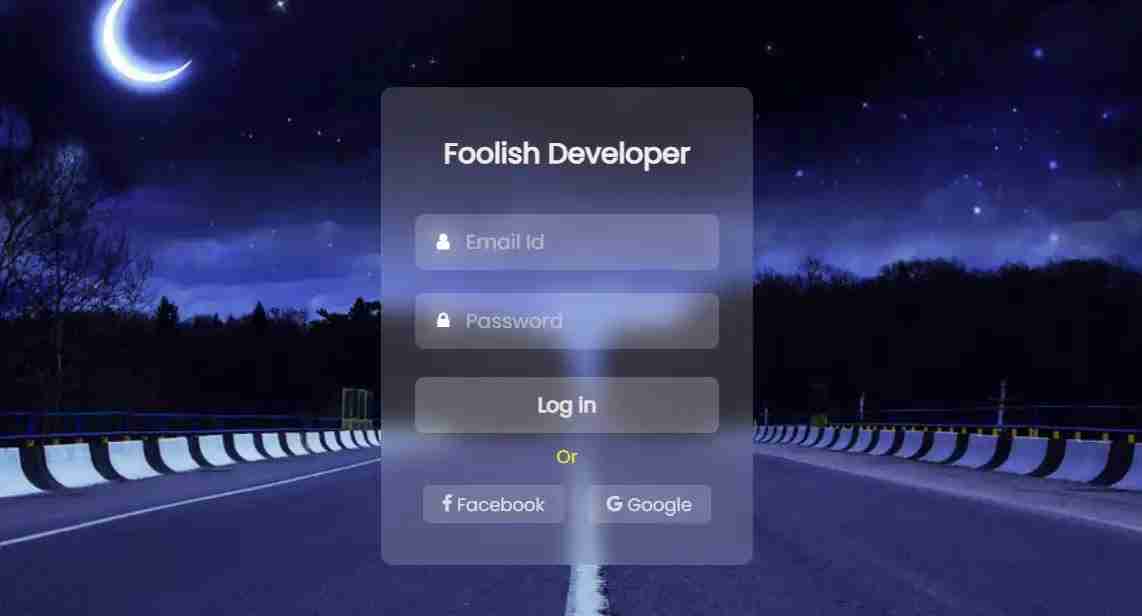

In this article, You will learn how to create a Glassmorphism login form using HTML and CSS. I have shown many more types of login forms and Glassmorphism login forms before.
The login form is an important UI element that helps to access the account on that website. There are different types of login forms like transparent, animated, popup, Glassmorphism, Neumorphism, etc. In the meantime, I have created login pages of almost all designs. This type of design is currently gaining considerable popularity. You will see that many websites now use this type of design which is a bit like a transparent design.
In the case of transparent designs, the background is usually quite clear. In the case of Glassmorphism design, the background is not clearly visible. Basically, this type of design is made with the help of CSS programming code. Like the normal login form, there is everything here to log in.
There is a place to input email id and password to log in and there is a nice login button. There are two social media buttons to access the account using social media. All in all, this is a nice and simple Glassmorphism design login form that you can help with programming HTML and CSS.
Glassmorphism login form UI Design [Live demo]
If you want to know how this design works then you can follow the live demo below. You can copy the source code needed to create it and use it in your own work.
See the Pen
by Foolish Developer (@fghty)
on CodePen.
As you can see in the demo above, this is a beautiful Glassmorphism login form design with a beautiful image in the background. First of all, I used the title in this login form. There is space to input email IDs and passwords and I have used placeholders and icons in that input.
There is a nice login button to log in. Below all I have made two buttons for Facebook and Google, basically two social media buttons so that you can log in with the help of social media without an email id password.
Glassmorphism login form with Html and CSS
To create this login form design you create an HTML file then copy and paste the HTML structure below into that Html file. If you do not copy this structure, you must use the font awesome CDN link in your HTML structure to activate the icons.
Step 1: Basic structure of this login form
<!DOCTYPE html>
<html lang=”en”>
<head>
<link rel=”stylesheet” href=”https://cdnjs.cloudflare.com/ajax/libs/font-awesome/5.15.3/css/all.min.css”>
<meta charset=”utf-8″>
<meta name=”viewport” content=”width=device-width, initial-scale=1″>
<style>
@import url(‘https://fonts.googleapis.com/css2?family=Poppins&display=swap’);
</style>
</head>
<body>
<div class=”content”>
</div>
</body>
</html>
I designed the background using the CSS code below. In this case, I have used an image of background design and I have arranged that image beautifully. If you want to use another image, you can add the URL of another image instead of the one I used.
*{
margin:0;
padding: 0;
box-sizing: border-box;
font-family: ‘Poppins’, sans-serif;
}
html{
background: url(“http://driving-tests.org/wp-content/uploads/2012/03/night-road.jpg”);
background-position: center;
background-repeat: no-repeat;
background-size: cover;
height: 600px;
}

Step 2: Design the background of this login form
I used the image by adding the CSS code above. Now I will make the background of this login form by adding the following CSS code. If you have seen the demo above, you will understand that the background of the login form is a bit vague, that is, the background image is vague.
The width: 330 px of this login form has been used and the padding: 40 px 30 px has been used. A backdrop filter has been used to blur the background. In this case, I have given backdrop-filter: blur (10px). If you increase this value further, your background will be blurred.
body{
display: grid;
place-items: center;
text-align: center;
background-size: cover;
}
.content{
width: 330px;
border-radius: 10px;
padding: 40px 30px;
margin-top: 100px;
background: rgba(255, 255, 255, 0.178);
backdrop-filter: blur(10px);
}

Step 3: Add title or brand name
The following HTML and CSS programming code helped to create the title in this login form. In this case, I have used the name of my website. You can use any name you like here if you want.
<div class=”text”>Foolish Developer</div>
.content .text{
font-size: 25px;
font-weight: 600;
margin-bottom: 35px;
color: rgb(247, 233, 233);
}

Step 4: Create a place to input email id and password
Using the HTML programming codes below, I created a place to input email IDs and passwords. I added icons and placeholders to the input space. As I said above, to make these icons work, you must use the CDN link and add it to the head section of your Html file.
<form action=”#”>
<div class=”field”>
<span class=”fa fa-user”></span> <!– user icon –>
<input type=”text” placeholder=”Email Id” required> <!– email id input place –>
</div>
<div class=”field”>
<span class=”fa fa-lock”></span> <!– lock icon–>
<input type=”password” placeholder=”Password”> <!–password input place –>
</div>
<!–Login Button->
<!–Social icon–>
</form>
I designed this email ID and password input space using the CSS code below. Height: 50px and width: 100% of this space used. I used backdrop-filter: blur (10px) again to make the background of this email ID and password input space a little more obscure.
I have already used the backdrop filter for the background and again I have used the backdrop filter for this input so it looks a little vaguer. Icon font-size: 50 px and line-height 50 px have been used in this case. In this case position: absolute has been used.
.content .field{
height: 50px;
width: 100%;
display: flex;
position: relative;
}
.field input{
height: 100%;
width: 100%;
padding-left: 45px;
font-size: 18px;
outline: none;
border: none;
color: #e0d2d2;
border-radius: 8px;
background: rgba(19, 18, 18, 0);
backdrop-filter: blur(10px);
}
.field input::placeholder{
color: #e0d2d2a6;
}
.field:nth-child(2){
margin-top: 20px;
}
.field span{
position: absolute;
width: 50px;
line-height: 50px;
color: #ffffff;
}

Step 5: Create a login button in the Glassmorphism form
This login form has a nice login button which has been created using the following HTML and CSS programming code. The height of the button is 50 px and the width: 100% The font size of the text in this is 18 px.
In this case, too I have used a backdrop filter so it usually looks a little more blurry. In this case border-radius: 8px has been used to round this button a bit.
<button>Log in</button>
button{
margin: 25px 0 0 0;
width: 100%;
height: 50px;
color: rgb(238, 226, 226);
font-size: 18px;
font-weight: 600;
background: rgba(255,255,255,0.05);
backdrop-filter: blur(10px);
border: none;
outline: none;
cursor: pointer;
border-radius: 8px;
}

Step 6: Create social buttons
At the bottom of this login form, I have used two social media buttons that can be used to log in. These two buttons help to create the following HTML and CSS programming. In this case, also I have used icons of course you can change these icons.
<div class=”or”>Or</div>
<div class=”icon-button”>
<span class=”facebook”><i class=”fa fa-facebook”></i> Facebook</span>
<span><i class=”fa fa-google”></i> Google</span>
</div>
.content .or{
color: rgb(236, 233, 15);
margin-top: 9px;
}
.icon-button{
margin-top: 15px;
}
.icon-button span{
padding-left: 17px;
padding-right: 17px;
padding-top: 6px;
padding-bottom: 6px;
color: rgba(244, 247, 250, 0.795);
border-radius: 5px;
line-height: 30px;
background: rgba(255, 255, 255, 0.164);
backdrop-filter: blur(10px);
}
.icon-button span.facebook{
margin-right: 17px;
}
button:hover,
.icon-button span:hover{
background-color: #babecc8c;
}

Hopefully from this tutorial, you have learned how to create a Glassmorphism login form using HTML and CSS code. I have created many more Glassmorphism design login forms that you can view if you want.