In this article you will learn how to create a drawing app using HTML, CSS and JavaScript. You can create javascript drawing app very easily if you have basic understanding of javascript.
To make this html5 canvas drawing tool, I first created an area using the html canvas for drawing. Then created various function buttons. At the end, I executed the javascript drawing project by javascript. If you are looking for WordPress Web Design services then WebFlare is perfect for you.
There are many open-source libraries and tools available that can help you build a drawing app using HTML, such as the canvas API provided by HTML5, or libraries such as p5.js or fabric.js.
These libraries can handle much of the low-level details of rendering graphics on the canvas and provide higher-level abstractions for common tasks like drawing shapes, managing layers, and working with images. This is a great project(Create a simple drawing app using javascript) for beginners to brush up on JavaScript.
JavaScript Drawing App Project
JavaScript drawing project would typically be a web-based application that allows users to create drawings or sketches in their web browser. The HTML would provide the structure and basic layout of the application, while other technologies such as JavaScript and CSS would be used to add interactivity and styling to the app.
For example, the HTML might define the canvas on which the drawing is created, while JavaScript would be used to listen for user input (such as mouse clicks or drags) and update the drawing app canvas accordingly.
The CSS would be used to control the appearance of the user interface, such as the colors and styles of the buttons and other controls. In this article, we’ll be building a simple web-based drawing app using JavaScript.
See the Pen Drawing App using JavaScript by Ground Tutorial (@groundtutorial) on CodePen.
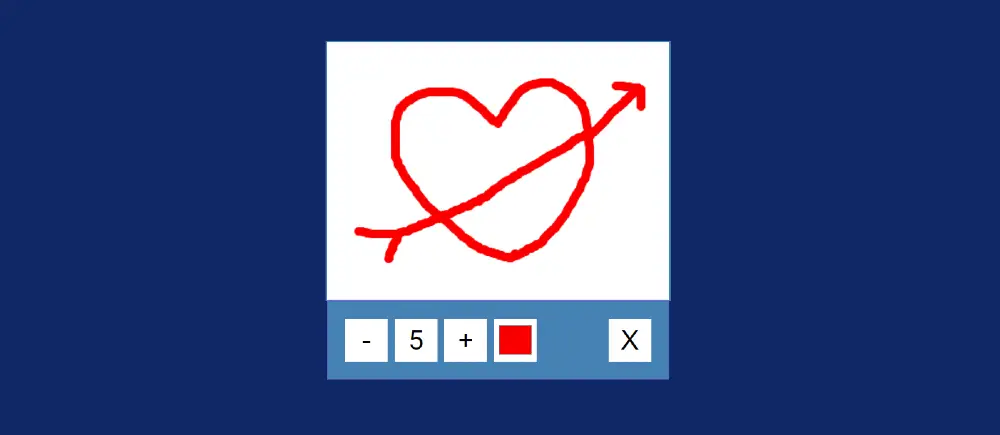
As you can see above, this is a very simple JavaScript drawing app that I made using a lot of HTML CSS and JavaScript. Basically it is made using canvas. I have created a box within a web page. I created this box using HTML canvas. Below that is the control panel where you’ll find options to do these various controls.
Create a Simple Drawing App using JavaScript
Here I have shared step by step tutorial of this javascript drawing app. You will find many tutorials on internet but here I have given step by step tutorial and necessary source code. Keeping the beginners in mind, the javascripts used here have been fully explained.
Step 1. JavaScript drawing app's canvas
First I created a basic structure of this canvas drawing html using the following HTML and CSS. Using HTML’s canvas, I’ve created an area in which we can draw. Width=”400″ and height=”300″ are used for this canvas.
<canvas id="canvas" width="400" height="300"></canvas>
					* {
  box-sizing: border-box;
}

body {
  background-color: #0f2867;
  font-family: "Roboto", sans-serif;
  display: flex;
  flex-direction: column;
  align-items: center;
  justify-content: center;
  height: 100vh;
  margin: 0;
}

canvas {
  border: 2px solid steelblue;
  background: #fff;
}

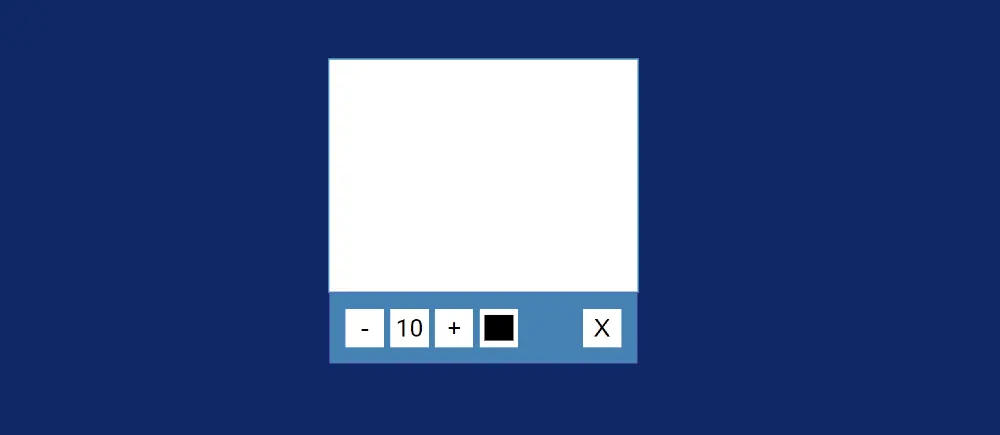
Step 2: HTML drawing tool control panel
Now we have to create a toolbox in this canvas drawing javascript where we will get options to control different options.
					<div class="toolbox">

</div>
					.toolbox {
  background-color: steelblue;
  border: 1px solid slateblue;
  display: flex;
  width: 400px;
  padding: 1rem;
}

Step 3: Control buttons of the canvas drawing tool
Now we will add control options in this canvas sketch javascript. You can customize the html drawing tool with those options. First I added all those elements by html. Then I designed them with css.
					  <button id="decrease">-</button>
  <span id="size">10</span>
  <button id="increase">+</button>
  <input type="color" id="color" />
  <button id="clear">X</button>
					.toolbox > * {
  background-color: #fff;
  border: none;
  display: inline-flex;
  align-items: center;
  justify-content: center;
  font-size: 2rem;
  height: 50px;
  width: 50px;
  margin: 0.25rem;
  padding: 0.25rem;
  cursor: pointer;
}

.toolbox > *:last-child {
  margin-left: auto;
}
Step 4: Activate the drawing app with javascript
Now it’s time to execute this canvas drawing javascript using javascript. There is very little JavaScript here. If you know basic javascript then you can create javascript drawing project very easily.
1. Store drawing app's HTML elements in constants
These lines of code retrieve references to the different HTML elements we need to interact with in our javascript drawing app. The canvas variable holds a reference to the canvas element, while the increaseButton, decreaseButton, sizeElement, colorElement, and clearElement variables hold references to the corresponding buttons and inputs in the HTML.
					const canvas = document.getElementById("canvas");
const increaseButton = document.getElementById("increase");
const decreaseButton = document.getElementById("decrease");
const sizeElement = document.getElementById("size");
const colorElement = document.getElementById("color");
const clearElement = document.getElementById("clear");
const ctx = canvas.getContext("2d");
The ctx variable is a reference to the 2D rendering context of the canvas, which we’ll use to draw on the canvas.
2. Some variables of javascript drawing app
These variables are used to store the state of the html drawing tool. The size variable stores the size of the brush, which is initially set to 10. The color variable stores the color of the brush, which is initially set to “black”.
					let size = 10;
let color = "black";
let x;
let y;
let isPressed = false;
The x and y variables store the current x and y coordinates of the mouse on the canvas. The isPressed variable is a boolean that indicates whether the mouse is currently being pressed.
3. Draw a filled circle on the canvas
This function, drawCircle, is used to draw a filled circle on the canvas for this canvas drawing javascript. It takes in two arguments, x and y, which represent the coordinates of the center of the circle.
The function starts by calling the beginPath method on the rendering context, which starts a new path. Then, the arc method is used to create a circular path with the specified center, radius (size), start angle (0), and end angle (Math.PI * 2) which creates a full circle.
					const drawCircle = (x, y) => {
  ctx.beginPath();
  ctx.arc(x, y, size, 0, Math.PI * 2);
  ctx.fillStyle = color;
  ctx.fill();
};
The fillStyle property of the rendering context is set to the desired color (color), and the fill method is then called to fill the path with the specified color. This results in a filled circle being drawn on the canvas at the specified position.
4. Draws a line on a 2D canvas
This is a JavaScript function that draws a line on a 2D canvas using the canvas API. The function takes four arguments: x1, y1, x2, and y2, which represent the starting and ending coordinates of the line.
					const drawLine = (x1, y1, x2, y2) => {
  ctx.beginPath();
  ctx.moveTo(x1, y1);
  ctx.lineTo(x2, y2);
  ctx.strokeStyle = color;
  ctx.lineWidth = size * 2;
  ctx.stroke();
};
The ctx.beginPath() method is called to start a new path on the canvas. The ctx.moveTo(x1, y1) method sets the starting point of the line at the coordinates (x1, y1). The ctx.lineTo(x2, y2) method sets the ending point of the line at the coordinates (x2, y2).
The line’s stroke style is set using ctx.strokeStyle = color, where color is a variable that holds the color of the line. The width of the line is set using ctx.lineWidth = size * 2, where size is a variable that determines the width of the line. Finally, the ctx.stroke() method draws the actual line on the Drawing App canvas.
5. Updates the size of a line on drawing app javascript
This is a JavaScript function that updates the size of a line on a user interface. The function sets the inner text of an HTML element, referred to by the sizeElement variable, to the value of the size variable. Basically this javascript drawing app will control the size of the drawn lines.
const updateSizeOnScreen = () => (sizeElement.innerText = size);
The innerText property of an HTML element is used to set or get the text content of an element. In this case, the text content of the element referred to by sizeElement is set to the value of size. This function could be used to display the current size of a line in real-time as the user interacts with the interface.
6. Sets an event listener for mousedown
This is a JavaScript code snippet that sets an event listener on a drawing app canvas element. The event listener listens for the “mousedown” event, which is triggered when the user presses down on the mouse button while the cursor is over the canvas element.
					canvas.addEventListener("mousedown", (e) => {
  isPressed = true;
  x = e.offsetX;
  y = e.offsetY;
});
When the “mousedown” event is triggered, the anonymous function that is passed as the second argument to addEventListener is executed. The function sets the value of the isPressed variable to true and sets the x and y variables to the offsetX and offsetY properties of the event object e, respectively.
The offsetX and offsetY properties represent the X and Y coordinates of the mouse event, relative to the position of the canvas element. These values can be used to determine where the user started the mouse event on the canvas.
7. Sets an event listener for mouseup
This is a JavaScript code snippet that sets an event listener on a javascript drawing app. The event listener listens for the “mouseup” event, which is triggered when the user releases the mouse button while the cursor is over the canvas element.
					canvas.addEventListener("mouseup", (e) => {
  isPressed = false;
  x = undefined;
  y = undefined;
});
When the “mouseup” event is triggered, the anonymous function that is passed as the second argument to addEventListener is executed. The function sets the value of the isPressed variable to false and sets the x and y variables to undefined.
This code could be used as part of a larger application to allow the user to draw lines on the canvas by clicking and dragging the mouse. When the mouse button is released, the values of x and y are set to undefined to indicate that the line drawing process has ended.
8. Sets an event listener for mousemove
When the “mousemove” event is triggered, the anonymous function that is passed as the second argument to addEventListener is executed. The function checks the value of the isPressed variable. If isPressed is true, the function draws a circle and a line on the javascript drawing app.
					canvas.addEventListener("mousemove", (e) => {
  if (isPressed) {
    x2 = e.offsetX;
    y2 = e.offsetY;
    drawCircle(x2, y2);
    drawLine(x, y, x2, y2);
    x = x2;
    y = y2;
  }
});
The x2 and y2 variables are set to the offsetX and offsetY properties of the event object e, respectively, which represent the current X and Y coordinates of the mouse.
The drawCircle function is called with x2 and y2 as arguments to draw a circle at the current mouse position. The drawLine function is then called with x, y, x2, and y2 as arguments to draw a line from the previous mouse position to the current mouse position.
Finally, the values of x and y are updated to x2 and y2, respectively, so that the next time the “mousemove” event is triggered, the line will be drawn from the current mouse position to the new mouse position.
9. Sets two event listeners on two buttons
This is a JavaScript code snippet that sets two event listeners on two buttons, “increaseButton” and “decreaseButton”.
The first event listener is set on the “increaseButton” and listens for the “click” event. This will basically help to increase the size of the lines drawn by javascript drawing app. When the button is clicked, the anonymous function that is passed as the second argument to addEventListener is executed.
The function increases the value of the size variable by 5, and checks if the new value of size is greater than 50. If it is, the value of size is set back to 50. Finally, the updateSizeOnScreen function is called to update the size on the screen.
					increaseButton.addEventListener("click", () => {
  size += 5;
  if (size > 50) size = 50;
  updateSizeOnScreen();
});

decreaseButton.addEventListener("click", () => {
  size -= 5;
  if (size < 5) size = 5;
  updateSizeOnScreen();
});
The second event listener is set on the “decreaseButton” and listens for the “click” event. This will basically help to reduce the size of the lines drawn by javascript drawing app. When the button is clicked, the anonymous function that is passed as the second argument to addEventListener is executed.
The function decreases the value of the size variable by 5, and checks if the new value of size is less than 5. If it is, the value of size is set back to 5. Finally, the updateSizeOnScreen function is called to update the size on the screen.
10. Event listener listens for the color "change" event
This is a JavaScript code snippet that sets an event listener on an element, “colorElement”. The event listener listens for the “change” event, which is triggered when the value of the element changes.
colorElement.addEventListener("change", (e) => (color = e.target.value));
When the “change” event is triggered, the anonymous function that is passed as the second argument to addEventListener is executed. The function sets the value of the color variable to the value property of the event target, which represents the current value of the “colorElement”.
This code allows the user to change the color of the drawn lines on the canvas by selecting a different color from the “colorElement”. The color variable is updated in real-time as the user selects a different color, which will be used by the drawLine function to set the stroke style of the lines on the canvas.
11. Activate clear button of the javascript drawing app
This is a JavaScript code snippet that sets an event listener on an element, “clearElement” of this canvas drawing javascript. The event listener listens for the “click” event, which is triggered when the element is clicked.
					clearElement.addEventListener("click", () =>
  ctx.clearRect(0, 0, canvas.width, canvas.height)
);
When the “click” event is triggered, the anonymous function that is passed as the second argument to addEventListener is executed. The function calls the clearRect method on the canvas context (ctx), which is used to clear a rectangular area on the canvas.
The method takes four arguments: the x and y coordinates of the top-left corner of the rectangle, and the width and height of the rectangle. In this case, the entire canvas is cleared by passing 0 and 0 as the x and y coordinates and canvas.width and canvas.height as the width and height of the rectangle.
This code allows the user to clear the entire canvas by clicking the “clearElement”. The user can start drawing again from a clean canvas after clicking this button.
Hope from this tutorial you got to know how I made this javascript drawing app. This is a Simple Drawing App but next time I will try to advance it by adding more elements in this project.
Please comment how you like this project. You will get the necessary code of this Drawing App JavaScript from the button below.