A to-do list is a web application software, where users can add all the important tasks that they need to perform in a day, adding the tasks inside the to-do list and performing all the tasks in a step-by-step manner helps increase the user’s work productivity and helps in managing the time effectively. The user can add multiple tasks inside our to-do list application, an option for marking them complete and we will also delete the completed tasks inside our to-do list app.

In order to make it simple for beginners to understand the concepts of forms and javascript methods for adding and removing tasks, we will be creating our to-do list from scratch. To-do list apps with nearly all of the features—such as editing, removing, and adding etc.
Create Search Filter Project UsingJavascript
Live Demo:
What is a to-do list app?
A to-do list app is a javascript app that helps the user manage their daily-based tasks. This software allows you to add multiple tasks inside the software, and then as soon as you complete the task, you can mark it complete inside the software. This helps the user manage the time for performing all the tasks.
Adding the structure (HTML):
Adding the icons Links :
Our to-do list app will be using some icons, which we will be importing from the Fontawesome website, where you can use free icons in your projects. You may include more than 10,000 icons, ranging from 2D to 3D, in your project by simply including an import link to the Fontawesome website in the HTML file’s header section.
<script src="https://kit.fontawesome.com/8535745612.js" crossorigin="anonymous"></script>
Adding the Structure:
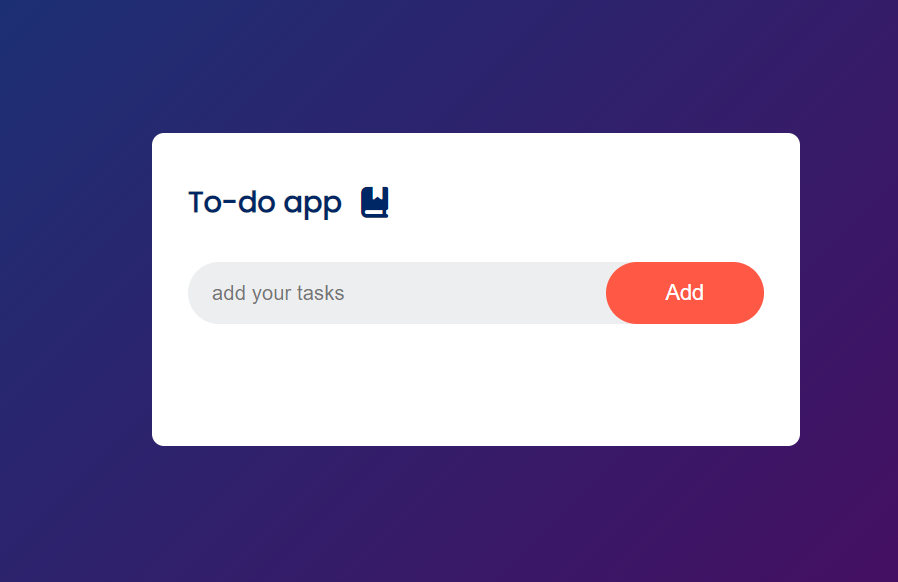
Using the <div>element, we will create a container for our to-do list inside the to-do list structure. Next, we will create a section for our to-do-app inside the child container. The heading for our to-do list will be added using the <h2>tag selector, and a bookmark symbol will be added next to the heading using the fontawesome icons classes. Next, we will build an input-type text box using another child div container for rows, and we will add the various jobs using the button.
<body>
    <div class="container">
        <div class="todo-app">
            <div class="app-title">
                <h2>To-do app</h2>
                <i class="fa-solid fa-book-bookmark"></i>
            </div>
            <div class="row">
                <input type="text" id="input-box" placeholder="add your tasks">
                <button>Add</button>
            </div>
            <ul id="list-container">
            </ul>
        </div>
    </div>


    <script src="script.js"></script>
</body>
Styling To-do List (CSS):
1. Basic Styling and Container Styling:
Using the google font import link, we will import the Poppins font for our to-do list project, and then, using the universal tag selector, we will set the padding and margin of the to-do list webpage to zero, and using the box-sizing property, we will set the box sizing to border-box.
We will use the class selector attribute to add style to our container for the to-do list. We’ll set the minimum height to 100 vh and the width to 100% using the minimum height attribute. Our to-do list app will have a blue and red linear background using the background property, and the item will be aligned in center the align item property.
@import url('https://fonts.googleapis.com/css2?family=Poppins&display=swap');


*, *:before, *:after{
    margin: 0;
    padding: 0;
    box-sizing: border-box;
}
body{
    font-family: 'Poppins', sans-serif;
}
.container{
    width: 100%;
    min-height: 100vh;
    background: linear-gradient(135deg, #153677, #4e085f);
    padding: 10px;
    display: flex;
    justify-content: center;
    align-items: center;
}
Adding styling to the to-do app:
The to-do app’s styling will be added by using the class selector property. With the help of the width property, we will increase the to-do app container’s maximum width to 540 and set the maximum width to 100%.
Additionally, to add a curve edge to the to-do app, we will set the border radius to 10 pixels using the border-radius property and the background color property to “white.”
We will add styling to the Todo app’s input by using the class selector attribute. We’re going to specify the input box’s maximum width, and its hover property will make its background translucent. The input box becomes brighter when the user moves their cursor over it.
.todo-app{
    width: 100%;
    max-width: 540px;
    background-color: #fff;
    padding: 40px 30px 70px;
    border-radius: 10px;
    display: flex;
    flex-direction: column;
    align-items: left;
    gap: 2rem;
}
.app-title{
    display: flex;
    gap: 1rem;
    align-items: center;
}
.app-title h2, .app-title i{
    color: #002765;
}
.app-title i{
    font-size: 26px;
}
.row{
    display: flex;
    align-items: center;
    justify-content: space-between;
    background-color: #edeef0;
    border-radius: 30px;
}
input{
    width: 100%;
    border: none;
    outline: none;
    background-color: transparent;
    padding: 12px;
    font-size: 17px;
    padding-left: 20px;
}
button{
    border: none;
    cursor: pointer;
    outline: none;
    padding: 15px 50px;
    border-radius: 30px;
    background-color: #ff5945;
    color: #fff;
    font-size: 18px;
    transition: all .25s ease;
}
button:hover{
    filter: brightness(.8);
}

@media screen and (max-width: 400px) {
    button{
        padding: 15px;
        border-radius: 0 30px 30px 0;
    }
}
Styling List tags for creating task list:
Using the unordered list tag with list option, we will set the font size of the list items to 17px, and we will set the list style to none in the unordered list tag selector. We will add a 12px padding using the padding property and a 5px margin using the margin top property.
We will apply the style to our span container using the span tag, which will assist in generating a task list. Within our span tag, we will add a transition ease and set the font color to white using the color attribute.
ul{
    list-style: none;
}
ul li{
    font-size: 17px;
    padding: 12px 8px 12px 50px;
    margin-top: 5px;
    user-select: none;
    cursor: pointer;
    position: relative;
}
ul li::before{
    position: absolute;
    content: '';
    width: 24px;
    height: 24px;
    border-radius: 50%;
    left: 0;
    border: 2px solid #ff5945;
}
ul .checked{
    color: #555;
    text-decoration: line-through;
}
ul .checked::before{
    background-color: #ff5945;
}
span {
    position: absolute;
    right: 0;
    top: 50%;
    transform: translateY(-50%);
    width: 30px;
    height: 30px;
    border-radius: 50%;
    display: flex;
    justify-content: center;
    align-items: center;
    color: #555;
    font-size: 18px;
    transition: all .2s ease;
}
span:hover{
    background-color: #c9c9c9;
    color: #fff;
}
Adding the Functionality (Javascript):
We will create some constant variables and set their values as the HTML tags in the document. getELementByID, we will select the HTML tags such as the input box, button, and list container.
30+ Javascript Projects with Source Code
Then we will create a function called addTask(). We will use the if and else property. If the inputbox value is empty, it will show an alert message to write something, and if we have written some text inside the text box using the list item property, we will create a list item and set the value of the list container property to add the list item to the container.
Using windoweventListener, we will add an event listener to our to-do list app. If the user clicks on the completion task, a cross-text property will be applied to the text, and using the mouse-click event listener, we can remove the completed task from the to-do list app.
const inputBox = document.getElementById("input-box");
const button = document.querySelector("button");
const list = document.getElementById("list-container");


function addTask(){
    if(inputBox.value === ''){
        alert("you must write something!");
    }else{
        let li = document.createElement("li");
        li.innerHTML = inputBox.value;
        list.appendChild(li);
        inputBox.value = '';
        let span = document.createElement("span");
        span.innerHTML = "x";
        li.appendChild(span);
    }
    saveData();
}
list.addEventListener("click", (e)=>{
    if(e.target.tagName === "LI"){
        e.target.classList.toggle("checked");
        saveData();
    }else if(e.target.tagName === "SPAN"){
        e.target.parentElement.remove();
        saveData();
    }
});

button.addEventListener("click", addTask);

function saveData(){
    localStorage.setItem("data", list.innerHTML);
}
function showTask(){
    const savedData = localStorage.getItem("data");
    if(savedData){
        list.innerHTML = savedData;
    }
}
window.addEventListener("load", showTask);
Final Video Output:
Conclusion:
So, you saw how we created the to-do list app in JavaScript in a step-by-step manner, explaining all the important concepts, starting from creating the structure for the to-do app to styling the to-do to make it look more interactive.
For more such projects stay connected with Foolish Developer and become an expert in coding. If you have any queries feel free to ask in the comment section.
Thank you!!
Author: Arun
Codepen by: NicoHDL