To protect user data from unauthorized access, most websites use sign-up forms for safety purposes. This method helps in protecting user data, users can use the signup form to create a personal account on the website and use the services for their personal use. The user must provide their unique user name and personal email address in the signup form in order to access their account when they re-log into the same website.
A signup form is a type of beginner project in which we will learn about the HTML concepts of forms, how we can create the structure of forms, and using CSS, we will add styling to the project.
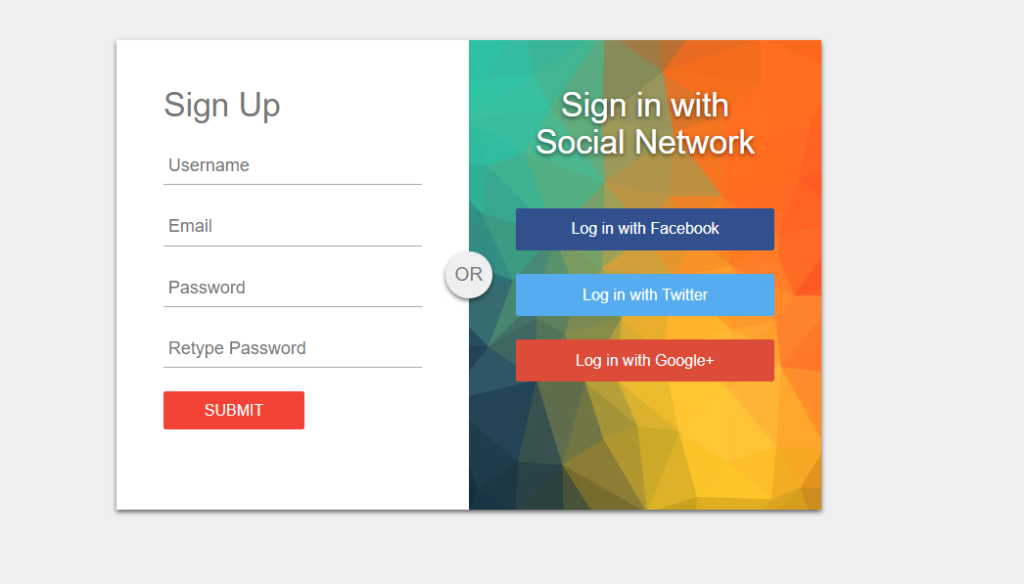
Live Project:
We will be creating the signup form from scratch so that everyone can easily understand the concepts of form, which helps developers gain knowledge about forms in HTML. But before we start, let’s understand some general concepts about forms in HTML.
30+ HTML CSS and Javascript Projects
What is a Signup Form?
Signup is a type of user’s data collection form that helps in creating personal accounts on websites with the help of a unique username and a unique email ID.
What is the basic syntax of Form Structure?
<form>
  <label for="fname">First name:</label><br>
  <input type="text" id="fname" name="fname" value="foolish"><br>
  <label for="lname">Last name:</label><br>
  <input type="text" id="lname" name="lname" value="Developer">
</form>
Adding the structure (HTML):
Adding the basic HTML Structure:
The doctype HTML tag is used to tell the browser that we are using the latest HTML version.
HTML: The HTML tag acts as a container that contains all the major data inside the HTML.
Head: In the head section, we add all the necessary links and the title of the webpage.
Body: In the body tag, we create the structure of any project.
<!DOCTYPE html>
<html>
<head>
<title> Singup Form Design</title>
  <!-- <link rel="stylesheet" type="text/css" href="style.css"> -->
</head>
<body>

</body>
</html>
Creating the structure:
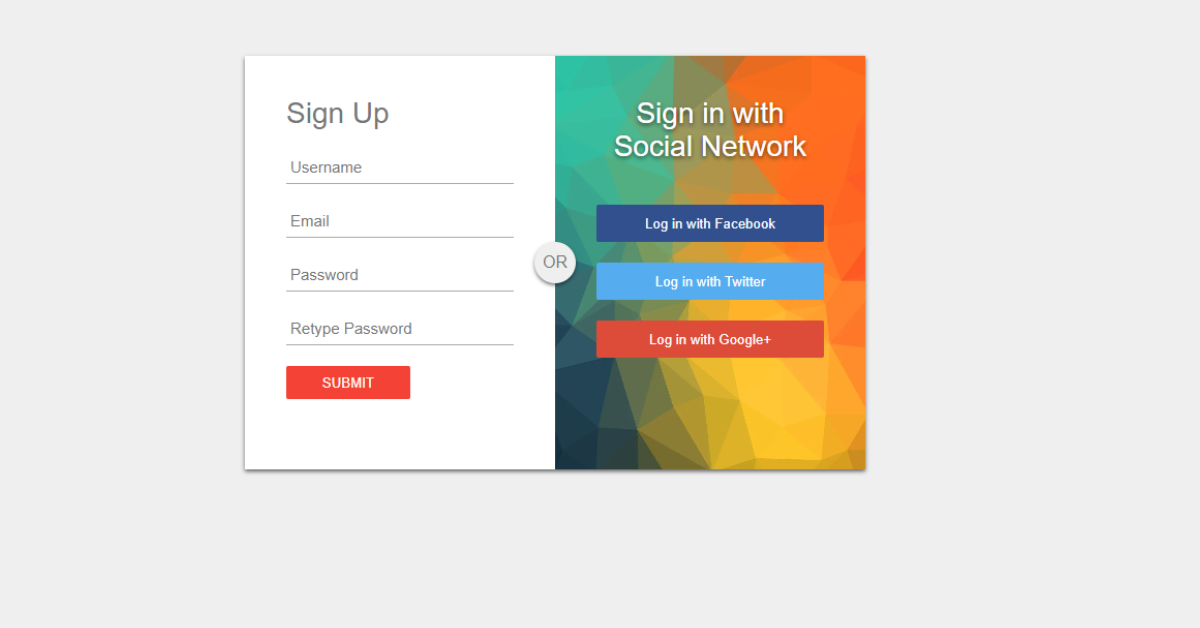
Firstly, we will create the container for our signup using the div tag with the class login box. We will create the main container for our sign-up form. In our project, we will create an advance signup form where we will provide the option for the user to create an account with the help of Facebook, Twitter, or a Google account. So here we will create two sections: the left section using manually adding email and username with password or using the buttons for Google and Facebook accounts.
Now using the <h1> tag, we will add the heading for our signup form and the input tag, such as text, password, and submit button, for creating the different inputs for the user.
We will also create another container where we will add the button for Google, Facebook,facebook and Twitter signup.
<div id="login-box">
    <div class="left-box">
      <h1> Sign Up </h1>
      <input type="text" name="username" placeholder="Username"/>
      <input type="text" name="email" placeholder="Email" required/>
      <input type="password" name="password" placeholder="Password" required/>
      <input type="password" name="password2" placeholder="Retype Password"/>
      <input type="submit" name="singup-button" placeholder="Sing Up"/>
    </div>
    <div class="right-box">
      <span class="signinwith">Sign in with</br>Social Network </span>
      <button class="social facebook">Log in with Facebook</button>
      <button class="social twitter">Log in with Twitter</button>
      <button class="social google">Log in with Google+</button>

    </div>
    <div class="or">OR</div>
</div> 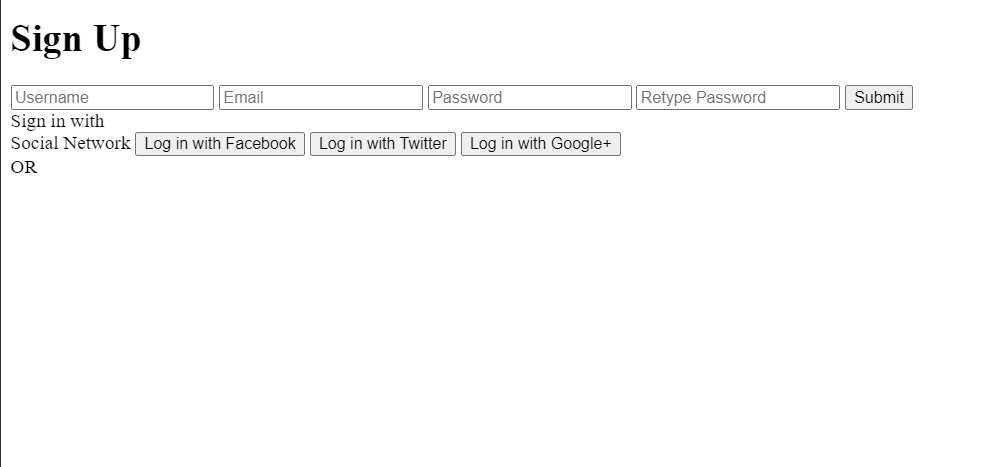
Styling the Signup form (CSS):
1. Basic Styling:
We will reset the webpage’s padding and margin to zero from the browser’s default values using the body tag selector. Also, we’ll change the background to “light gray” and the font size to 16 pixels using the background and font size properties, respectively. We will make the body text’s font color to “gray.” by using the font color property.
body {
  margin:0;
  padding:0;
  background:#efefef;
  font-size:16px;
  color:#777;
  font-family:sans-serif;
  font-weight:300;
}
Left Box Styling:
We will apply the style to the webpage’s main container in the ID selector (#login-box). We will set the position as “relative” according to the page body by using the position property. The margin will be set to 5% from the left and right and 5% from the top and bottom of the body. The container’s width and height are configured to be 400 and 600 pixels, respectively. We will also set the container’s white background using the background property.
Now that we have the header of the homepage with a font size of 28 px, we will use the h1 tag selector to add a little margin and padding.
After that, we will apply the basic style to every input element on the registration form. We will be changing the font size, padding, and margin of each element, as well as changing the button’s background when the user hovers over it by utilizing the button hover property.
#login-box {
  position:relative;
  margin: 5% auto;
  height:400px;
  width:600px;
  background:#fff;
  box-shadow: 0 2px 4px rgba(0,0,0,0.6);
}
.left-box {
  position:absolute;
  top:0;
  left:0;
  box-sizing: border-box;
  padding:40px;
  width:300px;
  height:400px;
}
h1 {
  margin:0 0 20px 0;
  font-weight:300;
  font-size:28px;
}
input[type="text"], input[type="password"] {
  display:block;
  box-sizing:border-box;
  margin-bottom:20px;
  padding:4px;
  width:220px;
  height:32px;
  border:none;
  outline:none;
  border-bottom:1px solid #aaa;
  font-family:sans-serif;
  font-weight:400;
  font-size:15px;
  transition: 0.2s ease;
}
input[type="submit"] {
  margin-bottom:28px;
  width:120px;
  height:32px;
  background:#f44336;
  border:none;
  border-radius:2px;
  color:#fff;
  font-family:sans-serif;
  font-weight:500;
  text-transform:uppercase;
  transition:0.25s ease;
  cursor:pointer;
}
input[type="submit"]:hover,input[type="submit"]:focus {
  background:#ff5722;
  transition: 0.2s ease;
}
Styling the right box:
Using the width and height properties, we will set 300 pixels and 400 pixels, respectively, and we will provide a 40-pixel padding to the right part in the right box class selector property. To make sure that the right section is properly covered, we will use the background size property to specify the background-size to cover after adding an image to the right section’s background using the background image property.
Now we will add the styling to the different signup buttons. In the Facebook button, we will add some width and height, and using the background color property, we will set the background to “blue.” Similarly, we will add the background to the Twitter and Google buttons as sky blue and red.
.right-box {
  position:absolute;
  top:0;
  right:0;
  box-sizing:border-box;
  padding:40px;
  width:300px;
  height:400px;
  background-image:url(http://www.psdgraphics.com/file/colorful-triangles-background.jpg);
  background-size:cover;
  background-position:center;
}
.or {
  position:absolute;
  top:180px;
  left:280px;
  width:40px;
  height:40px;
  background:#efefef;
  border-radius:50%;
  box-shadow: 0 2px 4px rgba( 0,0,0,0.6);
  line-height:40px;
  text-align:center;
}
.right-box .signinwith {
  display:block;
  margin-bottom:40px;
  font-size:28px;
  color:#fff;
  text-align:center;
  text-shadow:0 2px 4px rgba( 0,0,0,0.6);
}
button.social {
  margin-bottom:20px;
  width:220px;
  height:36px;
  border:none;
  border-radius:2px;
  color:#fff;
  font-family:sans-serif;
  font-weight:500;
  transition: 0.2s ease;
  cursor:pointer;
}
.facebook {
  background:#32508e;
}
.twitter {
  background:#55acee;
}
.google {
  background:#dd4b39;
}
Final Video Output:
Conclusion:
So, you saw how we created the signup form in a step-by-step manner, explaining all the important concepts, starting from creating the structure for the signup form to styling the signup form to make it look more interactive.
For more such projects stay connected with Foolish Developer and become an expert in coding. If you have any queries feel free to ask in the comment section.
Thank you!!
Author: Arun
Codepen by: Miroslav